I´m still having problems motivating myself to work on the bike. I sure do have enough to do on it. It´s not that. I have plenty of stuff to go through and fix. Most of those small projects within the project don´t even need new parts, just man hours. Well, at least last week saw some action in the garage! Not much, but some...
As you can see here I´m working only on the ignition part of the bike right now. I´m still trying to find all the small bits and pieces missing here and there. This is the only place I have to store the large fairing in a safe place. Lots of padding on the seat and tank and here it can rest safely.
The ignition is coming together slowly bit by bit. Here I have gathered the parts I have found so far. As I have mentioned before I decided to go the easier H1B-route for now, concerning the ignition. Lots of NOS stuff here... The three H1B ignition coils, for instance. Brand new and hopefully usable together with all the other H1B parts here.
Since I have been unable to locate the correct H1R ( 21103-004) points timing cam, I´m going H1B (21103-005) also here. One NOS on the left in the picture and one used in the middle. To the right is the correct timing cam plate. Used on both H1R and H1B.
I have also located a NOS early H1 ignition cover. I think the original on the H1R was left with its raw aluminium surface. This one is painted silver, the only difference. I can live with that. Easy to fix when you feel the need to. The rotor is also a common part (21007-016). I found a NOS one at a reasonable price on eBay a year ago. As I said, finding parts is the hard thing, here. When something shows up, BUY!
And the stator I worked on in my last post. I still like the look of it!
Here´s another gem. 21071-004, Regulator. Common part between the H1R and the H1B. Behind it is the used rectifier I have located so far. If a NOS one shows up I might buy it! This regulator is actually not only NOS (New Old Stock) but also NIB (New In Box)... You need to keep up with the lingo when you´re surfing the net for parts...
Not all purchases are a success, though. I ordered 5 of these Woodruff keys thinking they would be correct for the H1R. Not so. I had to go back to the parts lists and try to figure this one out. More about that later on!
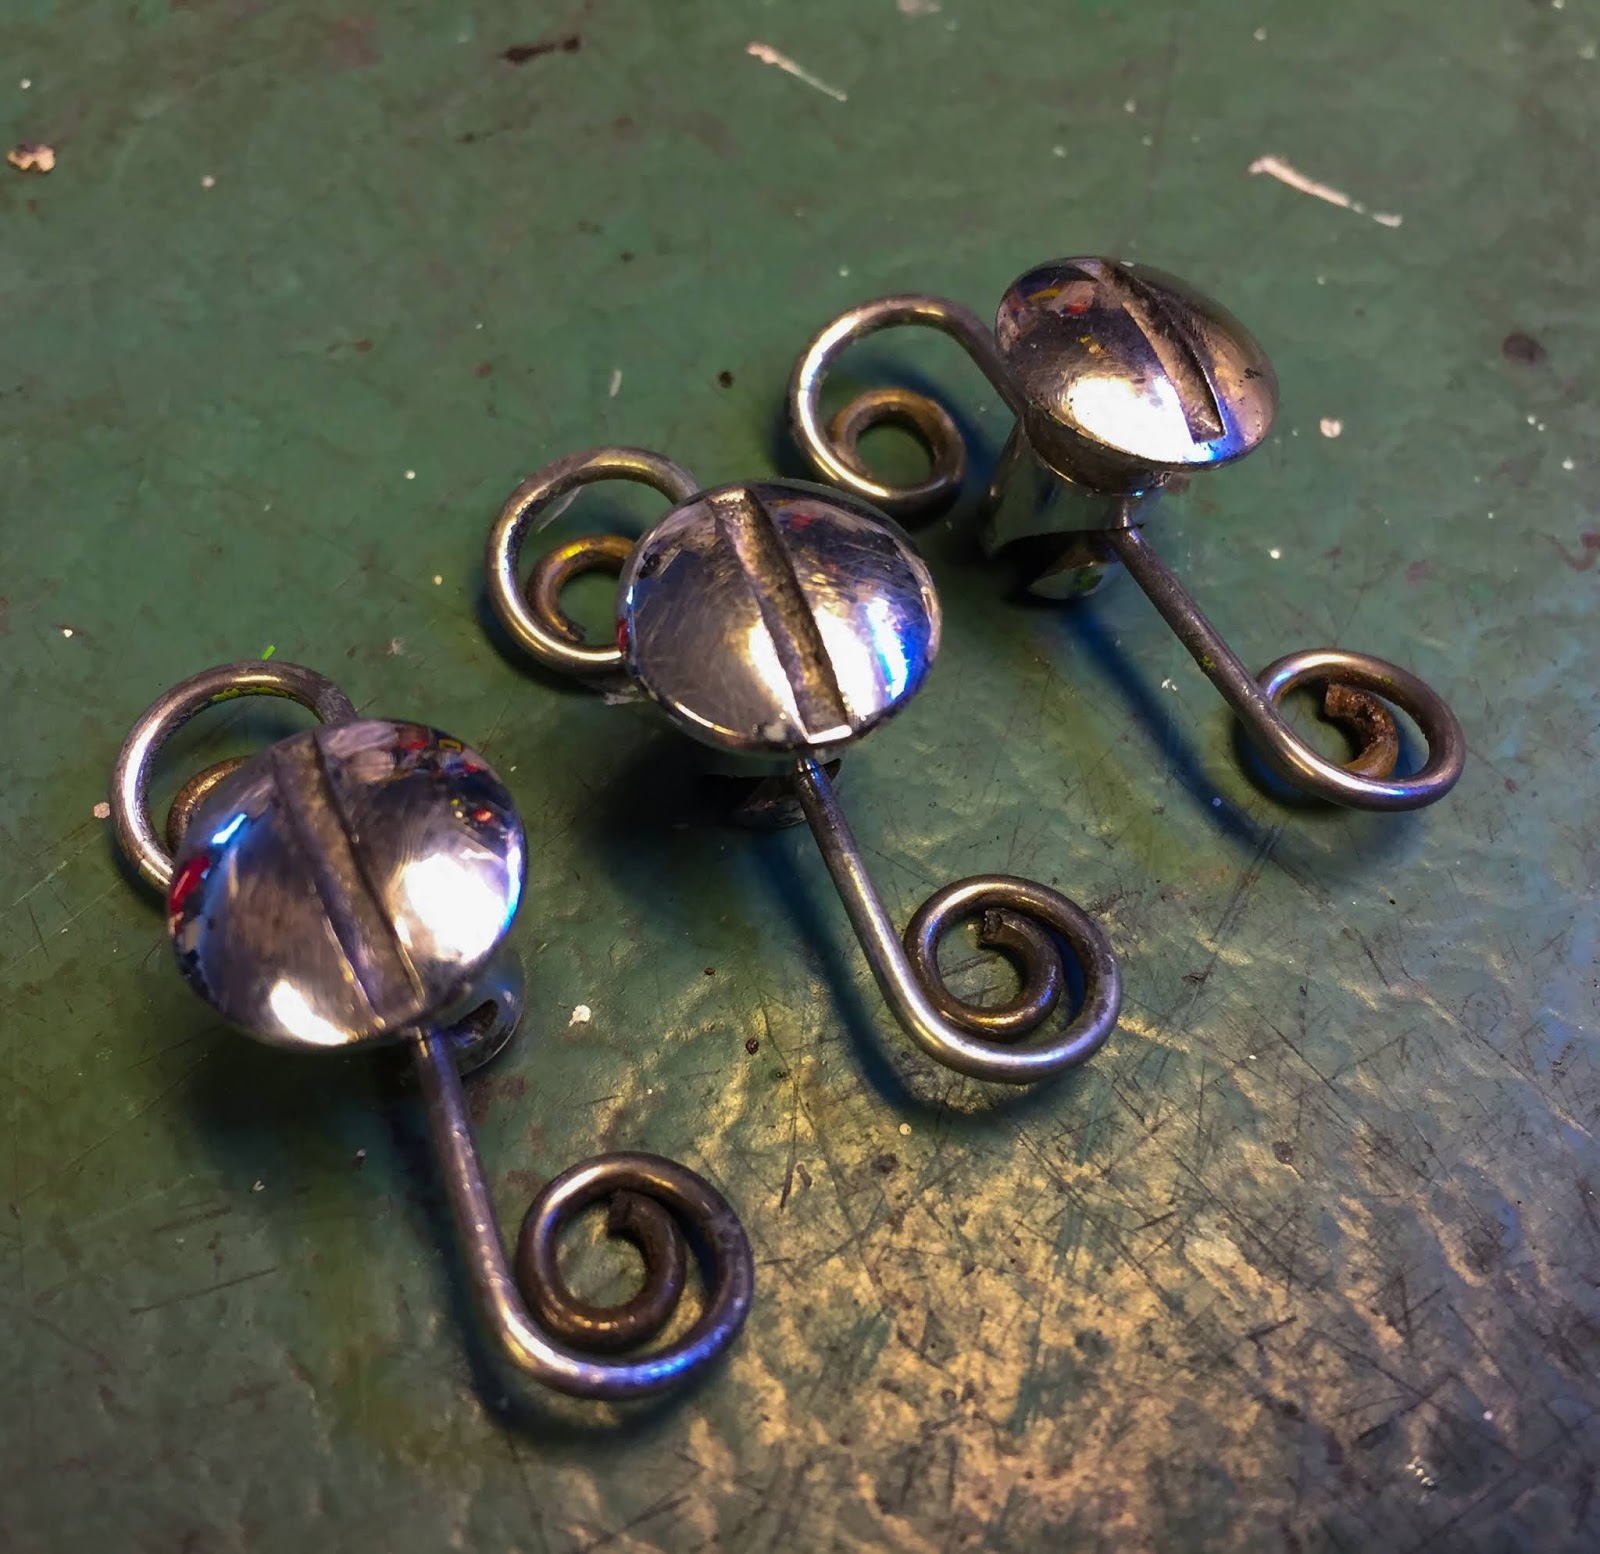
Gathering stuff and searching for that illusive little part over the net and via contacts is fun, but hands-on-working is really what is the most interesting part of this hobby. I´ll soon be needing to start working on the fairing and the fasteners on it. These are the original ones from the bike plus a few extra from "Tullar´n", the guy that repaired Janne´s and my fairing sets. They are called "Dzus" fasteners and was actually invented in the thirties by an american engineer of Ukrainian descent , William Dzus.

I knew so little about these things I had to google it... Here´s the actual patent from 1934. Really cool to see the stuff seems to be exactly the same in 1970 as in 1934. The principle is simple. The fastener is locked in place by pushing the two surfaces you want to join together. The small "Dzus" screw is pushed in to "catch" the wire part and is then turned 90 degress to lock them together. The tension in the wire keeps the screw from turning loose even during high vibrations. These are most commonly used in aircraft applications but also here, in racing.

OK, back to my fasteners. I was planning on getting a batch of new ones (they are readily available in many sizes...) but figured I could try and clean them up a bit. The part about not over restoring, remember? These had been painted at some point and had a little surface rust here and there. I counted the holes in the fairings and came up with a need of totally 9 sets. The parts list says 11... I believe it has to do with the number of fasteners on the bottom fairing. Mine has only 3 per side and pictures from other bikes show they have 4. This is something I´ll have to look into more later on. I´m thinking someone, "Esso" or Björn, cut the fairing at the rear part to accommodate big feet. Remains to be seen!
Well, nothing to lose... Just get on with it.
The first one done. That works for me! I prefer something with a bit of a story to tell compared to brand new stuff. This is not the last time I´ll use old, slightly tarnished parts instead of new ones.
During cleaning these, I came up with a plan to rezink them. That could have worked on the wire loops, but the actual Dzus screws are chrome. As good a clean as I could do would have to be enough.
It took a couple of hours... They are not in pristine, as new condition but they will fit my bike perfectly!
When "Esso" won the Swedish Grand Prix, July 1970, he had already raced it 4 times and Kjell Bogren entered the very first race in May 1970 at Falkenberg with it. That makes 5 races before the race I intend to duplicate its looks from. That gives me a lot of leeway when it comes to condition of things!
Sometimes it´s better to ask locally before buying things on a whim over the internet. I asked Ebbe about the Woodruff keys on H1 and H2:s.
"The H1:s and the H2:s both use 3x4,9x14 mm woodruff keyes in that location. I can send one to you, free of charge!"
Thanks, that´s the one to the right here. One less thing to worry about!
A couple of days later when I was rummaging through all my boxes and drawers searching for something else, I stumbled across these babies... Yeah, of course, the small 3mm woodruff key together with its larger 5mm cousin and a sprocket lock nut. These are some extra parts supplied, free of charge, by "Patrick Bras" of France when I ordered a larger quantity of H2 parts a while ago. See? I always do that! Ok, now I have at least two 3 mm keys and six 5mm ones. Not counting the ones I have, but haven´t located... yet. AAHHRRGG!!
So, here we are at present. The ignition is more or less complete and can go on the bike any year now...
Another H2 was mentioned in the headline of this post. Well, Someone made me an offer I couldn´t refuse. An H2A 1973 that has been sitting for 15-20 years. The last owner had the body repainted , bought new exhausts, wiring loom, decals etc, etc. I won´t write about it here, in this blog, but now you know why I´m distracted from working on the H1R instead. I told you I wouldn´t start on one of my other two H2:s... That´s sort of true since I got me another one!
The plan here is to put the engine back in the frame and mount as many parts as possible on to the bike to make it easier to store. When I bought it everything was in bits. During the first day of fettling with it I had the seat mounted, rear light and fastback with all its internal parts in place and cleaned up the fuel tank, sidecovers front fender and mounted that.... Today i fixed the front brake master cylinder that wasn´t working properly. Next is the engine.. We´ll see if I can stay away from putting on an exhaust system, clean the carbs and start it up... I´ll let you know!
Thanks for reading and keep driving safe out there.
/Per
It´s been a while.... Sorry about that.
To be honest I´ve been doing lots of other things in the garage lately. The H1R project takes its toll on me and from time to time it´s hard to muster the motivation to keep it up, looking for parts and going down to the garage working on it.
I know, I´m a whining sod, but sometimes I would prefer working on my two H2:s instead. I have promised myself to finish the H1R before starting out with something else. I know if I was to start building an H2, the H1R would probably not be finished at all.... At least not within a reasonable time frame. So, what has happened since my last post? As I said, not much. I posted an ad on a couple of forums on Facebook looking for ignition parts. You may remember I was asking for the H1R Points breaker cam, ignition coils, cam plate, condensers etc. Well, One of my best "part pushers", Gary Horsman in New Zealand, came through with the timing cam plate. 21106-003 is actually used on both the H1R and the H1B 1972 with points ignition.

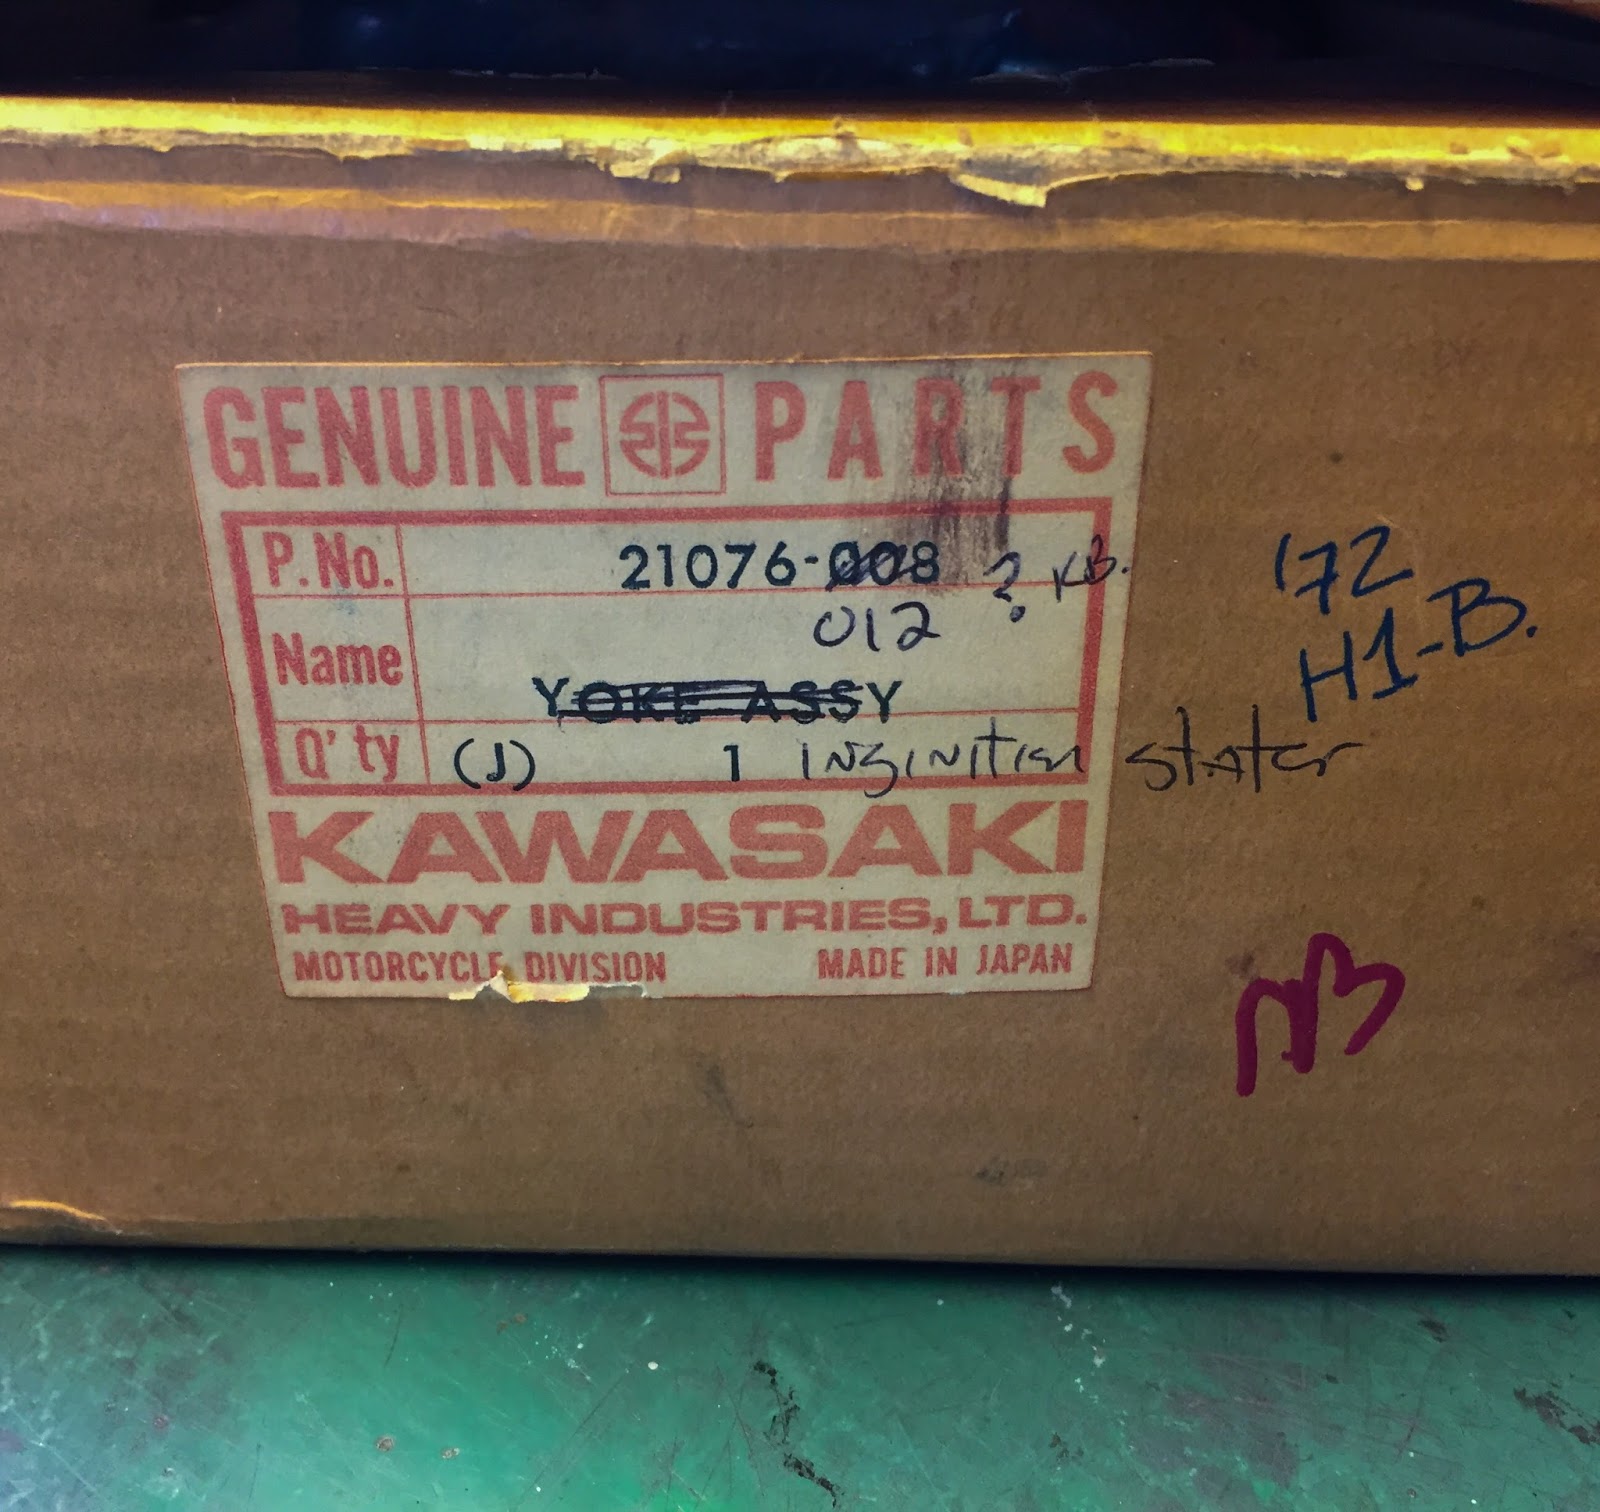
This small envelope for sure was a sight for sore eyes when it finally arrived. I regret shipping it as ordinary letter post without tracking. But it did get here... After two agonizing weeks! I usually ship all H1R-parts via secure, insured mail. Note to self: Don´t ever do that again!
And here it is, the little jewel... NOS (New Old Stock). With the part number tag intact. I have already found the rotor, bolt and the woodruff key. The hardest parts to find are the ignition coils and that freakin´little cam... 21103-004. Still no joy!
One option here is to go another route entirely when it comes to rebuilding the ignition yoke. Since it seems impossible to source the needed parts to rebuild it to H1R standards, I may have to go H1B 1972 points ignition instead. I found this stator on eBay in Canada, made an offer, and got it at an OK price of 500$US...
NOS is NOS and always preferred if available. On this yoke there are lots of NOS parts I can use. The thing when converting from H1R ignition to H1B is you have to use H1B condensers and H1B ignition coils. The coils and the condensers form the ignition circuit and their respective characteristics make them non-mixable. If you change the coils, you need to pair them with their kind of condensers.
In the hunt for H1R coils I´ve seen several NOS H1B coils and at one point I decided to buy 3 of them. On the left here you can see one of them together with the coil bands and the special spacer someone made to fit the Kröber coils to the frame. By coincidence the diameter of the H1B coils and the Kröbers are the same so I will most likely use the same bands. Locating original H1R bands, 92037-052, has also been impossible, so far. Please give me notice if you have them or know someone who has...
Here´s the collection of different H1 stators I have right now. The used one I bought on eBay a while ago on the left, the original H1R in the middle and the NOS H1B on the right. My plan here is to rebuild the original yoke with parts from H1B. I need to use the wiring from the original one since it is longer than the H1B. On the H1R the electrical components are located way up front in the fairing together with the RPM indicator. The two wiring harnesses are not identical either, so I have no choice but to restore the original stator...
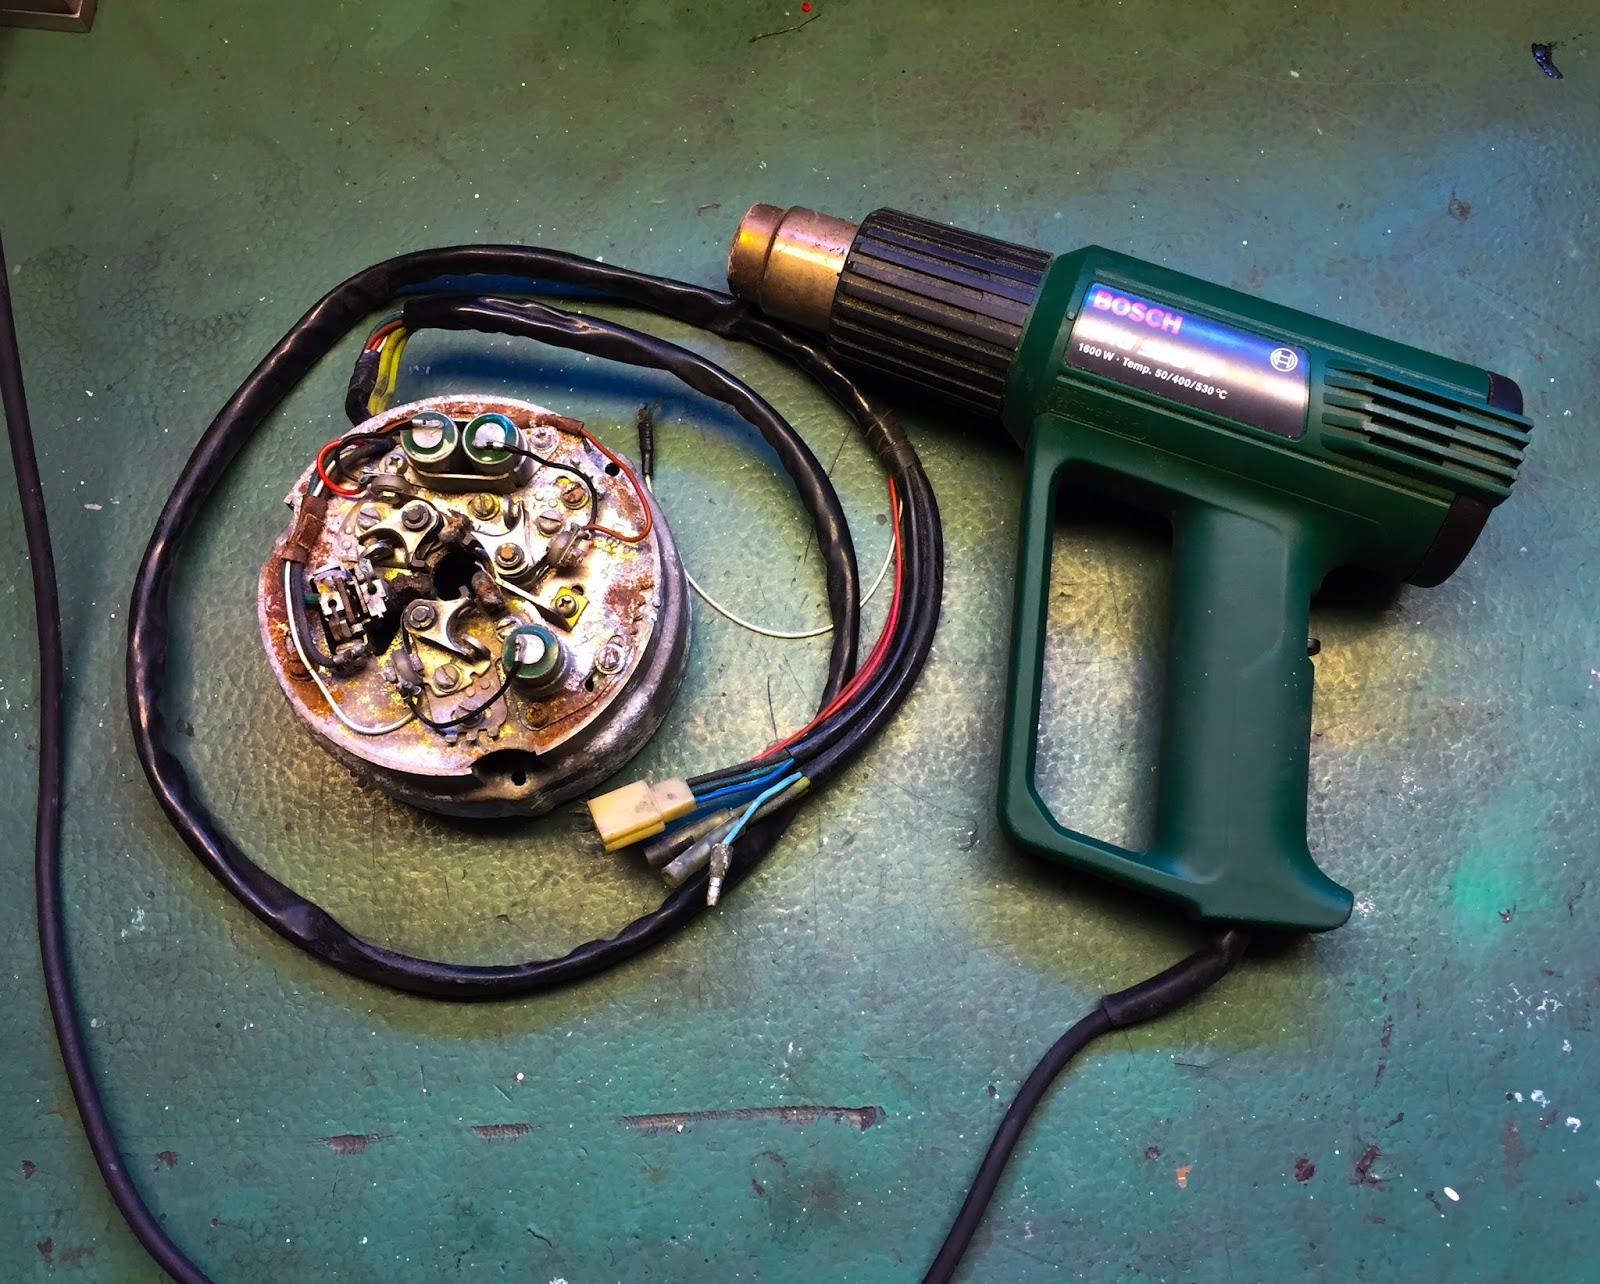
First up was softening the sheath a bit with my heat gun. The plastic sheath had dried and become a bit brittle. Braking it loose without warming it first would probably brake it in pieces. A slow, gentle warming from a distance softened it enough to straighten it out.
Success! Straight, warm, supple and flexible piece of wiring ready to be treated with my beloved "POL" and then "Armour All" for the finishing touch-up. Note how long the harness is! I´m actually quite lucky this stator was still around when the bike was found. It puzzles me a bit since "Esso" changed the ignition already during 1970 or 1971 to the Kröber that was still on it when I bought it.
There´s some cleaning and polishing to do also on wiring and connectors. These will look brand new when I´m done with them. So happy to see they are still around and fully usable. These attach to the respective ignition coil up front.
Some of the other connectors on the original yoke. There are very few wires on the racer compared to the street bike, H1B 1972, even though they both have points ignition. That suits me fine since I´m not very good at electrics or electronics. Ignition systems are no child´s play!
This is what I have to work with. I took lots of pictures to document how things are mounted in relation to each other. We can also see the special condensers used on the H1R. Two units, one single condenser to the left and a double-mounted unit to the right. These will have to go since I´m using components from H1B that are not compatible with these condensers.
Here´s the "Carbon Brush and Holder", 21088-009, commonly used on the H1B and H1R. I did consider taking the new one from the NOS H1B yoke, but opted not to. Enough is enough! There was enough carbon left in the holders here so it could stay. I just had to solder it loose in order to remove that rusted ignition timing plate and replace it with one of the others.
Two of the screws holding the timing plate to the yoke loosened easily enough, but one had to snap off! I should have been a lot more careful here, but I was eager to move on... Well, just more work to do. I´ll get back to that later...
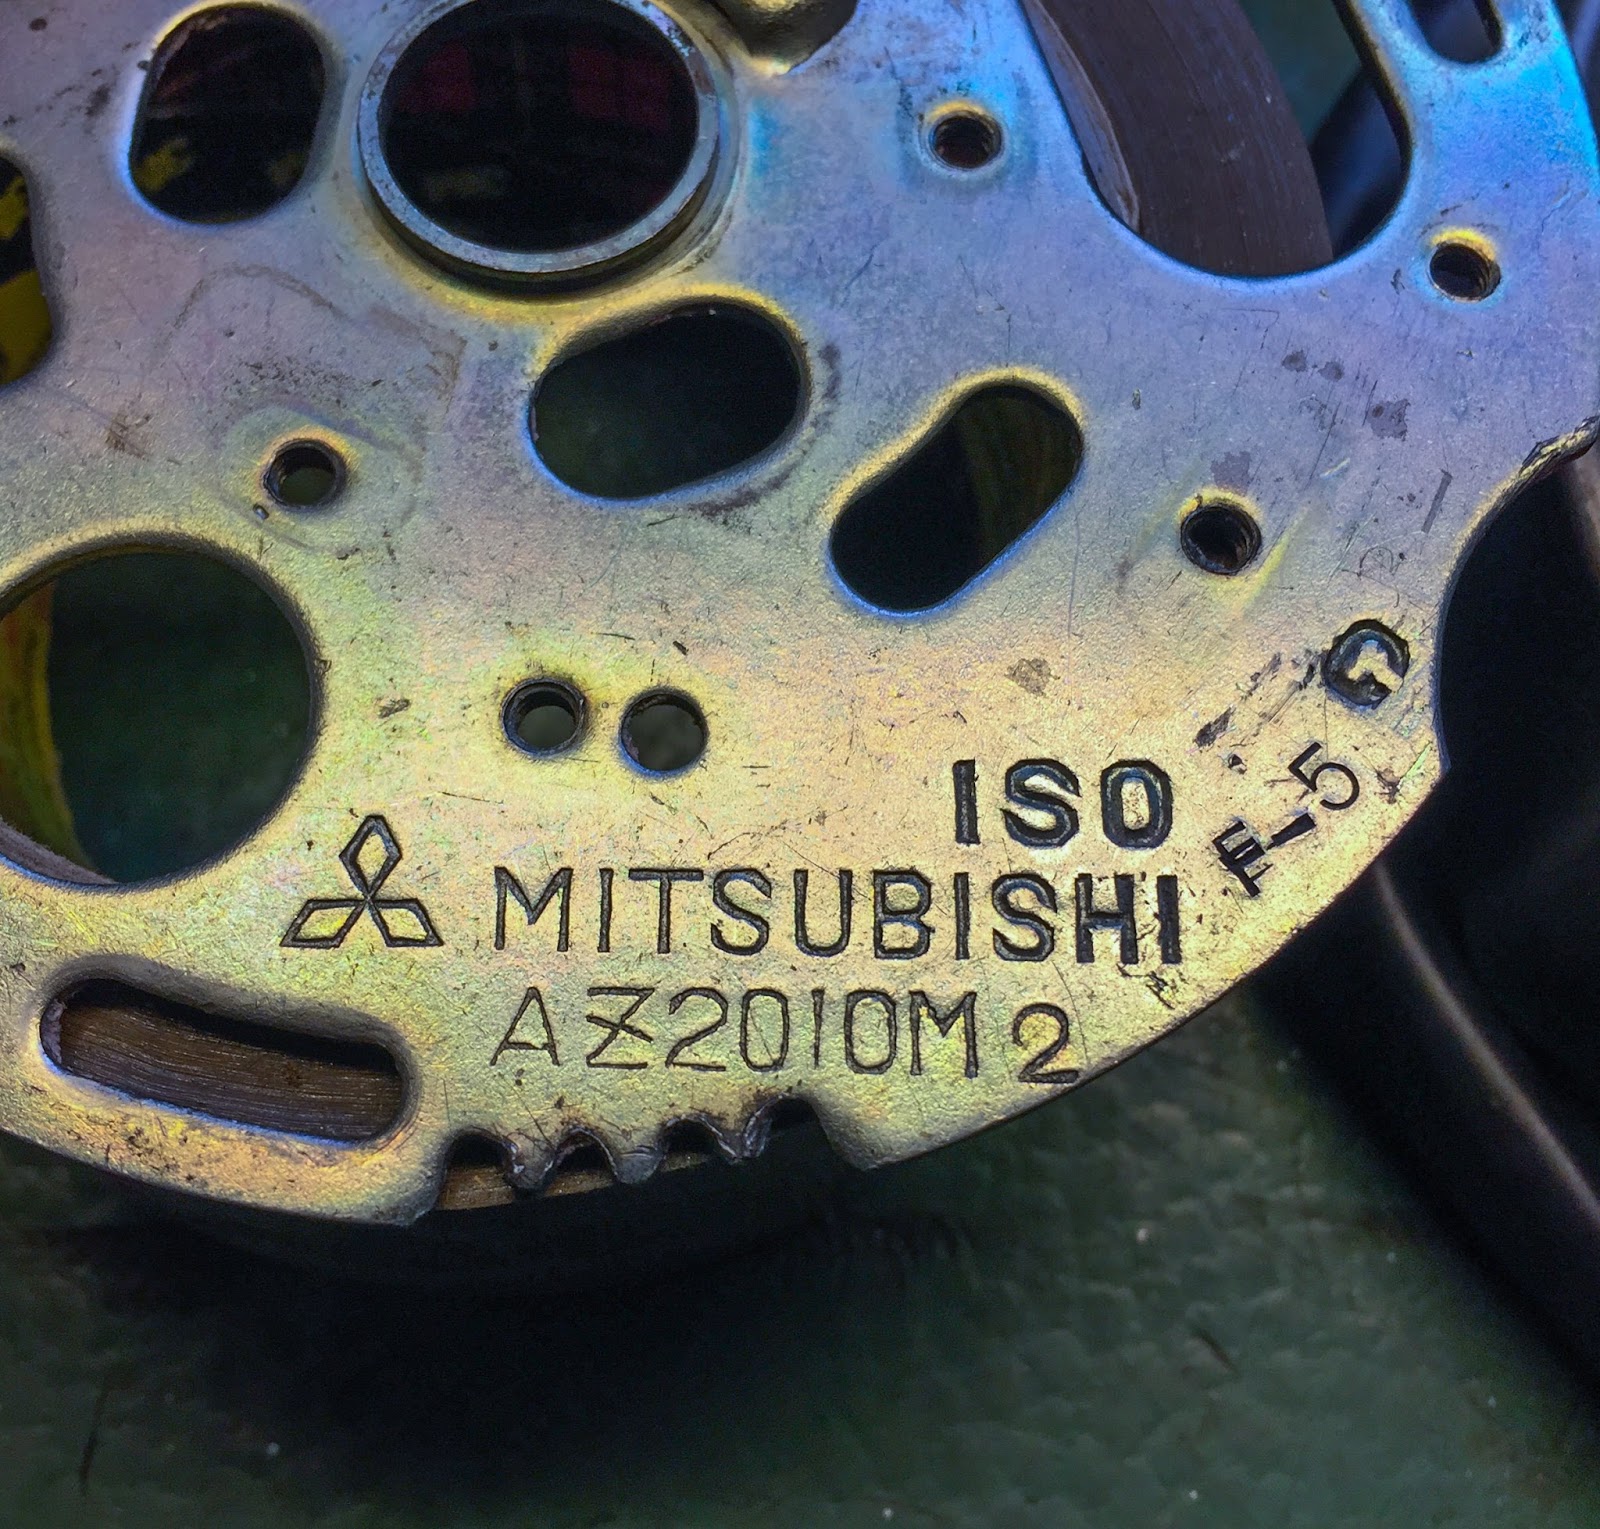
Now, here´s an interesting comparison between different timing plates. The original H1R plate, top left. Another used H1B plate I bought from a guy in New Jersey, top right. The plate from the used H1B I dismantled earlier, lower left and the NOS H1B, on the lower right.
What I was looking for here was if I would be able to replace the original H1R plate with one of the other ones. They DO look exactly the same! They have different lettering and stamped numbers only. To be quite frank, I don´t care too much about that for now. The used, original H1R plate will be refurbished in due time and when I find the correct coils and other parts I will be able to rebuild it correctly. The NOS H1B has a "2" plus "F-6" stamped into it. "F-6" might be a date code, maybe?
The top right H1B plate also has the "2" stamped in the lower right hand corner next to the "AZ2010M" stamp.
The first used H1B plate has "F-5" and also the "2" stamped.
And finally, the original H1R plate has "1" close to the "AZ2010M" stamp and nothing more. The cool thing is they all fit perfectly in the H1R stator housing! The slightly better looking, used, H1B plate has a tighter fit so I´ll use the other one. The NOS yoke will stay NOS.... I´m not going to cannibalize it to build my H1R plate... 500 bucks is 500 bucks and that yoke will maybe be worth that to some other needy guy someday.
OK, back to the stator housing. I couldn´t get that broken-off screw out without drilling. I tried heat, penetrating oil and a combination thereof without success. I was able to drill it out in such a way that I could clean out the threads with a tap and reuse the hole without helicoiling it this time.
As I got the thread repaired it was time to start putting parts back on. 3 NOS breaker points, 21082-007, were added. These are correct for the H1B but look exactly the same as the 21082-001, H1R points. I don´t know what the difference might be...
The same goes for the condensers. 21013-015 are H1B and they will be perfect for this H1R/H1B hybrid ignition... The originals, 21013-020 and 21013-021 are left where they are, in stock for later!
The Carbon Brush Holder goes back on the plate. The earth lead is screwed on to one of the fasteners and the power line is soldered back in place on the insulated part of the brush holder. It is going to be VERY interesting to see if this rebuild/restoration will work...It all comes down to whether or not the cam from an H1B can be fitted to the crank of an H1R and the angles will coincide... let´s hope so! That´ll show very clearly when the time comes for ignition timing and points gap adjustments.
Here´s a picture of the finished product. A couple of hours worth of fettling and tinkering in the garage. Nice H1R stator with its original, long, wiring harness and refurbished with components from the H1B points ignition.
I really hope I have got it all correctly fitted on to the plate. The condensers and the breaker points are totally isolated from contact with the timing plate through small plastic parts. Tiny, small and very, very easy to loose. Luckily I had a few extra. The small E-rings holding the points to the plate are also really tricky to get in place.
You can also see how the points are adjusted for timing one-by-one. One of the points are attached directly to the timing plate and two are fastened to their own adjusting plates on the timing plate. That way all three can be individually adjusted once the "master" one is correctly timed with one of the pistons at the correct position in relation to TDC, top dead center. More about that later on...
A couple of days ago I paid Janne a visit. I needed inspiration to go on and also to document the placement of the parts here and there on the bike. On the picture to the left here, we can see the rectifier on the right and the voltage regulator on the left. Those parts I have found. They are the same on the street bikes, so no big deal...
One of the coils is mounted on the forward facing "spear" with a special bracket and a clamp. I think I can reuse what I have here.
Janne has his engine ready for start-up any day now. Look at that tacky battery mount! Two long rubbers and a spring to the frame...
Here´s the "chain cover" in place on Janne´s bike. He also made one for me and I need to get the bracket that sits around the frame at the other end of the cover. No joy finding one yet... I´ll just have to make one myself!
His tank is ready for fuel and everything is set to go! He´ll go over everything again and then he will start it up.. I hope I´ll be able to document that event!
That is going to have to be it for now... Next up is locating all the parts for the ignition to finally go on to the bike, get the engine thoroughly fastened and safe-wired to the frame, fixing the rear brake pedal stopper screw, fitting the clutch cable, throttle cable and carbs and this and that and then the next thing....
I don´t have any problems filling my days with this project, that is for sure. What i do have problems with is my motivation right now. To be honest I don´t understand how I´ve been able to get all the things I´ve done so far done at all. I can´t imagine doing it all over again, ever. Not that I will ever have to, since these bikes are so extremely rare. What I DO look forward to is building something from my own ideas and ambitions after this restoration. Those two H2:s are looming up ahead and, to be honest, they are my motivation to finish this project right now.
Thanks for reading and being able to bare with me and my ranting!
/Per
 As you can see here I´m working only on the ignition part of the bike right now. I´m still trying to find all the small bits and pieces missing here and there. This is the only place I have to store the large fairing in a safe place. Lots of padding on the seat and tank and here it can rest safely.
 The ignition is coming together slowly bit by bit. Here I have gathered the parts I have found so far. As I have mentioned before I decided to go the easier H1B-route for now, concerning the ignition. Lots of NOS stuff here... The three H1B ignition coils, for instance. Brand new and hopefully usable together with all the other H1B parts here.
 Since I have been unable to locate the correct H1R ( 21103-004) points timing cam, I´m going H1B (21103-005) also here. One NOS on the left in the picture and one used in the middle. To the right is the correct timing cam plate. Used on both H1R and H1B.
 I have also located a NOS early H1 ignition cover. I think the original on the H1R was left with its raw aluminium surface. This one is painted silver, the only difference. I can live with that. Easy to fix when you feel the need to. The rotor is also a common part (21007-016). I found a NOS one at a reasonable price on eBay a year ago. As I said, finding parts is the hard thing, here. When something shows up, BUY!
 And the stator I worked on in my last post. I still like the look of it!
 Here´s another gem. 21071-004, Regulator. Common part between the H1R and the H1B. Behind it is the used rectifier I have located so far. If a NOS one shows up I might buy it! This regulator is actually not only NOS (New Old Stock) but also NIB (New In Box)... You need to keep up with the lingo when you´re surfing the net for parts...
 Not all purchases are a success, though. I ordered 5 of these Woodruff keys thinking they would be correct for the H1R. Not so. I had to go back to the parts lists and try to figure this one out. More about that later on!
 Gathering stuff and searching for that illusive little part over the net and via contacts is fun, but hands-on-working is really what is the most interesting part of this hobby. I´ll soon be needing to start working on the fairing and the fasteners on it. These are the original ones from the bike plus a few extra from "Tullar´n", the guy that repaired Janne´s and my fairing sets. They are called "Dzus" fasteners and was actually invented in the thirties by an american engineer of Ukrainian descent , William Dzus.
 Well, nothing to lose... Just get on with it.
  The first one done. That works for me! I prefer something with a bit of a story to tell compared to brand new stuff. This is not the last time I´ll use old, slightly tarnished parts instead of new ones.
 During cleaning these, I came up with a plan to rezink them. That could have worked on the wire loops, but the actual Dzus screws are chrome. As good a clean as I could do would have to be enough.
 It took a couple of hours... They are not in pristine, as new condition but they will fit my bike perfectly!
  Sometimes it´s better to ask locally before buying things on a whim over the internet. I asked Ebbe about the Woodruff keys on H1 and H2:s.
  A couple of days later when I was rummaging through all my boxes and drawers searching for something else, I stumbled across these babies... Yeah, of course, the small 3mm woodruff key together with its larger 5mm cousin and a sprocket lock nut. These are some extra parts supplied, free of charge, by "Patrick Bras" of France when I ordered a larger quantity of H2 parts a while ago. See? I always do that! Ok, now I have at least two 3 mm keys and six 5mm ones. Not counting the ones I have, but haven´t located... yet. AAHHRRGG!!
 So, here we are at present. The ignition is more or less complete and can go on the bike any year now...
 Another H2 was mentioned in the headline of this post. Well, Someone made me an offer I couldn´t refuse. An H2A 1973 that has been sitting for 15-20 years. The last owner had the body repainted , bought new exhausts, wiring loom, decals etc, etc. I won´t write about it here, in this blog, but now you know why I´m distracted from working on the H1R instead. I told you I wouldn´t start on one of my other two H2:s... That´s sort of true since I got me another one!