I mentioned earlier my friend Janne is getting his bike more and more ready. He asked me a while ago how the work on the seat cover is progressing... A couple of posts ago I fixed my own seat, got the push buttons back on there, fitted the oil tank, painted the underside etc, etc. And I finally concluded that my cover DOES fit. That means I can use my old, battered and repaired cover to make copies. The measurements are OK. Before telling you about that mission I´d like to show you exactly how far I´m willing to go to keep my stuff stored in a safe and convenient way. I talked earlier about my extra crank, rebuilt by Ebbe. I´ve been wondering how to keep it safe the best way. Cranks are delicate and can easily loose their true if dropped or handled roughly. They need to be stored in a stable and rigid place. I imagined a suitable wooden box to store it in with a possibility to secure it and maybe keep other spares as well. I bought such a box, but as I was looking at them in the store I came across these "flight cases" in different sizes. Real neat boxes/suitcases made for transportation of fragile goods such as cameras, sound equipment etc. Now, that´s my kind of solution!
 The case is sturdy plastic filled with 3 layers of padding that can be "picked" in to different shapes to house various objects with or without their own casings. Here I´ve started on the first layer and made holes for the crank.
 And here it is fitted with the second layer. The third, and last layer goes on top and keeps the crank in place no matter what. I like it! There´s room for some other delicate spares around the crank. Maybe I´ll store some pistons etc here later on, we´ll see!
Back to the seat cover! I bought material for this project a while ago from Germany. Remember it was impossible to find the correct fabric? Impossible is a strong word, I know. I have not found any, that´s for sure. People in the "recovering" business were quite puzzled with the surface of the cover and a couple of the guys I talked to mentioned "flocked" vinyl as a possibility. I haven´t ventured any further in that direction. I got a few square meters of Alcantara instead and that´ll have to do. I also bought a "padded" liner to use underneath the cover to make it a bit softer and to give it a bit "plush" look between the seems on the top side.
 Time to take my mother´s old sewing machine out. This is the only machine I know how to use. It is from the early sixties and still work like a charm. Well, not quite, as we´ll see in a bit! I do love the vintage look it has. That´s for sure!
 First off, loading the machine with a heavy duty needle, heavy duty canopy thread from the boating supplier. No big deal! That went well.
 The cover is made of three parts plus reinforcements and buttons. I outlined the seat surface very thoroughly taking measures often. To this outline you need to add a margin to sew in, a seam allowance. That is why it looks slightly bigger. I added 2 cm on each side. Better safe than sorry.
 Next is the "padded" liner. Approx 1 cm of soft foam rubber on a synthetic fabric. I cut it using the seat surface alcantara as a template. It feels a bit thick, but we´ll see how it plays out in the end. "No guts, No glory" as we say in the airline business!
 The liner needs no seam allowance so it can be cut down to the exact size of the seat surface. That´s done here. It is always smart to test fit everything you do versus the old cover.

Here´s a test on the seat with the padding on. Looks OK!
 Since I´m going to make more of these I need to document what I´m doing as I go along. The parts are copied on to paper during the process to make templates for the coming covers. Here´s the template for the liner being outlined.
 And here it is being tested on the seat. Note I cut a bit outside the outlines to have a margin for error making the template. During this fitting it was cut to exact size. As you can see I do everything over and over again. testing, testing and testing! Experience have shown I need to do it that way.... I often make mistakes and this way I can eliminate some of them.

And one final test of the liner template inside the seat. Fits like a charm.
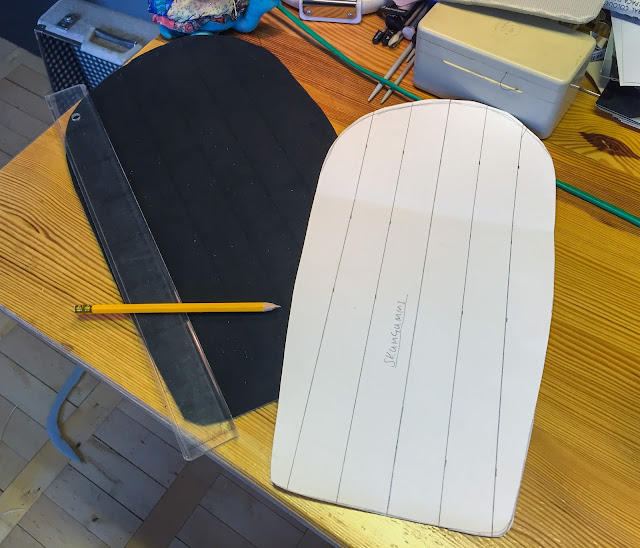 To make the seams on top of the seat cover I had to measure carefully and transfer the measurements from the template to the Alcantara surface. 35mm between the seams and a total of 5 of them along the entire length of the seat. These need to be exactly centered and evenly spaced. Better be careful here.
 With the seams outlined on the seat I attached the liner on the backside of it and pinned the two fabrics together. Time to start sewing! Being cautious I tested on another piece of fabric just to get in the "motion" of sewing again. It was more than 2 years ago I did it so a refresher seemed appropriate. And this is where things went downhill fast.... Our vintage sewing machine suddenly turned real "vintage" and didn´t function at all like it is supposed to. I spent a couple of hours trying to fix it but resigned, tucked everything away in anger and sank down in the sofa to watch 3 episodes of "Braking bad" instead! F**K !!
That´s why this post is labelled "Part 1"....
I´ll be back when I have fixed the wretched machine!
/Per


Back to the seat cover! I bought material for this project a while ago from Germany. Remember it was impossible to find the correct fabric? Impossible is a strong word, I know. I have not found any, that´s for sure. People in the "recovering" business were quite puzzled with the surface of the cover and a couple of the guys I talked to mentioned "flocked" vinyl as a possibility. I haven´t ventured any further in that direction. I got a few square meters of Alcantara instead and that´ll have to do. I also bought a "padded" liner to use underneath the cover to make it a bit softer and to give it a bit "plush" look between the seems on the top side.


Here´s a test on the seat with the padding on. Looks OK!


And one final test of the liner template inside the seat. Fits like a charm.


That´s why this post is labelled "Part 1"....
I´ll be back when I have fixed the wretched machine!
/Per
Inga kommentarer:
Skicka en kommentar