I got another ten days of Standby duty at work here during November-December. One quick trip to Hong Kong and then quite a few days without being called out. Perfect timing for wheel work! They have been sitting in the garage for a while, the rear wheel cleaned and polished and the front one on the bench as a constant reminder of what I need to prioritize right now. If I get the wheels done I can move on with the tires, brakes and finally getting the bike back on its wheels. Let´s just do it, as Nike says...
 I spent a few hours polishing the front rim and front spokes with the exact same technique as on the rear wheel. Fingers, drill, vice, cotton cloth and loads of elbow grease. The finishing touch was made with my beloved oil painting brushes and "Hagmans" wheel rim silver paint. The tone of that paint is a perfect match to the color used on the hubs and brake plates. Pure luck and coincidence.
 When I got the hub done I started working on the brake plates as well. Another thorough clean with thinner and a light sanding prepared the surface for my "vintage patinating brush technique" Broad strokes of silver paint and a light rub with the same brush dipped in a little thinner smoothed out any brush strokes still visible on the surface. The hard thing here is stopping when you think you are done. It is easy to go on for too long and never finish the task. I do have the same problem painting on canvas. Oil painting can go on for ever and ever.
 Here they are, the brake plates and the wheel. The "patina" will increase later when I work on the plates. I do not need to be that careful doing that since I don´t mind a few marks of the parts being used.
 And from another angle. You can´t really tell they have been painted with a brush, can you? This is a real good starting point for the plates to look used, but not battered. The 40 years in the barn has to go. I do not want that much patina on them.
 The front wheel bearings had to go in as well before going back to wheeler dealer here in Stockholm to get the tires back on. These were the exact correct type, open on one end and steel covered on the other. A good coating of grease and in they went with the spacer tube in between. As you see here I also repainted the inner surface of the brake hub with the wheel rim spray paint. With a brush, of course!

Here´s a close up of the area between the spokes. I used a smaller and very long brush to reach between these "fins" and get them painted. You can see the lower part of the spoke where I couldn´t reach with my cotton rag. Well, enough is enough. Kjelle at Wheeler Dealer recommended an electric toothbrush and polishing paste for these hard-to-reach-areas... Well, I am most certainly not the only one here nerding in on things!
 This angle shows how it all turned out in the end. That´ll do for me. I like the finish I got on the hub and also the polished surface on the rims and the spokes. I could have spent a few more hours doing this, but when the parts all come together it will look superb.
 The front hub freshened up and ready to take the tire and inner tube. The nice thing with this route I chose is that it is reversible in that respect I can always go back and take the wheels apart and do that 100% restoration the next time if, and when, I feel that is necessary. For now I´m quite pleased.
 This comes close to "bike porn" in my book.
 Wheeler Dealer is on winter time for his opening hours so I had an extra day to start working on the brake plates before visiting him. Here I have tried to pick the various components out from the bags and boxes of rezinked and stored parts. Quite a puzzle! Luckily I have taken lots of pictures during disassembly. Hopefully all the bits and pieces are still here.
 In the last picture you could see all the aluminium parts were dull and corroded. That was taken care of at the buffing wheel. I´m again amazed at how light and thin most of these parts are compared to street bike stuff. At the top of the picture you can see the three ventilator plates. They do need some TLC or to be changed. I did find 2 of them on eBay so I´m looking forward to fixing them later!
 From pictures taken earlier I could start putting parts together. There were still small marks of wear on the levers and I had marked them "R" and "L" respectively to be sure. This was just a try-out to see if I had all the parts. Looks like I did...
 The next day was "Wheeler Dealer time" I brought my new tires, the wheels, the inner tubes and also my restored tires. Kjell wanted to see how the restored tires looked and felt. He tried their "hardness" and they were actually very much softer than before. The new tires ended up at 60 units and the restored at 64. Before restoration they were over 80! Interesting indeed.
We also decided on reusing my old inner tubes. They had been sitting in my garage filled with air for 3 months and still held pressure. No need to substitute them for new, modern, worse in quality, Chinese inner tubes. These are vintage Dunlop racing tubes and they will last longer.
 The rear tire was very wide when not mounted. It measured 160 mm and I thought that would be an issue. Turned out to be OK when mounted on the rim and pressurized. It ended up being a perfect 120 mm with a nice rounded profile. Perfect for racing.
 The front wheel got the exact same treatment and they were both balanced and checked to be running true. Amazingly they were true and straight. We used vintage balancing weights clamped on to the spokes instead of modern ones you glue to the rims. In all, a fantastic afternoon spent out in the woods south of Stockholm. 3,5 hours including a nice coffee brake!
 Back home I continued working on the brake plates. Here is the rear one with the brake lever being adjusted from one of the pictures taken earlier. The castle nuts hold the brake shoes in place and also the brake torque link.
 The backside of it. The tricky part here was to get that powerful spring that holds the brake shoes back on. Of course I had to get everything off and start again with that spring getting on first. Lots easier that way. All moving parts are greased with a light coat of grease or copper paste to secure they won´t freeze up. There´s even a small grease nipple on the outside of the plate where you can grease the brake cam. You need to be careful not to grease these parts too much. Grease is not a wanted substance close to your brake shoes...
 My plan with the eBay purchase of the NOS ventilator plates was to replace the two up front with the new ones and fix the best one of the remaining for the rear wheel.
 As you have figured out by now, I just love unpacking these small Kawasaki bags of NOS parts. Vintage Kawasaki part labels from 1970 or thereabouts. Small works of art.
 Well, that didn´t work out. Anyone surprised? Not me... It´s not the first time Kawasaki engineers made a fool of me. The front and rear ventilator plates are not interchangeable. I bought two NOS ventilator plates for the rear wheel. Here I´m trying a front ventilator plate on the rear brake plate. No joy! My old, rear ventilator plate was actually my best one....
 Change of plans. The NOS ventilator plates went back in their bags together with those beautiful tags and I started fixing the old rear ventilator plate to the best of my ability. Buffing wheel, razor blade and the POL creme.
 It turned out just fine. Rezinked screws, cleaned and polished net and buffed frame came together nicely. This will do just fine!
 The rear wheel is finished! Brand new Dunlop racing tire fitted to the cleaned and polished rim. Brake shoes restored, moving parts greased and fitted to the refurbished brake plate. This looks more than OK to me. I´m actually very, very content here!
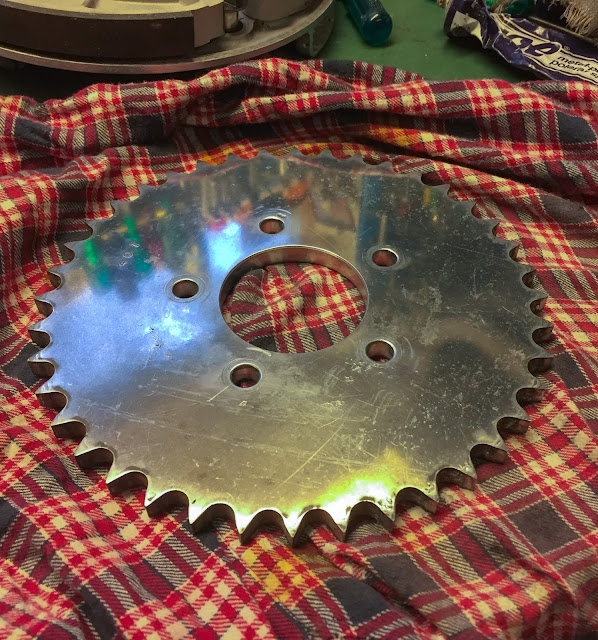 A quick glance at the rear sprocket... The book says 94 link 530 drive chain, the same as on the street bikes and also the H2:s. As I was cleaning the rear sprocket I felt it was a bit thicker than normal. A quick measurement revealed what I suspected. The sprocket is the same thickness the Z1 used, 630 chain. Why would someone change a 530 chain (that is actually a bit too heavy in the first place..) to an even heavier one, a 630? Beats me! A phone call to one of our best motorcycle salvage yards here in Sweden, Spinnin´wheel, secured a couple of rear sprocket blanks in different sizes. hopefully I can make a complete set in 530 and also a couple of sets in 520 thickness which is more than enough for this engine´s power output. This part of the story continues.
 Since I was working on the rear wheel parts I might just as well fix the rear brake torque link. It was painted black and needed to be aluminium instead. A coat of CRC gasket remover took the paint right off and the buffing wheel polished the link to almost mirror shine. Too shiny actually...
 The shine was dulled a bit by Scotch-Brite abrasive cloth. This will fit nicely with the rear fender and the surface I achieved there. I also found the pin and a suitable cotter pin. Rear brake torque link finished!
 As I was rummaging through the boxes searching for parts for the rear brake I also came across this one. The "ignition lock" The funny thing here is I visited Janne the other day to deliver his piston rings and we discussed his switch. We were both in doubt it was the correct one he had. Well, mine is the exact same! Is it the original? I don´t know!
 The Kawasaki number is 27005-034 and I seriously doubt it looks like this. The funny part is that both Janne´s and my bike has it. The backside looks like this. It says "Mera". Is that the manufacturer? if anyone out there has information on the switch, please let me know!
 This is the result. Fixing small things like this is one of the best parts of the hobby. Looks like nothing when you start and end up looking great with not too much work involved. This one will for sure go back on the bike unless I can source a correct switch. We´ll see about that!
 This is what it looks like on the front side. This will go on the front fairing holder just beside the left handle bar. This switch (or the original one...) was the reason my bike never finished the first race it was in, in Falkenberg, May 1970. That story is told in my history blog which you can reach from the start page. Press the "Racing history, Kawasaki H1R 1970" on the right side there, just below the main picture.
Right now I´m still working on the front wheel and the front brake panels. I hope I will get some news soon on the seat cover and the coming week might get me my sprocket blanks from Spinnin´wheel. When I have the wheels all complete I can continue working on the chassis and finally getting the bike back on its wheels again. I need to fix the front fender mounting and also address the driver foot pegs. The bike´s main stand attaches to the foot pegs, so they need to be in place before the wheels go back on. So many things to do and so much time to spend doing it! Wonderful....
Stay tuned, guys!
/Per


Here´s a close up of the area between the spokes. I used a smaller and very long brush to reach between these "fins" and get them painted. You can see the lower part of the spoke where I couldn´t reach with my cotton rag. Well, enough is enough. Kjelle at Wheeler Dealer recommended an electric toothbrush and polishing paste for these hard-to-reach-areas... Well, I am most certainly not the only one here nerding in on things!


We also decided on reusing my old inner tubes. They had been sitting in my garage filled with air for 3 months and still held pressure. No need to substitute them for new, modern, worse in quality, Chinese inner tubes. These are vintage Dunlop racing tubes and they will last longer.


Right now I´m still working on the front wheel and the front brake panels. I hope I will get some news soon on the seat cover and the coming week might get me my sprocket blanks from Spinnin´wheel. When I have the wheels all complete I can continue working on the chassis and finally getting the bike back on its wheels again. I need to fix the front fender mounting and also address the driver foot pegs. The bike´s main stand attaches to the foot pegs, so they need to be in place before the wheels go back on. So many things to do and so much time to spend doing it! Wonderful....
Stay tuned, guys!
/Per
Inga kommentarer:
Skicka en kommentar