I had a thought about a month ago that I would have the racer back on wheels in two weeks. Well, that didn´t happen... The work on the wheels are so boring and tedious I can barely make myself do it at all. Luckily SAS has come to the rescue the last month. We do have standby duty at work every now and then. The maximum is 14 days in a row and during those times we are unable to plan any own, private, activitis at all. I basically have to be within 1:20 from Arlanda (the airport I´m stationed at) all the time to be able to check in for duty in that time span. Now, our house is just 45 minutes from the airport so I can be in my garage during standby duty and clean wheels... That feels OK! You might argue I actually get paid for cleaning wheels. That feeling makes it a bit easier!
The last post was about me finishing up the rear wheel and buying another racer. I did some more work on the wheel since the last time:
 I mounted the new rear wheel bearings. The first bearing goes straight in with the covered side of the bearing facing outward. After that bearing is inserted the wheel is turned around and the spacer tube is inserted in to the hub. Time for the second (last) bearing to go in and meet the tube. A coat of bearing grease in to the balls on the inside of the bearing and in it goes!
 I use a large socket to drive the bearing in to the hub. Ideally you would use an automotive hudraulic press to do this, but since Stickan closed shop a while ago I´m on my own. Lightly tapping your way around the OUTER bearing race makes it enter the hub. A light coat of grease also on the hub walls will make sure the bearing stays on track and enters straight and level.
 Here I´m halfway in. Nice and easy tapping does it!
 And here I´m done. You can feel when the bearing hits the bottom of the hub. The sound of the tapping also changes and the bearing should ideally be "flush" with the hub surface. The rear wheel is ready for its new tire! Over to the front one.
 The process starts over again. Dirty wheel with slight surface rust and corrosion here and there. Since I´m into bearings right now, why not start by removing these at once? Problems directly! my beloved "Bearing remover tool" didn´t work on these bearings. The smallest insert to use on the spindle was too big! So, I had to use something else. I know screw drivers don´t work that well. so a brass mandrel I could fit through the smaller inner race of the front bearings did the job!
 And here they are... The front bearings and the tool that was used to get them out. Luckily they hadn´t stuck that hard inside the hub. Sometimes it can be a pain removing old bearings that have been in place for 40+ years.
 The bearing position on the left side, or is it the right one? Well, who can tell by these ambiguous markings? "V" stand for "Left" and "H" stands for "Right". I don´t even remember writing anything on the hub myself when I took it apart... No big deal right now but I will have to look for it later. I do think it doesn´t matter that much at all. The wheel seems to be completely symmetrical left to right side.
 OK, here we go again... Cleaning in progress!
The front wheel seems to be in better nick than the rear one so I´m hoping I´ll be spending less time polishing it. Here I´m starting off with the brake surfaces and the 180 grit sanding wheel on my Milwaukee battery drill. As I said, tedious and boring. So boring I didn´t do it for so long....
As I said earlier...The wheel cleaning business is no fun. The other day I got an e-mail from my friend, Janne, the owner of the other H1R being restored here in Stockholm. He was wondering how I was doing with the seat covers I promised to make copies of. His bike is getting closer to starting up so he soon needs the seat cover. I´have been working a bit on my old cover as described in an earlier post of this blog. If I am going to try to make seat covers I need to know my own fits as it should before copying it. So, I needed to finish my seat restoration! Lot´s more fun than cleaning wheels... Here´s a picture of the cover loosely on top of the seat on which it is supposed to be attached by push buttons. OK, lets´s fix the seat!

 My plan was to use these small push button "bottoms" I bought at a boating equipment shop where they also sell stuff for making hoods and boat covers. These Stud bases can be fastened by a screw or a rivet. A few of the old holes were left open after the seat was repaired so I had a few spots to start with and get the cover correctly lined up. These remaining holes were a bit too big to use my slightly small rivets so I opted for screws and nuts here. Of course the head of the screws were slightly too big so I had to grind them down to size. A washer for reinforcement of the fiberglass. Turned out OK!
 The next step was to stretch the cover as hard as possible to reach the edge of the seat base and then mark where to drill the next hole. Remember I had to make the "cut out" for the rear shock absorbers in relation to the seat´s position versus the gas tank and rider height. Now I had to try and get the cover as close to that cutout as possible. The technique here was to set one base stud at a time and try to keep a sharp look out all around the edge of the cover all he time. Tricky, to say the least.
 The first rivet I installed ended up being loose and not securing the base stud at all.... Now what? As I looked closer I saw the problem. The riveting tool never reached the rivet head directly inside the base stud.... I needed a spacer. High enough to meet the tool and the rivet head at the bottom of the base stud. This little guy fixed it! An M4 Nyloc nut fit snugly inside the base stud at stood out just enough to meet the riveting tool. Victory!

An aluminium washer on the inside for support and this is what it looked like once installed. Not too good. I believe these base studs were originally screwed to the seat pan with M4 screws. There is no record of these parts in the parts manual as the seat is only one part number as a set. So, I can do whatever I prefer here. And I prefer rivets.

This is the look after a slight "massage" with my small hammer. Nice and tight fit.
 Here´s the seat with the cover snapped in to position. Looks quite alright, I think. Let´s move on to the padding! The cover seems a bit "flat" here, don´t you think?

And now we can see another problem I have to sort first... The oil tank bracket has to be installed before putting the padding in place. This phenomena is very common working on bikes (and, to be honest, most everything you´re doing on a house as well...). There´s always something obstructing your progress, something you need to get done before further advancement is possible. And it goes on... To be able to fit the bracket I need to paint the underside of the seat first. There you have it! Two things to sort before fixing the padding to see if it can be copied for other restorations. Jeezzz!
 Anyways... A quick masking of the underside and a thick coat of Hagmans flat black spray paint sorted the first obstacle. Painting done!
 This paint actually dries quite quickly and after some 30-40 minutes I was able to handle the parts again. Let´s move on to the oil tank!
 You remember me finding another oil tank here in Sweden at our "Swedish eBay", Tradera? If, not, here it is... The brighter colored one with the fuel tap. It was used as a fuel tank on an engine driven flashlight called "Diamond" I saw it, got lucky and bought it for petty cash. It came with its own bracket and felt liners. I´ll use the "new" oil tank but try to remove the fuel tap and replace it with the brass fitting from the original, more "brownish" , tank that was on the bike. Here we go!
 The fuel tap was easily removed from the newer tank. The oil outlet in the older one was a bit more stuck! I had to be careful not to brake anything. Finally I found the correct tool to use to reach that far inside the tank and get a hold of the 12mm nut. Here´s everything loose and away from the tank.
 I needed to manufacture a new gasket. I had nu fiber washers that fit to size so I decided to go for a rubber one instead. Some sturdy, fuel/oil secure, rubber material I found was very well suited for the job.
 The rubber gasket became a bit thicker but I think it´ll do. Now I just had to get the washer and nut back on and tighten it.
A big pair of tweezers got the washer back on inside the tank.
 Getting the nut on there was far more difficult. I had to use these bent tweezers, locking them with a clamp to hold the nut in place while carefully turning the brass outlet from the outside... Got it!

I cleaned the felt strips and let them dry in order to let the double sided tape glue them to the bracket. They will be in constant "press" from the rubber bands holding the tank to the bracket so they just need to stay in place for now.
 And here´s the "new" oil tank ready to go inside the seat. The correct length of hex head screws according to the part manual and washers plus nuts. These thick nuts were later changed to a thinner type that fitted the seat better considering you will actually be sitting on, or at least, hitting these with your butt when riding...

Here´s what it looks like from the outside. Thinner nuts and slightly larger plain washers for extra support on the fiber glass. Looks real uncomfortable here, doesn´t it?
 This is the look on the inside. The initiated Kawasaki parts guy will recognize the screws from the seat of the H2 750. These are used to hold the hinges to the seat pan on the H2:s. I have no problem using them here. They´re Kawasaki screws, that´s all that matters. And they´re seat screws. Suites me fine. Remember the oil tank had been moved from under the seat to the right front inside of the fairing? I believe "Esso" did this for some reason. Well, I´m moving it back since the pictures from early 1970 shows it in it´s original location.
 OK, moving on to the padding next. I bought some sturdy foam rubber from an upholstery shop nearby. 20mm thick and not too soft. Perfect for seat padding on a seventies racer. In this picture I´m outlining the contour of the seat on to the seat foam.
 Piece by piece I cut it down to size and tried to get it flush with the edges all around the seat. My big, Chinese, pair of scissors did an excellent job. I love tools. I guess you found that out by now, right?
 There´s an enforcement on the seat right at the angle between the seat and the "backrest". The padding had to be cut to make room for that "bump". Small cuts do the trick together with frequent checks how far I´have come. I do like upholstery work! Very rewarding and fun.
 I thought I would have to make holes for the nuts in the backrest part of the padding but that wasn´t necessary at all. They couldn´t be felt through the foam. Ready for fitting of the cover!
 Fits like a charm! A bit stretched, but not too much. I have seen many pictures online of seats where the owners release the cover from the seat base when not in use. I think mine can be left on without destroying the cover.
 And here it is! the finished product... I think the paint that Johnny laid is absolutely perfect! It blends nicely with the used, slightly ragged, seat cover that´s over 47 years old.
 The front view of the seat cover. You can see my repairs here and there. I don´t mind them at all! I´m very happy to be able to use this old cover on the bike. It is a true relic from the early days. I believe it is the original one the bike had when sold in 1970. The seat cover can most often be reused even after a crash. I actually think the seat base is the original as well. The fairing and windscreen are different, though. They take a pounding each time there´s a crash and they have most certainly been replaced a couple of times.
 The outside is done. The only thing missing now is the black text "Esso Gunnarsson" that goes between the bottom white lines at the rear of the seat. I´ll deal with that later.
 Time to get the oil tank in place. I got a tip about a Yamaha rubber strap having the same length as the H1R oil tank rubber bands. I bought a couple of them and will use them until I can source the correct ones, if I ever will.... ?
 And here´s a peek inside the seat. Oil tank in place with its bracket and rubber bands. Brass outlet fitted to the better looking tank and ready to receive two stroke oil. If someone out there has two BAND OIL TANK #311220-6721 on stock, I´m very interested in buying....
 Here´s a look down in to the hole in the seat. I need the correct oil tank cap as well. There´s no way I can reach down there to open the cap and refill oil. The original cap has a "handle bar" that reaches upwards to ease getting a grip on it. So, if you have a CAP, OIL TANK # 52003-012 I´m buying!
 Here´s a comparison with the stock "fuel tank" cap on my oil tank and that of an S2 350cc triple. The one I am looking for is the same color as the one on the left but has the "handle bar" like the one on the right. It also has a vent hole as can be seen in the next picture.

The insides of the two caps. 52003-012 has the vent hole and color of the left. one. Let me know if you find one, Please!
 My investigation concerning my other racer (the home built one I bought a couple of weeks ago...) is ongoing and yesterday I got a hit! A friend here in Sweden who´s very much into racing history sent me this picture taken in 1973, probably in Karlsborg at the Gelleråsen track. I think it might actually be my bike!
The rear sets look exactly the same, the tank and the rear shocks also. The mounting of the fairing and the BING carbs are the same. I was told by someone else the bike might have been restored in the eighties and that can be the time the seat and fastback was changed. If you recognize the bike (or the hand in the picture) please let me know! The guy my friend suggested as the driver was not the correct one. I talked to him on the phone the otehr day and he never owned or built it. The hunt goes on!
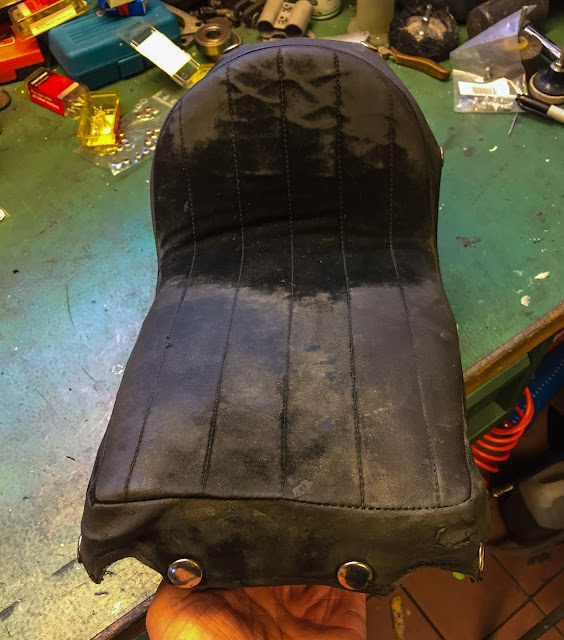
I will leave you now with one last picture of the seat as it looked when the bike was found in the barn 18 months ago. There´s been quite an improvement...

I have also started telling the story of the bike and the races it was in. The easiest way to do this and not mix that story with my restoration of the bike was to start another blog and link the two together.
You can read it here: www.kawapilot-races.blogspot.se
The history blog is also available from the start page of this blog on the right side where it says "pages" or "sidor" click on the line"Racing history Kawasaki H1R 1970" and you´ll get to the history blog. Those posts will be very living documents in the respect that I´ll add information to them as I come by it. Enjoy!
/Per
The last post was about me finishing up the rear wheel and buying another racer. I did some more work on the wheel since the last time:


The front wheel seems to be in better nick than the rear one so I´m hoping I´ll be spending less time polishing it. Here I´m starting off with the brake surfaces and the 180 grit sanding wheel on my Milwaukee battery drill. As I said, tedious and boring. So boring I didn´t do it for so long....
As I said earlier...The wheel cleaning business is no fun. The other day I got an e-mail from my friend, Janne, the owner of the other H1R being restored here in Stockholm. He was wondering how I was doing with the seat covers I promised to make copies of. His bike is getting closer to starting up so he soon needs the seat cover. I´have been working a bit on my old cover as described in an earlier post of this blog. If I am going to try to make seat covers I need to know my own fits as it should before copying it. So, I needed to finish my seat restoration! Lot´s more fun than cleaning wheels... Here´s a picture of the cover loosely on top of the seat on which it is supposed to be attached by push buttons. OK, lets´s fix the seat!


An aluminium washer on the inside for support and this is what it looked like once installed. Not too good. I believe these base studs were originally screwed to the seat pan with M4 screws. There is no record of these parts in the parts manual as the seat is only one part number as a set. So, I can do whatever I prefer here. And I prefer rivets.

This is the look after a slight "massage" with my small hammer. Nice and tight fit.


And now we can see another problem I have to sort first... The oil tank bracket has to be installed before putting the padding in place. This phenomena is very common working on bikes (and, to be honest, most everything you´re doing on a house as well...). There´s always something obstructing your progress, something you need to get done before further advancement is possible. And it goes on... To be able to fit the bracket I need to paint the underside of the seat first. There you have it! Two things to sort before fixing the padding to see if it can be copied for other restorations. Jeezzz!


A big pair of tweezers got the washer back on inside the tank.


I cleaned the felt strips and let them dry in order to let the double sided tape glue them to the bracket. They will be in constant "press" from the rubber bands holding the tank to the bracket so they just need to stay in place for now.


Here´s what it looks like from the outside. Thinner nuts and slightly larger plain washers for extra support on the fiber glass. Looks real uncomfortable here, doesn´t it?


The insides of the two caps. 52003-012 has the vent hole and color of the left. one. Let me know if you find one, Please!

The rear sets look exactly the same, the tank and the rear shocks also. The mounting of the fairing and the BING carbs are the same. I was told by someone else the bike might have been restored in the eighties and that can be the time the seat and fastback was changed. If you recognize the bike (or the hand in the picture) please let me know! The guy my friend suggested as the driver was not the correct one. I talked to him on the phone the otehr day and he never owned or built it. The hunt goes on!
I will leave you now with one last picture of the seat as it looked when the bike was found in the barn 18 months ago. There´s been quite an improvement...
I have also started telling the story of the bike and the races it was in. The easiest way to do this and not mix that story with my restoration of the bike was to start another blog and link the two together.
You can read it here: www.kawapilot-races.blogspot.se
The history blog is also available from the start page of this blog on the right side where it says "pages" or "sidor" click on the line"Racing history Kawasaki H1R 1970" and you´ll get to the history blog. Those posts will be very living documents in the respect that I´ll add information to them as I come by it. Enjoy!
/Per
Inga kommentarer:
Skicka en kommentar