Getting that carb problem sorted earlier meant a lot and was a big relief! Now I am able to continue cleaning them up in a more serious way and also do the finishing work on the cables, choke and throttle. Remember I left the throttle cable hanging on the bench drenched in penetrating oil and gear oil while I was away on a work trip? Not surprisingly it was still stuck when I got back so I had to start working on that one.
 I tried to free it by pulling on the end of the cable and jiggling it back and forth. It wouldn´t let go until I again used heat.
Careful heating with the torch all over the sheath and even more 5-56 finally did it. It loosened up and a murky mixture of oil, 5-56 and rust ran out. Luckily the cable seems to be fine.
Naturally I managed to burn the sheath... I was able to remove that burn mark, though. Phew!
 Now it was time to start cleaning it up and lubricating it with oil and grease. First I had to get rid of that strange cover of electric tape up at the joint between the cable and adjuster up at the throttle cable attachment at the throttle grip body.
 A bit of cleaning and polishing on the metal parts of the cable assy. My buffing wheel is always on STBY right next to the work bench. Better be careful not to overdo it here. I don´t want it too bright.
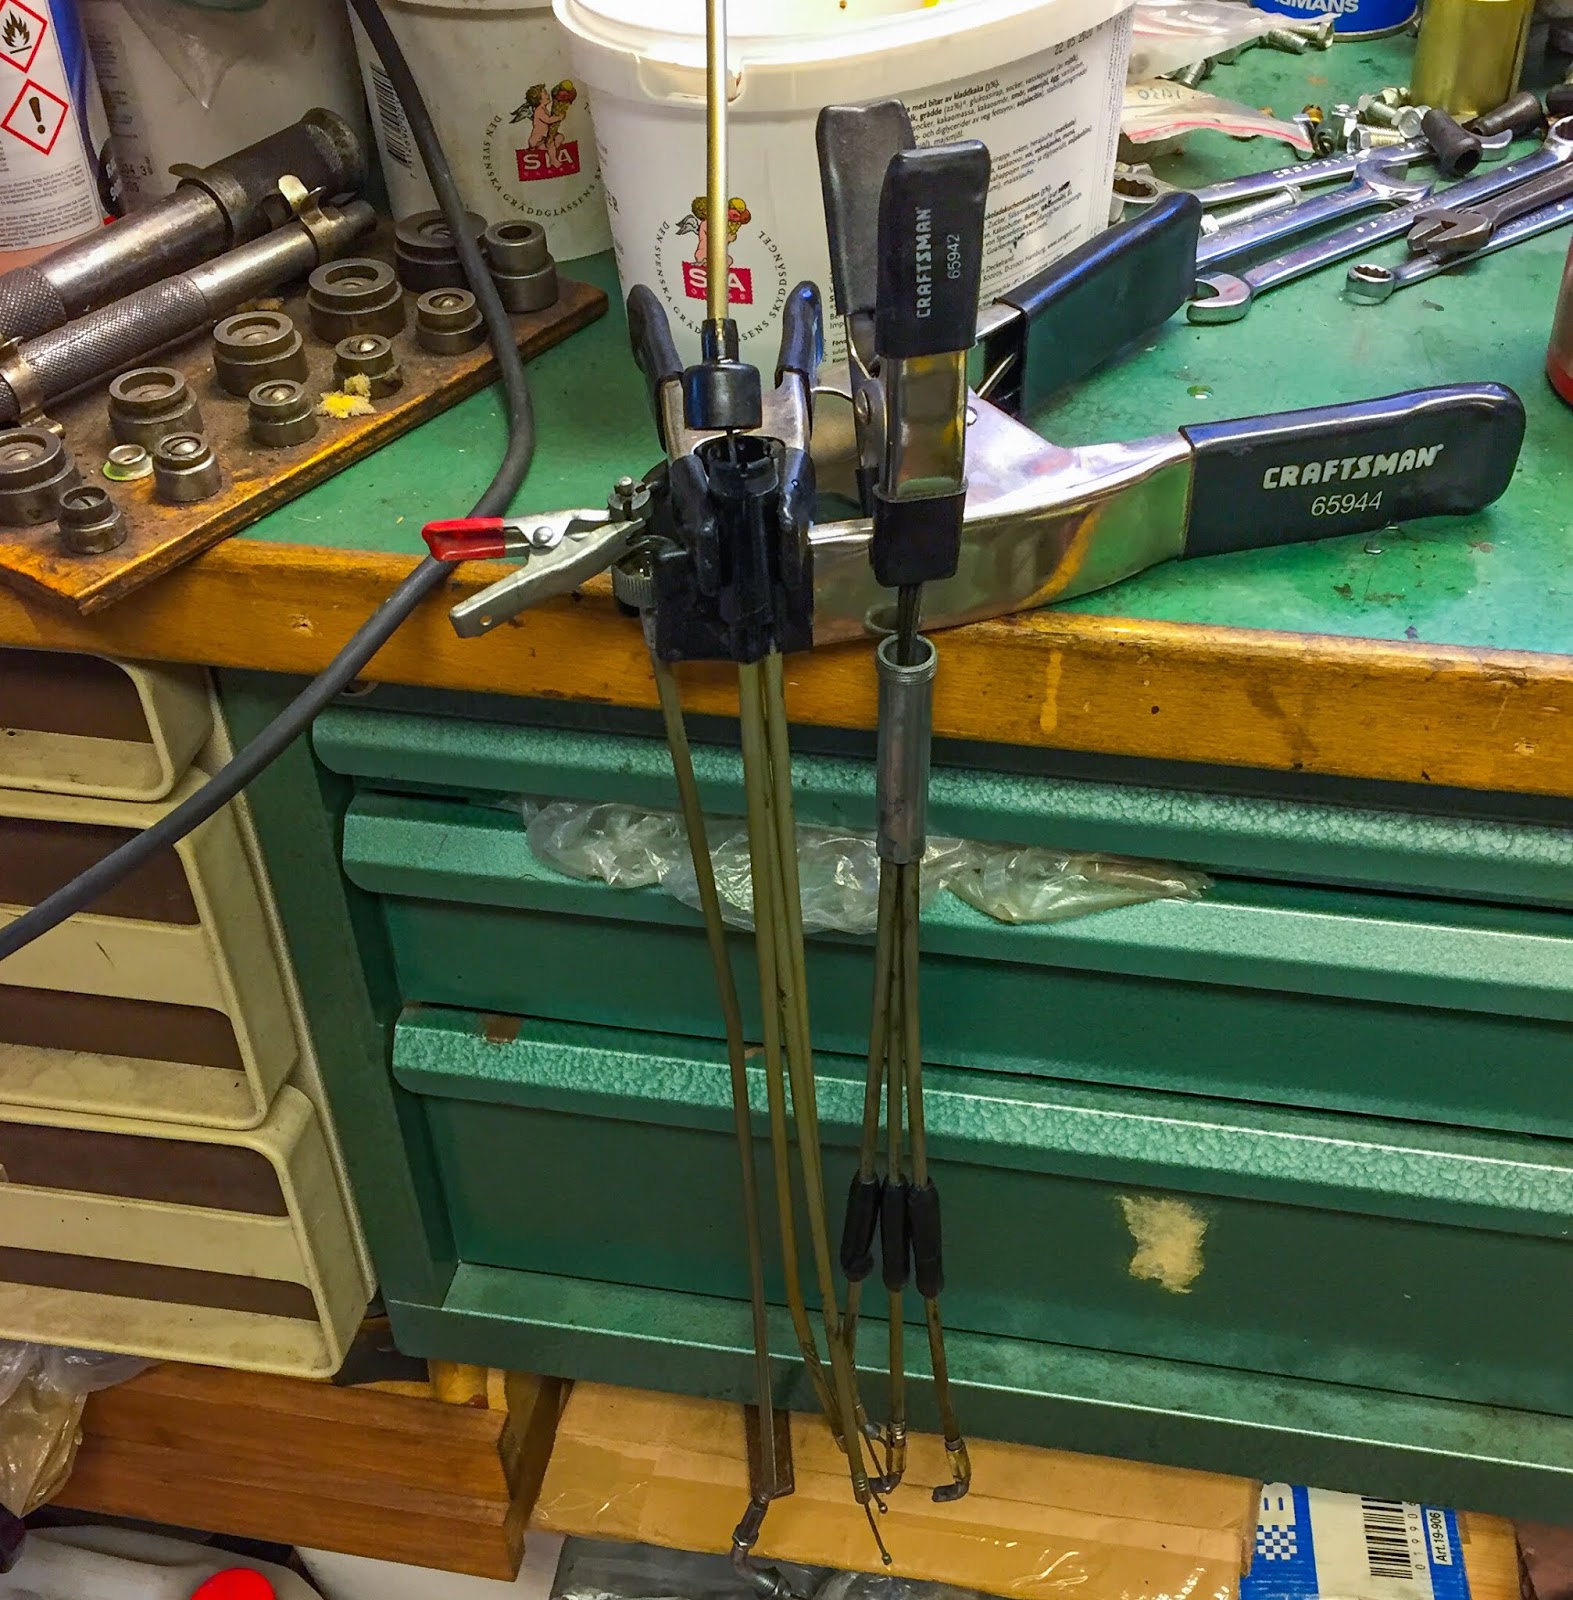
 Next was hanging it again but this time with a lubricating mixture of gear oil and grease. A slightly thicker formula than the rust clearing penetrating oil I used the last time. How do you know when it is done?
 Well, when the lower parts of the cable assy look like this, it is completely lubricated and can go back to service.
All three ends of the cables coming out from the split are wet of oil and grease. Everything runs smoothly and nicely without any scraping or hooking. Good as new, well, sort of... Next up is the choke cable.
 It was quite dirty, didn´t run that smooth, so it also needed a thorough cleaning and a good service. On the right here we can see a few of the problems. Doesn´t that housing look broken? Are the cables beneath that split housing still usable or are they too damaged?
 At least they all did move... Anyway, this kind of work is some of the best. Restoring the original part to as good a standard as possible and hope you will be able to reuse it. That is right up my ally.
 Here´s something I couldn´t accept, though. The lower ends of the cable assy are supposed to be fixed firmly to the split housing by those small, black plastic "tubes" sticking out at the top right in the picture.
Two of them were broken badly and the third was cracked.
Now, would I be able to replace that plastic housing with another one? Did I have one extra? The major problem here was to see if there was place for the cable nipples to go through that plastic split and free it?
 After some digging around in my boxes of old junk I came across this old, battered-up, choke cable from an old H2 engine being used in a side car racing bike. I don´t know why I had it, but boy, was I happy to find it and not having to send for it via eBay or one of my part pushers.
 After a bit of dismantling and cleaning it actually looks the part! You can also see I tried to get the cables out of the old housing. Not too smart, right?
 You always learn by your mistakes. The thing is to try not to make them too big...
Here it was merely a matter of pushing them back in and pulling the inner cables out the other way so I could free them at the plastic joint that slides within the splitter housing.
As I got them unhooked from the white plastic part, the cables were fee to pull out at the other end. Thank you, Kawasaki for making the holes in the plastic housing big enough....
 Two splitter housings, four cables, one extra internal plastic cable splitter and one extra top cable hat. Enough to get a working choke cable from! Let´s start cleaning and polishing!
 I guess you know it by now... That POL can be used to virtually everything! I know, you might think I have a stake in that company, but I don´t. I just love that product. I´ll take a picture later on to show you my stash of these tubes. It´ll probably last my life time and even my children´s...
 Here´s what I do. The instructions on the tube says "Apply sparely to the surface and polish by hand, let dry and then remove for that extra nice shine"
It actually works great to put quite a lot of it on, rub it in some and then let it sit for a while before polishing and finally removing it. It has some kind of solvent that works wonders on most dirt and oxides I´ve come across so far. Rubber, plastic, paint, chrome, aluminium, windshields, helmet visors, I use it on everything! OK, now I just might get a 20% discount on my next purchase...
 When the sheaths are clean and the metal parts polished it is time to get it all together again. The tricky part here is getting the three lower cable nipples in the correct spot in the white plastic inner joint and getting the whole shebang into the housing without any of the cables getting loose. You need to make sure the lower cables don´t get twisted or crossed inside the housing. If they do, your choke will not be adjustable enough to close completely. Then you´ll have to do it all again.
 Time to lubricate also the choke cable. It could join the throttle cable on the edge of the bench letting gravity do its wonder.
 A bit crowded, but it´s not for long... Over night does it, for sure. Grease and oil until the floor gets oily. Then they´re all done and ready to go on the bike.
 Yeah, I know, it looks some kind of commercial. But the choke cable looks nice, right? Considering what I had to work with in the beginning I´m more than happy with the outcome.
 OK, I have to admit it. I went a bit too far here. The choke plungers ARE too shiny as are the brass housings. It is extremely hard to stop buffing before it gets too good. I failed at it, Sorry.
In my defense I might argue that most of these parts won´t even be visible when on the bike and it is imperative that the choke plungers move freely inside the carb bodies.
 A final coat of "Armour All" for that final finishing touch on the cables and the rubber parts and they can rest below the bike waiting for the carbs to get ready. That is happening quite soon, I promise!
 Remember that flimsy, small, ridiculous chain cover I talked about earlier? Well, I had the clamp painted, the chain guard drilled and ever so lightly angled at the bottom end. Finally it got on the bike! I know these parts are not the original ones but they were the best I could do, at least for now.
 I think it looks great! It could definitively be the correct one as far as I´m concerned. That´s just going to have to do until I can find an original clamp and cover. Not that I think that´s ever going to happen, but one never knows, right?
 As I was fettling with the chain cover I realized I might have a much more serious problem sailing up in the near future.
I suddenly found the air intake rubbers looking very small! Will they take the carbs at all? These intake rubbers were supplied by Ebbe when he rebuilt the engine for me a couple of years ago (strange how time flies, right?) and I have no clue as to what kind of bike they are from. It does look a bit tight, don´t you think?
 A quick test revealed that they will function quite perfect! A light coat of my favorite food grease spray and the carb slid right in there. Great! I was worried stiff there for a while...
The carbs will get its final treatment and clean-up as soon as I can muster up the energy to get my hands all dirty and my fingers to take the pounding of thinner, white spirit and acid treatment. I´ll do that soon but not right now. Let´s move on to something easier...
 I painted and got the tachometer bracket ready for mounting on the bike a while ago. Here it is. That finish will do just fine. I´m so pleased with the work from Kinnander´s gummi in Linköping. That was more than 1,5 years ago...
 Here´s the opposite side. I just need to paint the last part of the inner steel ring to get it fully ready. It was kind of difficult to use masking tape on the rubber parts. The tape wouldn´t adhere correctly so I will paint it by brush. No biggie. What is more important is I really should cut some of the rubber away on this side. As I see it right now, I might not do that at all if I at all can avoid it. Cutting rubber is very hard to do and get it to look good. We´ll see how it turns out with the fasteners on there later on. Getting the tachometer off the bike to cut the rubber is very easily done in the future.
 Here I have attached the tacho to the bracket. Ordinary M6 nuts and one lock washer. I always consult the parts manual when putting stuff on to the bike. As close to original as humanly possible!
 A bit more polishing and refurbishment of the black paint on the housing and a short look for the correct fasteners for it, and the tacho is ready to be mounted.
 This side goes towards the bracket on the "spear" up front. Metal to metal, no problems here. The outer and inner rings of the brackets are separated by the vulcanized rubber, thus creating the rubber "hinge" for this delicate instrument.
 This is where I should do the cutting. The screw should go all the way in to the metal here and no rubber should be between the washer and the bracket. let´s see how it looks and works out without cutting...
 Yeah, that´ll work for me! The rubber is sturdy enough to stay in place and if I ever feel the need to correct this "impurity" it is easily done. Let´s move on and get the tacho cable ready and cleaned.
 I never gave this part much thought since I put it away after the disassembly of the bike a long time ago. It looks OK, just needs the, now familiar, treatment with penetrating oil, gear oil, POL polishing and Armour All finishing. Easy peasy!
 Rather nice to see a part that survived the stay in the barn better than most other stuff did. This will be perfectly OK when I´m done with it. On the left here is the part of the cable that goes in to the clutch cover and drives the tacho.
 And here it is on the engine. Nice and cleaned, lubricated for prolonged life on the very racer it most probably was attached to from the very beginning. This is not a part that wears as much as some others do. Note also how the oil pump has no throttle cable varying the pump output due to throttle position. No need on the racers since there´s also 4% two stroke oil premixed in the fuel tank. The pump outlet volume is only depending on RPM:s. Quite neat, actually.
 Last picture for this post. The tachometer up where it belongs. On the bike, in front of the potential driver doing what it is supposed to do. Keeping him/her from over revving the engine!
 Ah, what the hell... One more! I took this one during test mounting just to get an idea of how it would look. Amazing, I think!
This bike is actually coming together quite fast and nicely right now. Not so very much left to do.
Getting the carbs and cables on, adjusting them and the ignition system, doing some electrical wiring to and from the battery, ignition switch and earth. The fuel tank has to be addressed as well. Will it hold fuel? will I have to get a replica for the start up of the bike and the driving of it?
Anyone know a good tank builder around here or someplace else? Aluminium, fiberglass, plastic, I don´t give a d-mn as long as it fits the bike, has three fuel outlets, a fuel tank cap, a vent hose and looks OK... I´m buying!
And the fairing, of course. That is a major thing to work out. it is supposed to be fit tight and snug and I remember how bad it fit on the bike when I put it together for pictures on my driveway almost 3 years ago. The exhaust system also need a lot of work...
Yeah, you see... lots of fun left!
The next post will be carbs, carbs and more carbs....
Stay tuned!
/Per

Careful heating with the torch all over the sheath and even more 5-56 finally did it. It loosened up and a murky mixture of oil, 5-56 and rust ran out. Luckily the cable seems to be fine.
Naturally I managed to burn the sheath... I was able to remove that burn mark, though. Phew!


All three ends of the cables coming out from the split are wet of oil and grease. Everything runs smoothly and nicely without any scraping or hooking. Good as new, well, sort of... Next up is the choke cable.


Two of them were broken badly and the third was cracked.
Now, would I be able to replace that plastic housing with another one? Did I have one extra? The major problem here was to see if there was place for the cable nipples to go through that plastic split and free it?


Here it was merely a matter of pushing them back in and pulling the inner cables out the other way so I could free them at the plastic joint that slides within the splitter housing.
As I got them unhooked from the white plastic part, the cables were fee to pull out at the other end. Thank you, Kawasaki for making the holes in the plastic housing big enough....


It actually works great to put quite a lot of it on, rub it in some and then let it sit for a while before polishing and finally removing it. It has some kind of solvent that works wonders on most dirt and oxides I´ve come across so far. Rubber, plastic, paint, chrome, aluminium, windshields, helmet visors, I use it on everything! OK, now I just might get a 20% discount on my next purchase...


In my defense I might argue that most of these parts won´t even be visible when on the bike and it is imperative that the choke plungers move freely inside the carb bodies.


I suddenly found the air intake rubbers looking very small! Will they take the carbs at all? These intake rubbers were supplied by Ebbe when he rebuilt the engine for me a couple of years ago (strange how time flies, right?) and I have no clue as to what kind of bike they are from. It does look a bit tight, don´t you think?

The carbs will get its final treatment and clean-up as soon as I can muster up the energy to get my hands all dirty and my fingers to take the pounding of thinner, white spirit and acid treatment. I´ll do that soon but not right now. Let´s move on to something easier...


This bike is actually coming together quite fast and nicely right now. Not so very much left to do.
Getting the carbs and cables on, adjusting them and the ignition system, doing some electrical wiring to and from the battery, ignition switch and earth. The fuel tank has to be addressed as well. Will it hold fuel? will I have to get a replica for the start up of the bike and the driving of it?
Anyone know a good tank builder around here or someplace else? Aluminium, fiberglass, plastic, I don´t give a d-mn as long as it fits the bike, has three fuel outlets, a fuel tank cap, a vent hose and looks OK... I´m buying!
And the fairing, of course. That is a major thing to work out. it is supposed to be fit tight and snug and I remember how bad it fit on the bike when I put it together for pictures on my driveway almost 3 years ago. The exhaust system also need a lot of work...
Yeah, you see... lots of fun left!
The next post will be carbs, carbs and more carbs....
Stay tuned!
/Per
Hej!
SvaraRaderaFör tillverkning av en alutank, kolla med Alucars i Hällestad.
Tack!
RaderaKollar med dem... Bra tips!
/Per
Sitter och läser Classic Bike nu, vilket projekt och härligt att den blev klar! :)
Radera//Widahr
Thanks for the updates! I've been checking every month since your last post in May.
SvaraRaderaThank you for the kind words. I hope to be a but more consistent here during the spring. This bike has to get done soon... /Per
SvaraRadera