Since my last post I´ve been waiting, trying and modifying... I´ve Done some shopping over the internet for more parts and also locally, here in Stockholm, getting more safety wire. I now have two quite large bobbins of wire 0,6 and 0,8 mm that for sure will last a life time. I just need to muster the energy to get it done. One of these days...
A few weeks ago I helped a friend and colleague to get his new BMW motorcycle close to Hällestad where my aluminium tank is being made. I called Bert and asked how things were moving along.
- "Good thing you called, I need to ask you a few questions about the tank project"
Nice, that meant we could visit Hällestad on our way home and talk to Bert and check out his work!
 As always, when I meet people with serious skills, I was totally speechless in awe. This is what we saw when we entered Bert´s workshop. He had spent a few hours measuring and making parts for the tank build.
 He needed to ask me about the air hose and its attachment to the top part of the tank.
The result? He will weld a reinforcement in to the top of the "bubble" and thread it for a brass tube fitting instead of just making an aluminium tube fitting that will break easily. Good call!
 Here we can see the left tank side plate taking shape. He is extremely thorough, even copying the very small extensions at the bottom of the sides and at the front of the tank.
 On the left here you can see the "bulb" for the tank cap that I told Bert he could disregard and simply move the cap up front a bit to make the build easier. Well, he couldn´t have it that way. He also needed to know my thoughts on the small hooks that takes the rubber bands and holds the tank in place. You can see the original tank has a screwed-on hook at the rear. We concluded that a welded aluminium reinforcement with two threaded holes, just like the original would be best. A bit more work, but it´ll look and feel a lot better.
 On the right here are the four parts on display. We can see the bottom part taking shape and the side pieces plus the top part. He said this stage is about halfway making the parts and then it´ll take a while getting them welded together and sanded/ground for later polishing.
 A close-up of the bottom part of the tank. It is being fabricated by a true artist, that is for sure.
You can also see the surge tank will be approximately half the original depth to accommodate the modern Pingel high-flow fuel petcock. All other measurements will be exactly as the original. When it comes to this guy, I´m certain I´ll be pleased with the work.
 The top side of the tank. The diameter of the radius from the top to the side piece will also be exactly like the original. We can see he has started mating those two pieces together.
 I´m always curious as to what kind of equipment these guys use to do their magic. A small tour around the workshop revealed some of them.
Here on the left is Bert´s favorite machine when it comes to shaping sheet metal, or "tin-bashing" as it is called in daily speech.
This is the "Eckold" crimp/stretch machine. Here it is possible to crimp and stretch sheet metal to virtually every shape you can imagine. Don´t ask how it works... I wouldn´t be able to start explaining even the basics of it.
 This one is a little more easy to understand. "The English wheel"
By applying pressure to the lower, rounded, wheel and pulling/pushing a sheet of metal through it, you can create a rounded shape on the metal. The rear bumper to the left of the machine is an aluminium copy of an original one for Bert´s Chevrolet Galaxie race car. Yes, made by Bert.... Saves around 17kgs of weight on ONE bumper.
 The "Eckold" crimping/stretching machine is a true work of art in itself, don´t you think?
Who would put a logo like that on a modern machine today?
Yeah, you guessed it, No one.
It costs a lot of money and doesn´t improve the performance of the machine, so why?
Well, I know what I think...
 I mentioned earlier I would try to get some more time-correct spark plug caps for the racer.
The originals are, of course, impossible to find anywhere. I´m still looking for 21130-015, if you have any?
On the right here are three of my options. I do have more, but these are the most interesting
21130-2060 are from a straight four, four stroke, from the eighties. I imagined they could be OK if I loose the large rubber cap at the bottom. Hmm, Maybe.
The one in the middle is the stock one for the H2:s. Also looks great, but I don´t like that flimsy stock cap spring that holds the high tension cord in place to the spark plug.
The ones on the right are the British "Lodge" type sold in many part supply shops. Doesn´t look quite right, but I´ve actually used them many times before in a way I´ll describe here.
 This is a close-up of the Lodge type of caps. Much more suited on a British 650 like BSA or Triumph in my point of view. They work alright, but doesn´t look the part on Japanese bikes.
 These are more correct for the Japanese market and thus more appropriate for my racer. BUT, as I said I really don´t like that small spring thing that you connect the high tension cord to the spark plug with. It feels like the connecting surfaces between the spring and the inner core of the cord will be a bit poor.
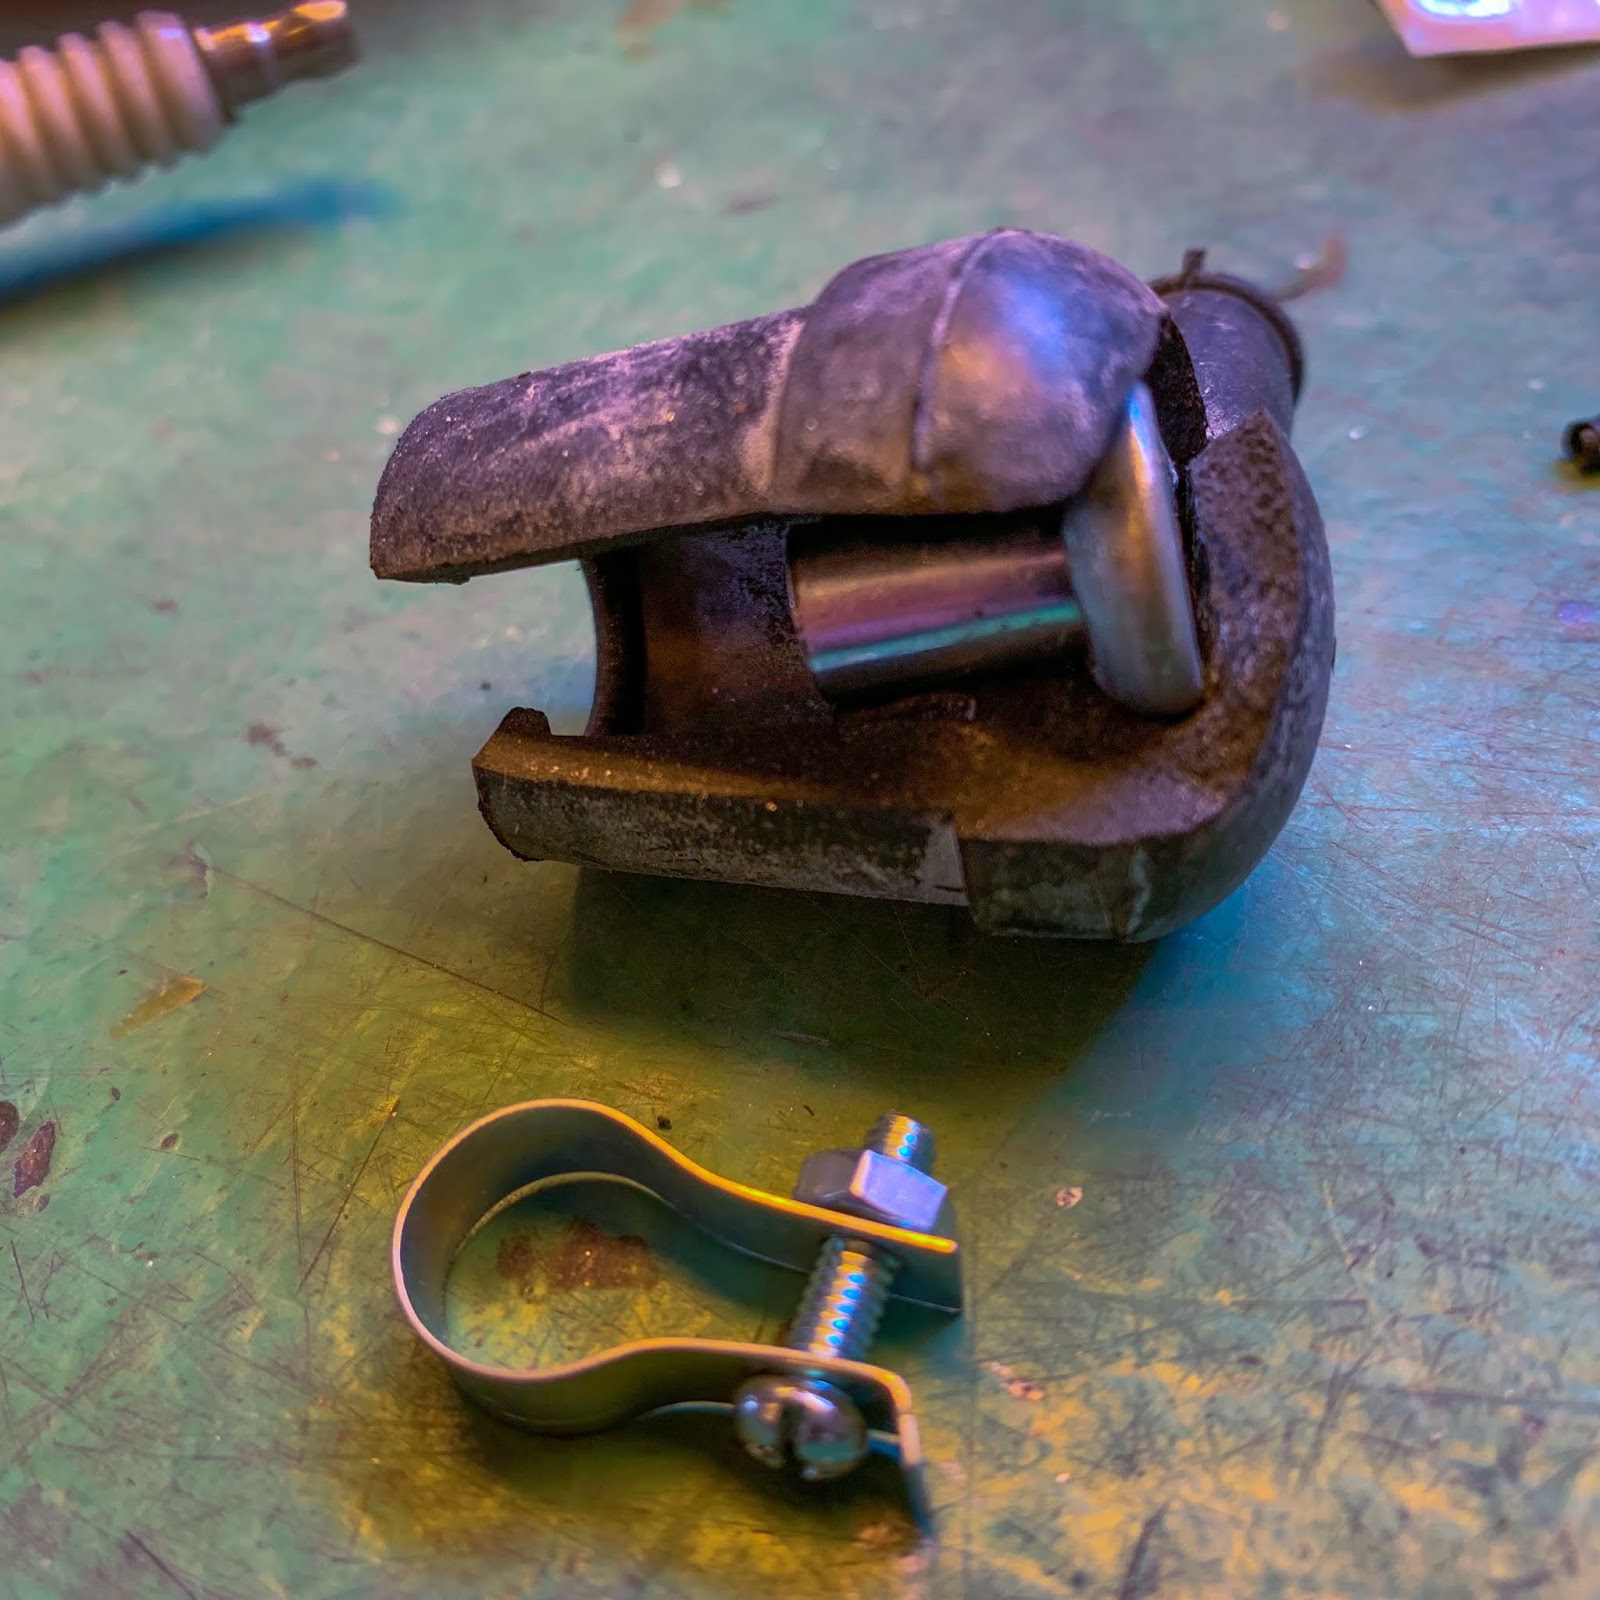
 I´ve noticed earlier that the inner part of the Lodge type cap have a much more sturdy inner structure.
The solution?
Cut it open and remove the inner connecting part from the Lodge caps and put them inside the good-looking Japanese ones!
 They do open relatively easy and that inner part firs like a charm inside the H2 caps. You just need to get them out...
Just a little "open surgery" and here we are!
 A little bit of rubber grease and they slide right inside. Looks quite stock, don´t you think?
 And on the high tension cord side you get this "screw on" model that, in my world, connects a lot better to the cord.
A simple, cheap conversion of the stock H2 caps to something much more sturdy.
 I made all three of them in less than 30 minutes. Easy peasy fettling!
 Done!
Done!
Now, if I don´t use them on the racer they will be perfect for my next H2 build. I guess you figured it out by now, I like to have many options when it comes to parts ans stuff.
 The ones presently on the bike don´t look too bad either with their NGK embossed logo´s on top. Just a tad to late time wise for this old racer. Anyway, they will stay on for now.
 Something completely different happened a couple of weeks ago. My friend Peter Goertz in Canada asked if I knew the guy on this T-shirt. Could it even be my bike?
Peter was kind enough to buy me one of them at a local dealership in Niagara falls, where he lives. Niagara race Crafters, NRC, sent me a couple of stickers and an extra T-shirt just because they like to follow my build of the H1R. Super nice guys! I sure hope I can come visit in the future.
Anyway, I could see that the picture is not "Esso" or the H1R. Too bad. More likely a Yamaha TZ350 or something like that. But it sure looks like "Esso" on the H1R at a quick glance.
 So far I´ve been waiting and modifying.. Time for the trying.
I will have to address the fairing and its attachments to the frame. Why not just make a trial fitment and see where we are on that part of the project.
First the small rubber caps on all the fastening points on the frame.
On the right here is the top left attachment up at the windscreen.
 And the front-most point. Up high at the front "spear" with one of the two, three original fairing screws I have. I have ordered a couple of sets from Konturverktyg, the business that made my replacement front fork stanchions perfect.
Still waiting.... Its been only 1,5 years now.
So, I went there to make a friendly reminder and possibly take them elsewhere top get them done. The time I will need them is fast approaching! Belmir hadn´t forgotten about them, he had been very busy and they had slid further and further down the priority list. No biggie at all, he promised to get them done ASAP.
 I needed some kind of support for the fairing under the bike for my trial fitting. One of my battery operated screwdrivers box was perfect. A bit of rag on top and we are ready to rock!
 This is going to be a pain... I got it on to the bike, but it won´t fit that good at all. It has most certainly been changed and possible replaced over the years. I will have to adjust most everything on it to get it right. Janne had similar problems fitting his fairing also, so nothing new here!
 The fitment actually looks a lot better than it is in real life. The bracket holding the top part of the fairing is adjustable in height, but not in width. This looks OK up here, but 2-3 mm adjustment in any direction up here makes a very large change further down below the belly of the bike.
 This is the way it is supposed to look later on up at the windscreen. I need to fine tune the placement of all parts of the fairing and make sure they all fit this good all over the place. Not an easy task.
 Here´s one of the major problems. There´s absolutely no way the fairing can be brought in far enough to meet the bracket and the rubber here.
Janne had to make an extension of the bracket, and so will I.
Bugger!
 The same problem on the right side of the bike. Here it is even more important to get the fairing off the engine. That dry clutch will eat a large hole in no time if it ever gets in contact with the ultra thin fiber glass fairing.
 I´m quite close here on my first fitting attempt as you can see on the right. The repair "Tullar´n" made can be seen and that is, of course, where the hole was before he fixed it. The extension on the right side doesn´t have to bee quite as long, though. Later on we´ll see how to go about it!
 Front view of the fairing. I think it "hangs" a bit on the left side of the bike. As I said, a lot of adjustments will be necessary later on.
 Here, on the front underside, it looks quite all right. Somewhat symmetrical and straight. Not too bad at all!
 The lower right side of the fairing and the fitment of the belly to the upper fairing. Yes, problematic. I guess it is going to have to be what it is. I know Janne is planning to produce new belly fairings in aluminium. I might just go along and get me one of those.
There´s even discussions here and there that the original belly fairings were made of aluminium from factory. I´m not completely convinced about that, though.
Any thoughts out there?
 The left side. Ever so little better fitment here.
Thanks.
As you can see I only have three holes for the Dzus fasteners. The original have four...
I believe "Esso" cut the lower part at the rear of his fairing to accomodate is rather large racing boots. Not comfirmed yet, but that is my theory.
 A view of the "cockpit"
Rather cramped-up space everywhere. Tight fit between the fairing and the engine on both sides.
You can tell I will need those bracket extensions as well. I just need to figure out how long they have to be.
 A peek in to the front fairing with the electrical system and the other components up there. Tight and snug.
 The inside of the fairing below the lower triple tree. Those plastic fasteners will be replaced by the Dzus screws later on. Not much turning radius on this bike But on the other hand, when racing you don´t use the handle bar for steering that much.
 So, this is the state right now. The fairing is on the bike... Sort of. It´ll need a lot of work getting it right everywhere, but that is going to be quite fun once I find the time for it...
 A snapshot from the garage a couple of weeks ago... My new, drivable "classic", Kawasaki ZRX1200R is looking on the H1R build in a bit of awe.
My garage is very small and lots of things have to take place there and on the same time at times. Crowded but cosy.
 When I started this post about a month ago I didn´t have enough material to publish it, that´s why it has taken so long.
I even started on my new H2 build, to resurrect "Snow white", my ported H2 special. That has given me something to do while waiting for H1R stuff to get ready.
Yeah, I know, I could have safety wired everything else that needs it, but no, Not yet.
A friend in Norrköping paid Bert a visit a while ago and he was allowed to snap a few shots of the progress being done!
The top part and the sides of the tank are welded together and the bottom part is being adapted to fit the top part.
 Lots of work left to be done, but Bert is getting there, I´m sure of it!
 Progress was made concerning the fairing as well!
Belmir at Konturverktyg came through with my fairing fasteners. I kindly asked him to make a few of them extra and he did...
16 of them to be exact.
The original fairing screw up front and the copies behind.
 Once again I´m totally awe-struck by people that know their business!
Those copies are made from stainless steel and can be polished or sanded to the exact finish you like on your own project.
The original on the right.
 I think he nailed it! The original on the right and his copy on the left.
Making these fasteners was one thing.... Below is something completely different!
 I needed to change a shaft on a set of foot pegs for the H2 build. These rearsets were bought from Japan, made by PMC and are absolutely stunning in quality and workmanship
My problem was my braced JMC aluminium swing...
It is wider than the stock steel swing arm and the shaft that holds the brake pedal was a bit too long and interfered with the swing arms movement. Yeah, I could go back and use the stock swing, but this is going to be a rather spacial build.... So no, No can do!
Belmir simply made me another one, stainless steel, shorter but with the exact angle for the pedal and the brake puller... I just love it!
 Ok, if I said "A" I´m going to have to say "B". Here it is.
PMC rear sets, Kawasaki H2, Sick engineering and quality. As long as you use the original bike frame and other parts...
 On the left here you can see the problem. The brake pedal shaft is too long. And there´s ample space for the lever closer to the frame. You just need to shorten the shaft a bit....
 And the other side. The gear change pedal and parts. So far no problems here. We´ll see later on. It is a fantastic kit including a longer swing arm shaft and all parts needed to fit them to the bike.
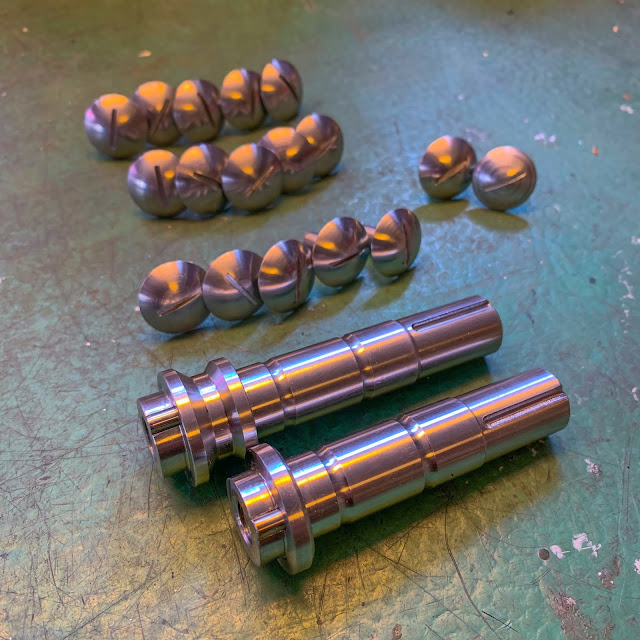 Let´s end this little parenthesis with a picture of all parts Belmir made for me.
Stunning work at a very, very reasonable price!
 Coming home from work last week Bert called me and said he had sent me a couple of pictures of the tank.
He had questions about the tank filler and petcock threads and our plan to use steel parts in those areas.
He was worried the sealing he would use screwing the steel parts to the aluminum sheet metal would burn when he starts to weld the tank halves together...
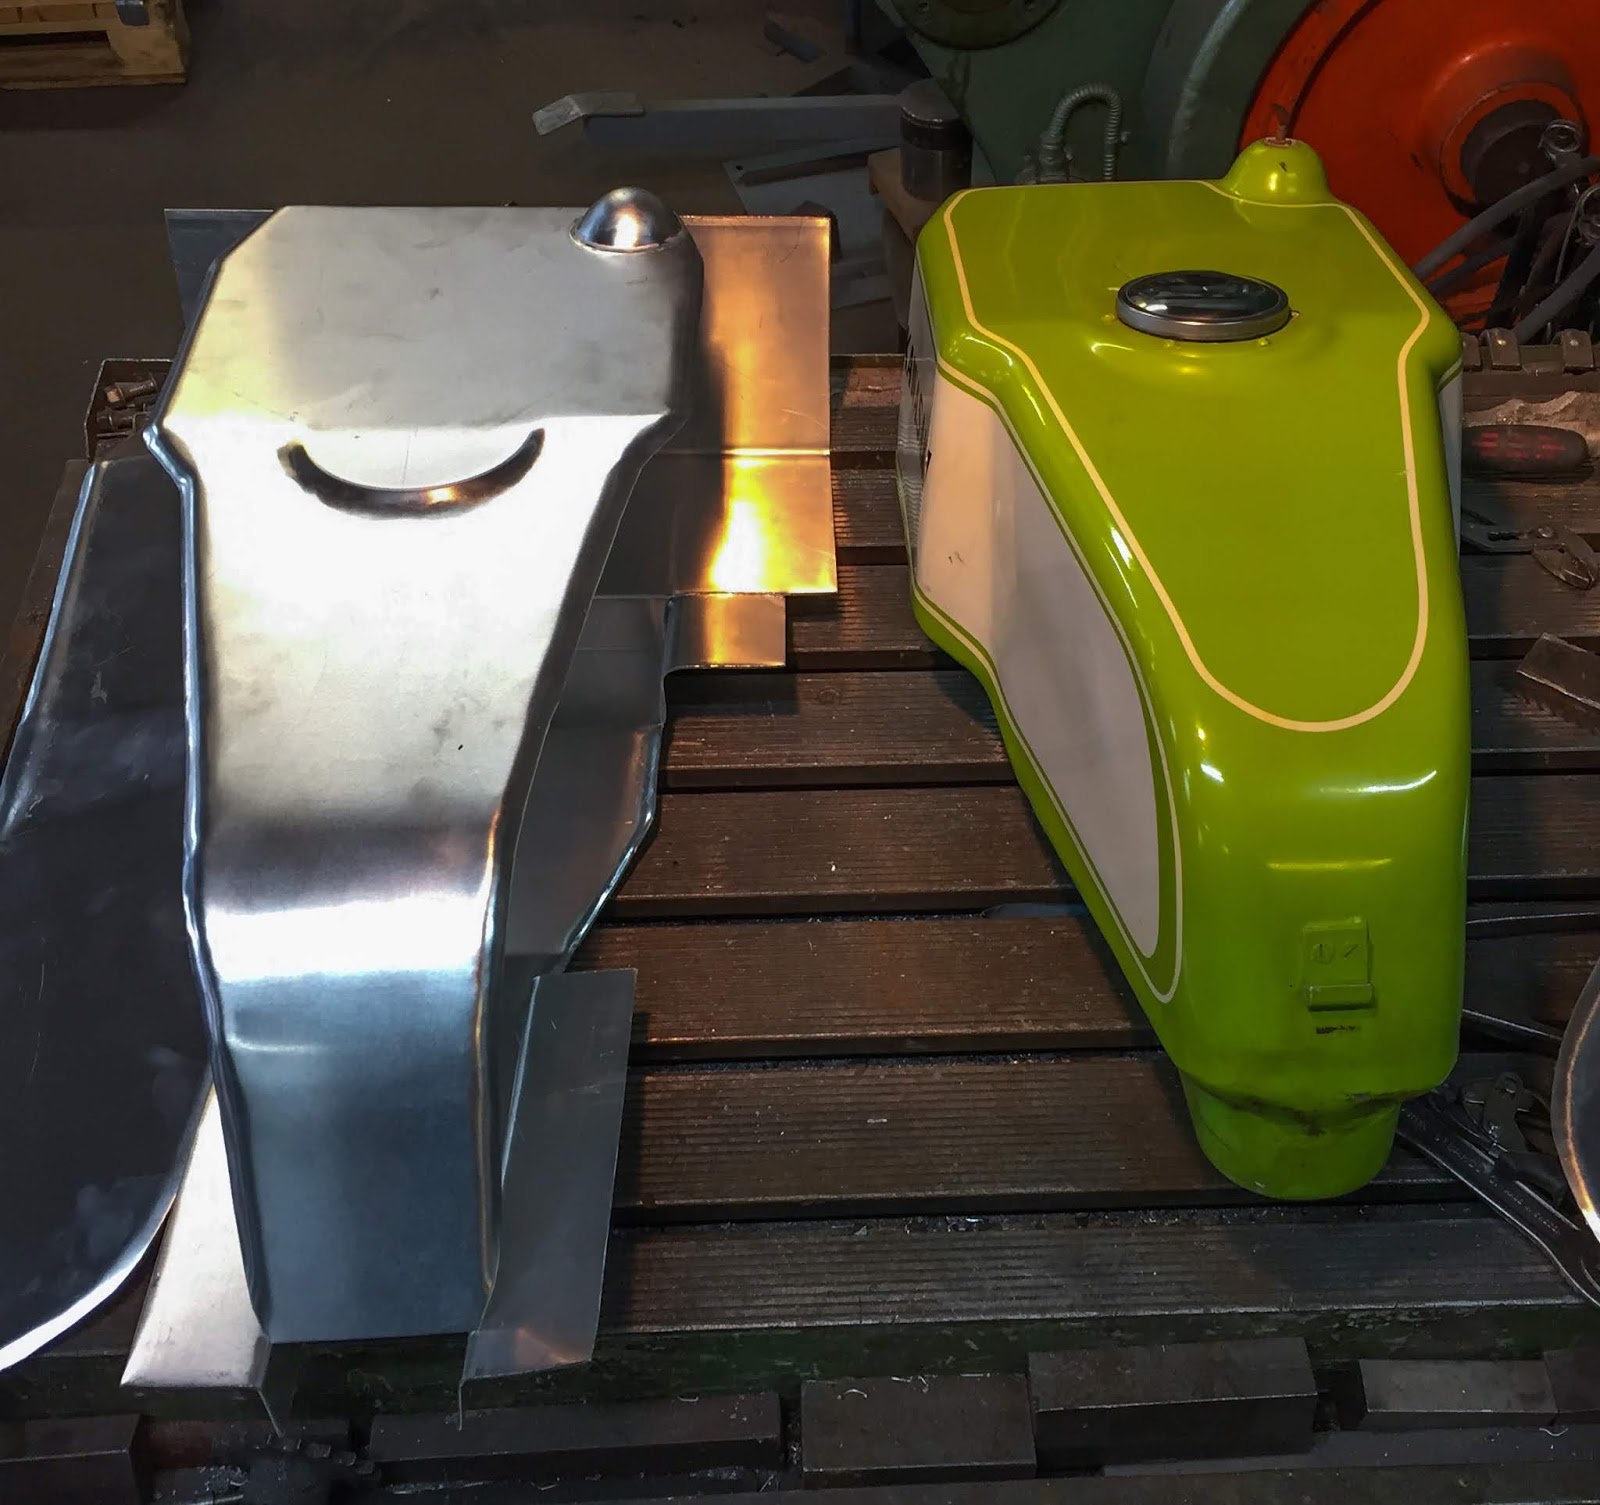
 My plan here was to get the steel filler from a thrashed tank screwed to the top of the tank, just like the one on the fiberglass tank. Bert persuaded me to reconsider. You can see the aluminium filler he made instead, between the two tank parts.
 I usually listen to people with knowledge and skills so we went that rout instead. He persuaded me the aluminium filler would be just as durable as the steel one. We´ll see about that, won´t we?
The internal petcock thread idea is actually quite good since that will lift the petcock even a bit higher in to the surge tank at the bottom there. Now I´m just anxiously waiting even more for the tank to be finished..
 There are other things happening here as well. Johnny came through with the graphics for the fairing. His "graphics-guy" made these from pictures I sent him from "Essos´s" winning race at Anderstorp and my measurements of the rear striping on the seat where the "ESSO" GUNNARSSON decal will go.
Such a nice touch to provide one extra of all decals... The probability for me failing getting them on right is quite high.
 Another small side track is these Tacho backets. A fellow H1R owner from California had four of them in bad condition. I have, as you know, the mold to fix them. I actually needed two of these myself so we made a deal! I repaired all 4 of them and sent him the two he needed for his bikes. That is the kind of win-win deals I like to do dealing with parts and other H1R owners.
 You can see on the top pair in the picture how they looked when I picked them up at Kinnander´s gummi a few days ago. There´s a bit of work cutting excess rubber off the brackets, freeing all the holes etc and then finally painting the steel parts. They do look great when done, though!
 Here at the end of this post, let´s go back 3 years... I had just picked the bike up and more or less just put it together in the driveway for a few pictures.
Just a very brief moment I figured I´d try to save the dust on it for the pictures... What a God sent thought that was!
These, the very first pictures I took, are extremely valuable to me now. Part for reference when it comes to fitment of stuff, but mostly to remember what it really looked like and to be able to see today, how much effort has been laid in to the project.
 As you can see there has been some progress made during the three years that has passed.
I thought I´d have it done in one or two years. That didn´t happen, did it?
I think, maybe, possibly I can have it started and test run this year. To do this I need the alu tank, a pit starter and a lot of work done on the fairing.... The tank will probably be done the coming weeks and I will try my best to muster up the energy to work on fitting that fairing in a good way.
For starters I´m off to work for a few days and soon it is time for the annual Kawasaki triples meet in Jondalen, Norway. I´ll be going for the first time ever... I´m super excited about that!
Stay tuned, guys!
/Per
A few weeks ago I helped a friend and colleague to get his new BMW motorcycle close to Hällestad where my aluminium tank is being made. I called Bert and asked how things were moving along.
- "Good thing you called, I need to ask you a few questions about the tank project"
Nice, that meant we could visit Hällestad on our way home and talk to Bert and check out his work!


The result? He will weld a reinforcement in to the top of the "bubble" and thread it for a brass tube fitting instead of just making an aluminium tube fitting that will break easily. Good call!


You can also see the surge tank will be approximately half the original depth to accommodate the modern Pingel high-flow fuel petcock. All other measurements will be exactly as the original. When it comes to this guy, I´m certain I´ll be pleased with the work.


Here on the left is Bert´s favorite machine when it comes to shaping sheet metal, or "tin-bashing" as it is called in daily speech.
This is the "Eckold" crimp/stretch machine. Here it is possible to crimp and stretch sheet metal to virtually every shape you can imagine. Don´t ask how it works... I wouldn´t be able to start explaining even the basics of it.

By applying pressure to the lower, rounded, wheel and pulling/pushing a sheet of metal through it, you can create a rounded shape on the metal. The rear bumper to the left of the machine is an aluminium copy of an original one for Bert´s Chevrolet Galaxie race car. Yes, made by Bert.... Saves around 17kgs of weight on ONE bumper.

Who would put a logo like that on a modern machine today?
Yeah, you guessed it, No one.
It costs a lot of money and doesn´t improve the performance of the machine, so why?
Well, I know what I think...

The originals are, of course, impossible to find anywhere. I´m still looking for 21130-015, if you have any?
On the right here are three of my options. I do have more, but these are the most interesting
21130-2060 are from a straight four, four stroke, from the eighties. I imagined they could be OK if I loose the large rubber cap at the bottom. Hmm, Maybe.
The one in the middle is the stock one for the H2:s. Also looks great, but I don´t like that flimsy stock cap spring that holds the high tension cord in place to the spark plug.
The ones on the right are the British "Lodge" type sold in many part supply shops. Doesn´t look quite right, but I´ve actually used them many times before in a way I´ll describe here.


The solution?
Cut it open and remove the inner connecting part from the Lodge caps and put them inside the good-looking Japanese ones!

Just a little "open surgery" and here we are!


A simple, cheap conversion of the stock H2 caps to something much more sturdy.


Now, if I don´t use them on the racer they will be perfect for my next H2 build. I guess you figured it out by now, I like to have many options when it comes to parts ans stuff.


Peter was kind enough to buy me one of them at a local dealership in Niagara falls, where he lives. Niagara race Crafters, NRC, sent me a couple of stickers and an extra T-shirt just because they like to follow my build of the H1R. Super nice guys! I sure hope I can come visit in the future.
Anyway, I could see that the picture is not "Esso" or the H1R. Too bad. More likely a Yamaha TZ350 or something like that. But it sure looks like "Esso" on the H1R at a quick glance.

I will have to address the fairing and its attachments to the frame. Why not just make a trial fitment and see where we are on that part of the project.
First the small rubber caps on all the fastening points on the frame.
On the right here is the top left attachment up at the windscreen.

Still waiting.... Its been only 1,5 years now.
So, I went there to make a friendly reminder and possibly take them elsewhere top get them done. The time I will need them is fast approaching! Belmir hadn´t forgotten about them, he had been very busy and they had slid further and further down the priority list. No biggie at all, he promised to get them done ASAP.


Janne had to make an extension of the bracket, and so will I.
Bugger!


There´s even discussions here and there that the original belly fairings were made of aluminium from factory. I´m not completely convinced about that, though.
Any thoughts out there?

Thanks.
As you can see I only have three holes for the Dzus fasteners. The original have four...
I believe "Esso" cut the lower part at the rear of his fairing to accomodate is rather large racing boots. Not comfirmed yet, but that is my theory.

Rather cramped-up space everywhere. Tight fit between the fairing and the engine on both sides.
You can tell I will need those bracket extensions as well. I just need to figure out how long they have to be.


My garage is very small and lots of things have to take place there and on the same time at times. Crowded but cosy.

I even started on my new H2 build, to resurrect "Snow white", my ported H2 special. That has given me something to do while waiting for H1R stuff to get ready.
Yeah, I know, I could have safety wired everything else that needs it, but no, Not yet.
A friend in Norrköping paid Bert a visit a while ago and he was allowed to snap a few shots of the progress being done!
The top part and the sides of the tank are welded together and the bottom part is being adapted to fit the top part.


Belmir at Konturverktyg came through with my fairing fasteners. I kindly asked him to make a few of them extra and he did...
16 of them to be exact.
The original fairing screw up front and the copies behind.

Those copies are made from stainless steel and can be polished or sanded to the exact finish you like on your own project.
The original on the right.

Making these fasteners was one thing.... Below is something completely different!

My problem was my braced JMC aluminium swing...
It is wider than the stock steel swing arm and the shaft that holds the brake pedal was a bit too long and interfered with the swing arms movement. Yeah, I could go back and use the stock swing, but this is going to be a rather spacial build.... So no, No can do!
Belmir simply made me another one, stainless steel, shorter but with the exact angle for the pedal and the brake puller... I just love it!

PMC rear sets, Kawasaki H2, Sick engineering and quality. As long as you use the original bike frame and other parts...


Stunning work at a very, very reasonable price!

He had questions about the tank filler and petcock threads and our plan to use steel parts in those areas.
He was worried the sealing he would use screwing the steel parts to the aluminum sheet metal would burn when he starts to weld the tank halves together...


The internal petcock thread idea is actually quite good since that will lift the petcock even a bit higher in to the surge tank at the bottom there. Now I´m just anxiously waiting even more for the tank to be finished..

Such a nice touch to provide one extra of all decals... The probability for me failing getting them on right is quite high.


Just a very brief moment I figured I´d try to save the dust on it for the pictures... What a God sent thought that was!
These, the very first pictures I took, are extremely valuable to me now. Part for reference when it comes to fitment of stuff, but mostly to remember what it really looked like and to be able to see today, how much effort has been laid in to the project.

I thought I´d have it done in one or two years. That didn´t happen, did it?
I think, maybe, possibly I can have it started and test run this year. To do this I need the alu tank, a pit starter and a lot of work done on the fairing.... The tank will probably be done the coming weeks and I will try my best to muster up the energy to work on fitting that fairing in a good way.
For starters I´m off to work for a few days and soon it is time for the annual Kawasaki triples meet in Jondalen, Norway. I´ll be going for the first time ever... I´m super excited about that!
Stay tuned, guys!
/Per
Inga kommentarer:
Skicka en kommentar