Another month has passed. Almost, anyway. Time flies when you´re having fun, they say. True.
During this last month I´ve been checked out as Flight Captain on the A330. That was that, career-wise... Not much more to strive for at work unless you feel the need to start an administrative career. I for sure don´t need that! I´m perfectly happy where I am right now. More time to spend in the garage doing bikes.
Speaking of which, that is exactly what I did today. I spent a few hours cleaning the wheels for the H1R as a preparation for hand polishing OR total dismantling and restoration, the well known, "There-are-no-shortcuts-to-perfection" way. I am, to say the least, ambivalent in this respect and considering what happened to the engine and frame, we all know where I´ll end up. Well, we´ll see ´bout that!
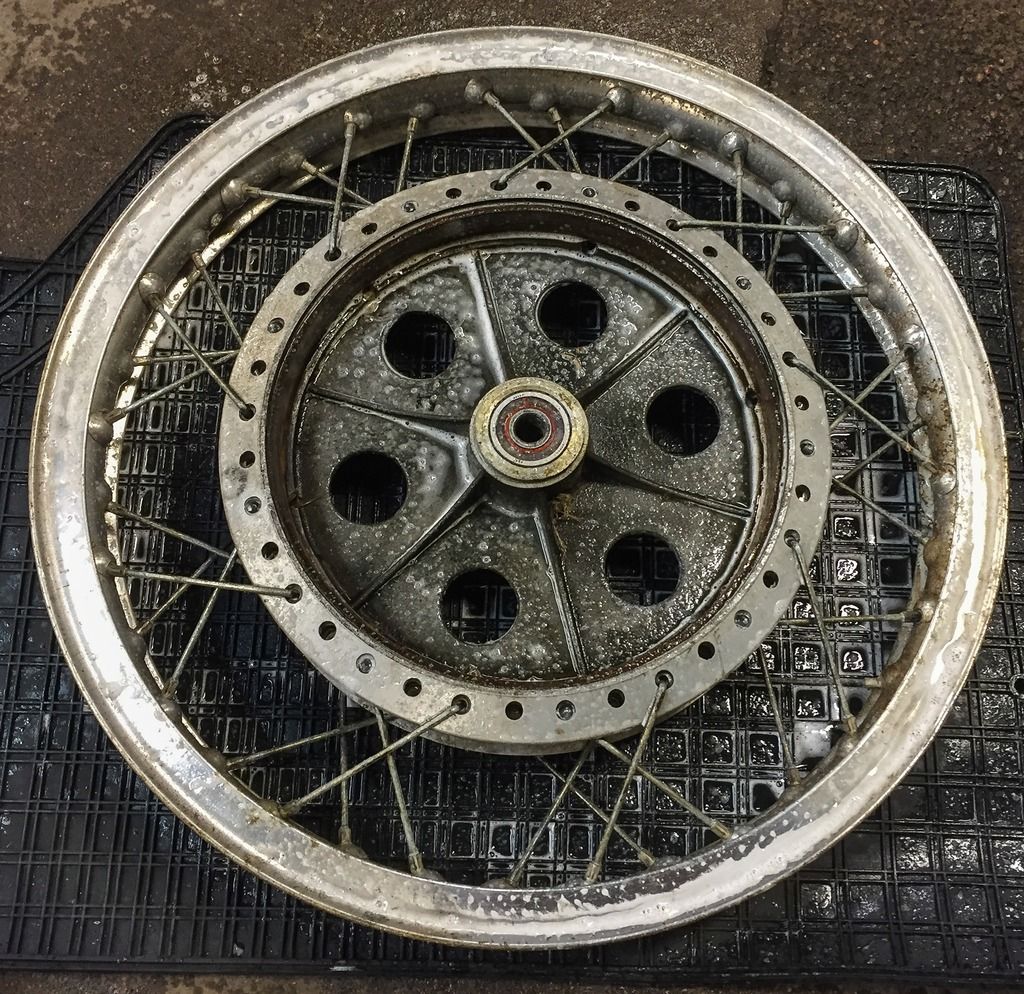
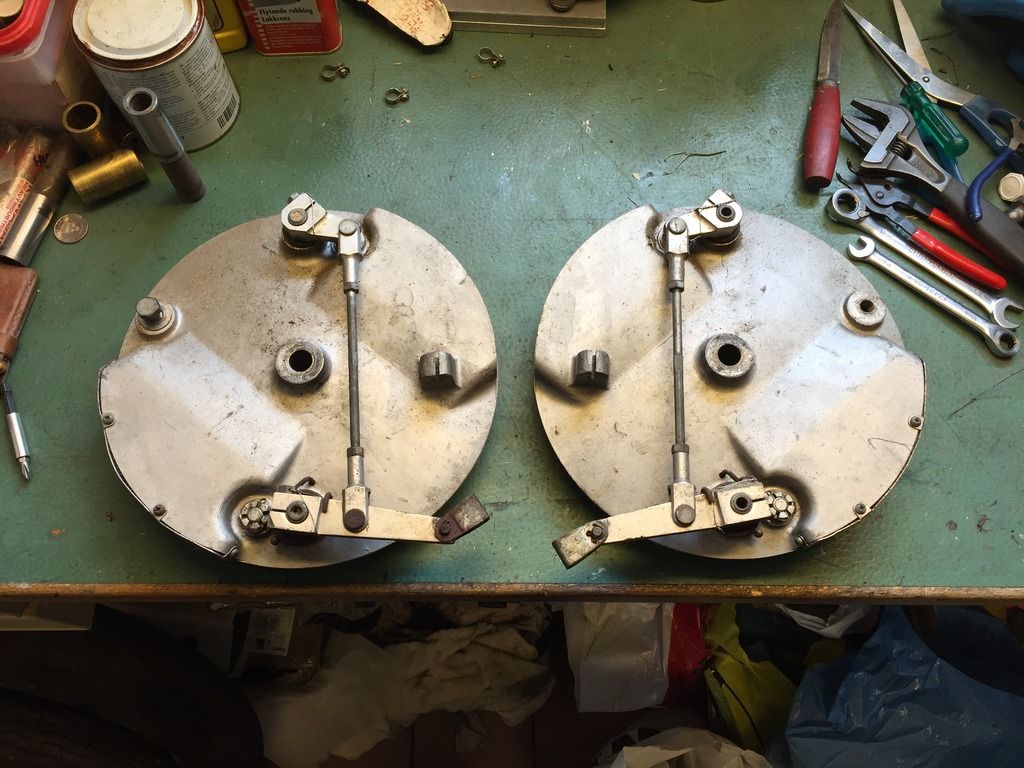
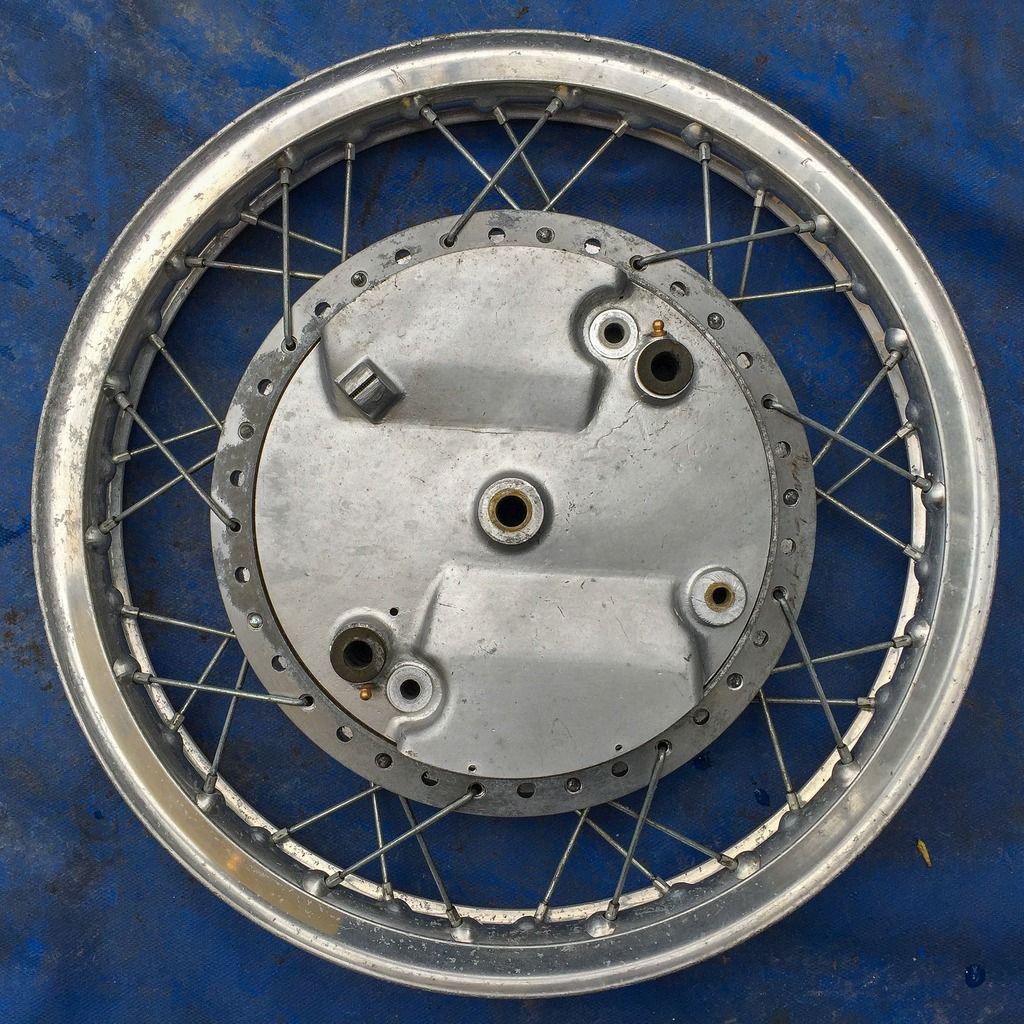
Here´s the starting point for the front wheel. Let´s dismantle the brake plates!
As you can see there´s a lot of corrosion and rust going on on various parts of the wheel and brake parts. Corrosion and rust is a big No-No on this rebuild and will have to be taken care of. I am once again taken aback by how lightweight and optimized these things are. Aluminium actuators and "forks" where the street bikes have steel parts. Very thin sheet metal brake wire brackets and also very thin and light brake plates. I took a lot of pictures here to document everything I removed from the plates. It doesn´t look to complicated, but I know, from experience, it is crucial to have lots and lots of pictures. Usually I end up needing pictures I never took anyway. Well, that´s life!
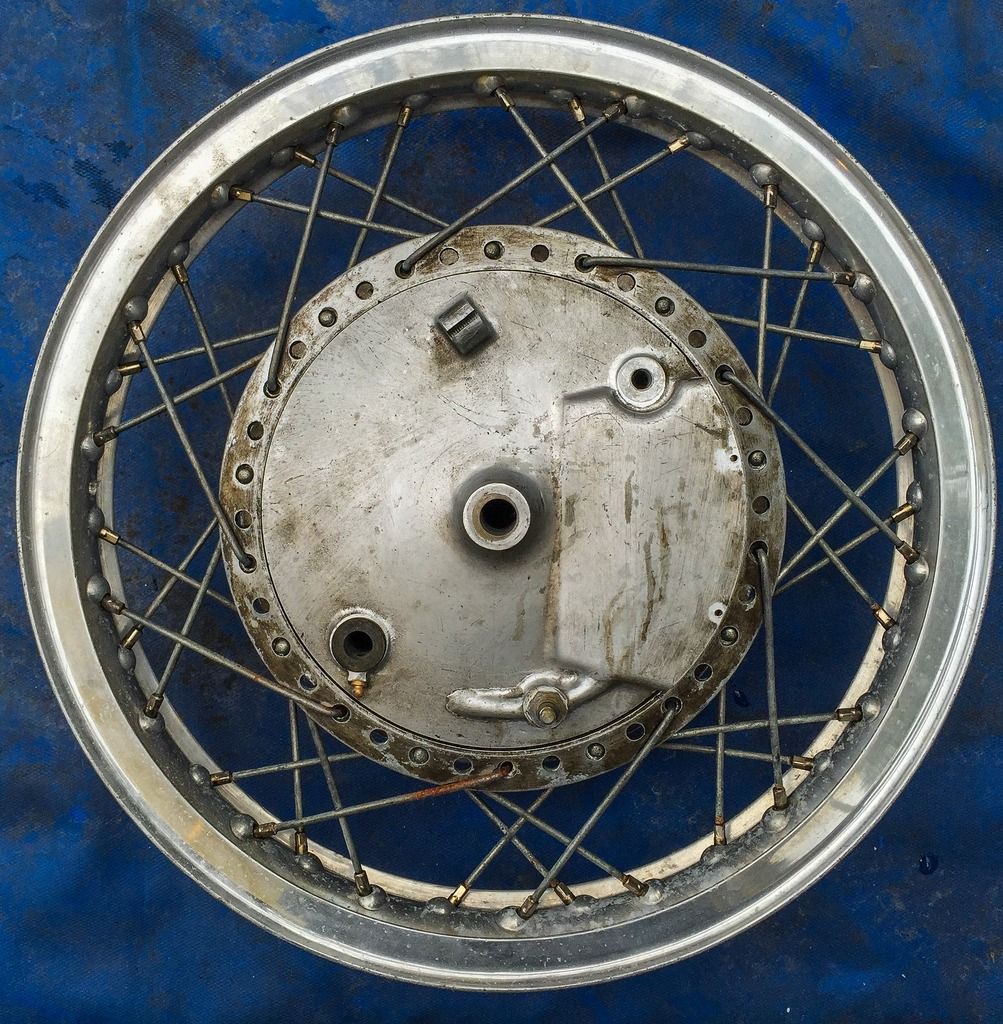
When we turn the brake plate around we can see the dual action brake system and how it is constructed. Note also how good condition the brake linings are! Seems to be brand new and never used. Nice, saves me a trip to the brake liner specialist and a few bucks...
The brake cable pulls the long arm on the outside and that one is connected to the shorter one via an adjustable rod. These two "actuators" each turn a cam on the inside of the brake plate and thus expands the two brake shoes. The thing is to have two of each on each side of the front wheel. This is called 4LS brake "Four leading shoe brake" They are actually not that bad, if correctly adjusted, and that will be a later problem. I remember adjusting the 4LS brake on my Suzuki GT750 1972 when that restoration was getting close to being finished... Not easy, but great fun!
On the front side of the panels the mechanism is clearly visible.
Most everything on these panels are safe-tied or locked in place by castle nuts and cotter pins. They look quite OK, just need a good clean and a bit of rust removal/rezinking.
We´ll see how good these springs and screws will get in that process. They need to be adressed, that´s for sure!
I´m collecting all these small parts in a bath of white spirit to loosen up grease and oil and then I´ll go over every nut and bolt and prepare them for rezink. This is the type of tinkering I´m very good at. Some good music on the radio and the hours just fly away... I Haven´t got much machinery so good old elbow grease will have to do.
The rear wheel got the same treatment and was taken apart for cleaning and inspection. The rear sprocket came off as did the rear brake panel and parts
Lots of dirt and grease here as well. Interesting here is the lack of a cushioned sprocket carrier as seen on the street bikes. The sprocket attaches directly to the hub. That must be rather unforgiving for both engine and wheel when you race hard.
The inside of the rear hub contained even more of that hay from the barn... Easily removed with some compressed air.
 The rear brake is a "single action" more ordinary type of brake drum. Interesting way to mount the brake shoes, though. Maybe they did it this way to make place for larger diameter brake shoes? Never seen it on any street bikes.
Here´s the moving brake "cam" with it´s grease nipple and the brake linings on the shoes clearly visible. These are also in very good nick!
Thanks!!
After a couple of hours everything was in pieces. The small stuff bathing in white spirit and the larger awaiting further cleaning. The next step was to get the tires off...
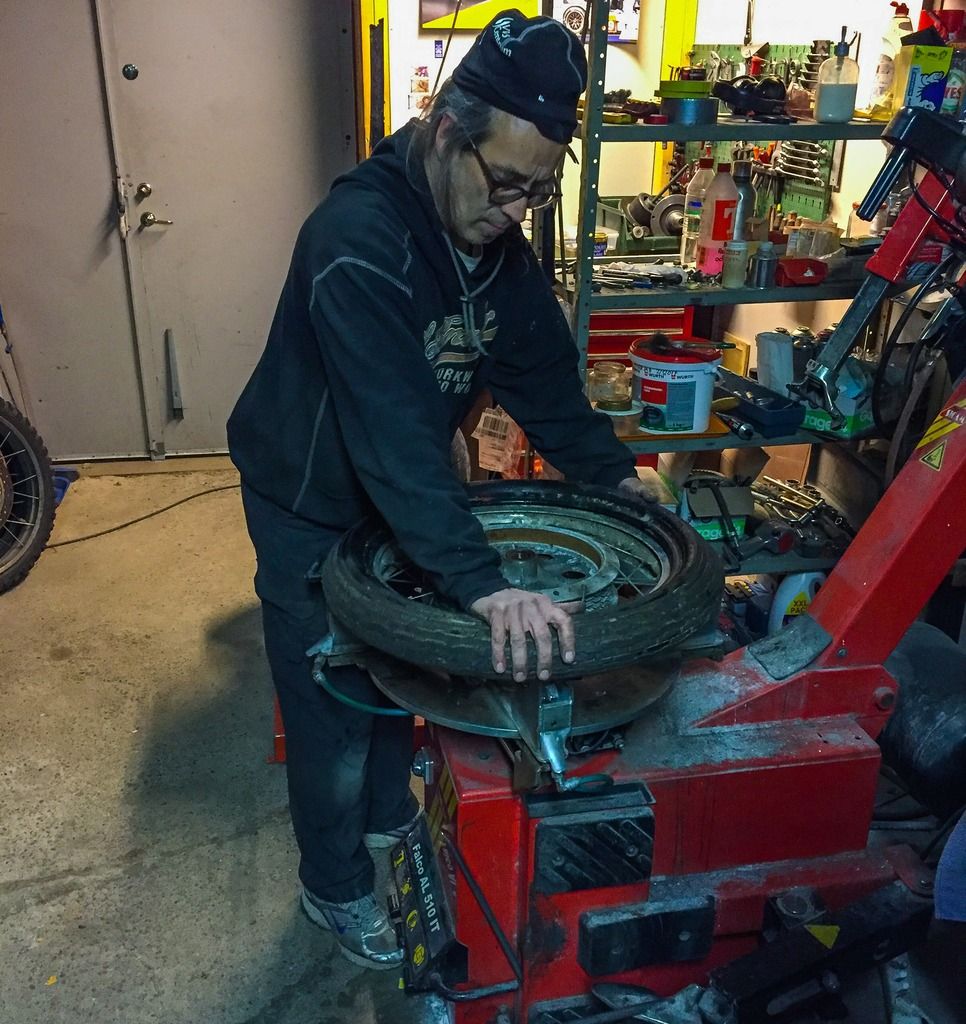 Removing (and mounting..) tires here in Stockholm is a job we all leave to this man. "Wheeler dealer" in Nacka, just south of town. He´s simply the best! Such a nice guy to talk to during his work. He knows all there is to know about tires and never fails to let you know when you got something wrong. I spent a couple of hours in his shop watching and learning. He will do the rebuilding of the wheels if it comes to that. At this stage I still haven´t decided...
After my visit to Wheeler dealer I went back to the media blaster company and discussed what to do with my dirty and corroded wheels. I had read about ice blasting and thought that would be a good route to take. It sounds like a good idea to keep the wheels together and just blast away with dry ice and get them thoroughly cleaned. Well, turned out that wouldn´t happen. Pelle at "Allblaestring" did NOT recommend it. He said it would not work, period! OK, I usually listen to people and go by what they say, especially people who know their business, and Pelle does! Maybe I´ll have to rebuild the wheels totally?
Now, that would be the easy way to choose. Measure the offset, if any, and just remove all the spokes and nipples and get everything to as new condition. I did that on the engine and frame. Mostly because of the state they were in. I believe maybe the wheels can be spared that treatment... Let´s start with more cleaning!
There are many makes of "wheel cleaners" out there. They all have very good de-greasing properties and they also remove old brake pad/lining dust from aluminium parts. Some of them have color coding when the product has been on for long enough . These usually turn purple when the brake dust has been resolved and is ready to be sprayed off.
I took my wheels and brake plates across the street to my friend with the automotive shop and used his high pressure washer and a few different bottles of chemicals...
Here´s the front wheel covered in wheel cleaning solution waiting to be sprayed. Don´t worry about the wheel bearings... I´ll be changing them later!
And here is the rear wheel waiting to be treated the same way... The guys at the shop have a real good high pressure washer that removed all grease and grime. the wheels and parts were left clean, but slightly corroded.
Here they are. Clean and waiting for the final "blow job". Getting the water off by compressed air. Now it is time to decide what route to take.
Elbow grease for a few hours or complete dismantling and restoration, polishing, rezinking, painting and finally rebuilding...?
I took the wheels back home and put them on my trailer outside to see what I had to play with in broad daylight. My goal is to restore the bike to the condition it was in when "Esso" won the Swedish GP in July 1970. He had raced it a few times by then so it doesn´t have to be "brand new". It can show marks of racing and a little wear and tear here and there and I firmly believe I can do that with these wheels!
This is the worst side of the front wheel. You can see the silver gray paint flaking here and there on the edge of the hub. Yes! These wheels were actually painted from the factory! I spent a couple of days researching the internet and asked a few of my fellow restorers about this and they all came back and said the brake plates and hubs are painted... That was news to me. I´m going over to Janne to check out the exact tone of silver gray and get a can of something close to check if I can fill it in where needed. If not, I´ll just leave it as is.The rims will be polished by hand as will the spokes and nipples. Yeah, a whole lot of work! But I love it!
The rear wheel has taken a lot more grease and oil. Both from the drive chain and the exhaust system. The brake plate will need a light sanding, probably, and the edge of the hub a good polish to be acceptable. Well, that´s an easy task. Just put in the hours!
The drive sprocket side looks about the same. Some loss of silver gray paint here and there, but nothing major. I´m a bit puzzled by the "Borrani" rim on my H1R. I believe "Esso" changed it sometime during his ownership of the bike and then it´s been there. If anyone out there has an original Kawasaki rim I´m interested!
The spokes on the rear wheel seems a bit more corroded than up front. I MAY have problems leaving them, but I´ll try. I know you won´t see it that obviously when everything is back together, It is so easy to stare at a flaw at this stage and go too far in fixing it. Wish me luck....
I´ll leave you with this last picture of the brake plates and brake shoes on the bench. The shoes all have been media blasted (aluminium oxide...) to get them clean and good looking. I need that for myself when reassembling the brakes. Now it´s time to attend to the surfaces of the wheels and plates. A good polish and maybe a bit of paint improvement is what´s up next.
I´m still waiting for my front fork stanchions to be finalized at the grinder´s. We´ll see how long that will be. Hopefully not too long!
All the small parts will be going out to rezink this week (hopefully...) And when they get back I´ll start assembling the frame and triple trees... The true turning point!
Stay tuned.
/Per
During this last month I´ve been checked out as Flight Captain on the A330. That was that, career-wise... Not much more to strive for at work unless you feel the need to start an administrative career. I for sure don´t need that! I´m perfectly happy where I am right now. More time to spend in the garage doing bikes.
Speaking of which, that is exactly what I did today. I spent a few hours cleaning the wheels for the H1R as a preparation for hand polishing OR total dismantling and restoration, the well known, "There-are-no-shortcuts-to-perfection" way. I am, to say the least, ambivalent in this respect and considering what happened to the engine and frame, we all know where I´ll end up. Well, we´ll see ´bout that!
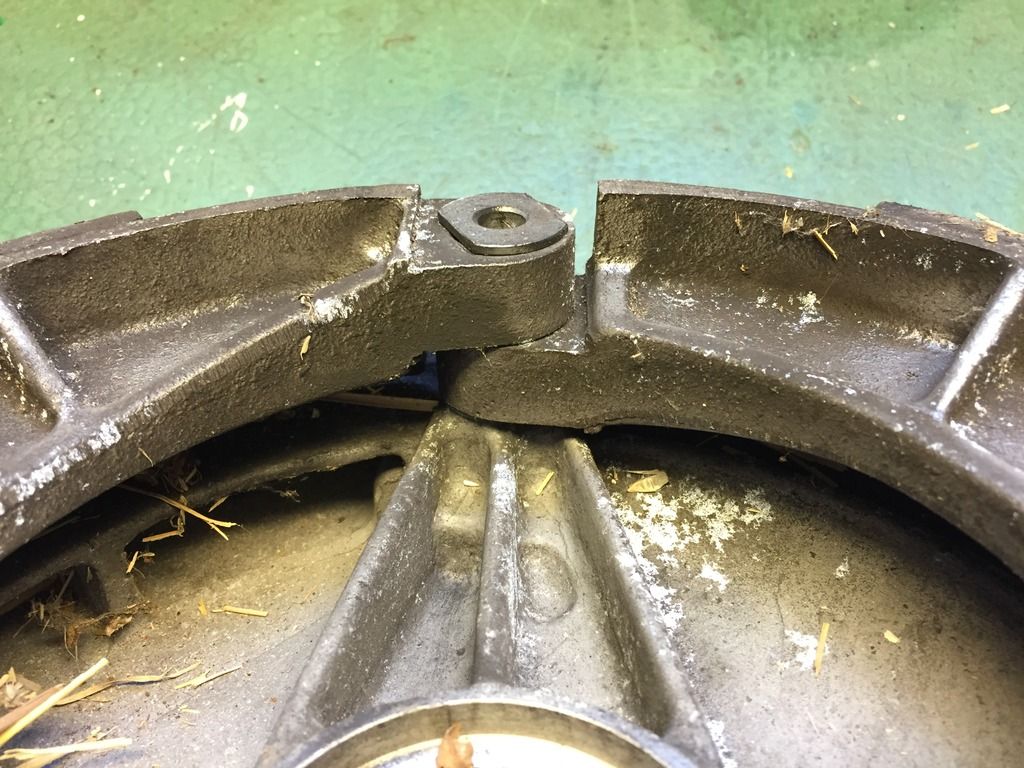
Here´s the starting point for the front wheel. Let´s dismantle the brake plates!
 |
| Front wheel starting point. |
When we turn the brake plate around we can see the dual action brake system and how it is constructed. Note also how good condition the brake linings are! Seems to be brand new and never used. Nice, saves me a trip to the brake liner specialist and a few bucks...
 |
| Dual action brake. |
The brake cable pulls the long arm on the outside and that one is connected to the shorter one via an adjustable rod. These two "actuators" each turn a cam on the inside of the brake plate and thus expands the two brake shoes. The thing is to have two of each on each side of the front wheel. This is called 4LS brake "Four leading shoe brake" They are actually not that bad, if correctly adjusted, and that will be a later problem. I remember adjusting the 4LS brake on my Suzuki GT750 1972 when that restoration was getting close to being finished... Not easy, but great fun!
On the front side of the panels the mechanism is clearly visible.
 |
| Front side of the front brake panels. |
We´ll see how good these springs and screws will get in that process. They need to be adressed, that´s for sure!
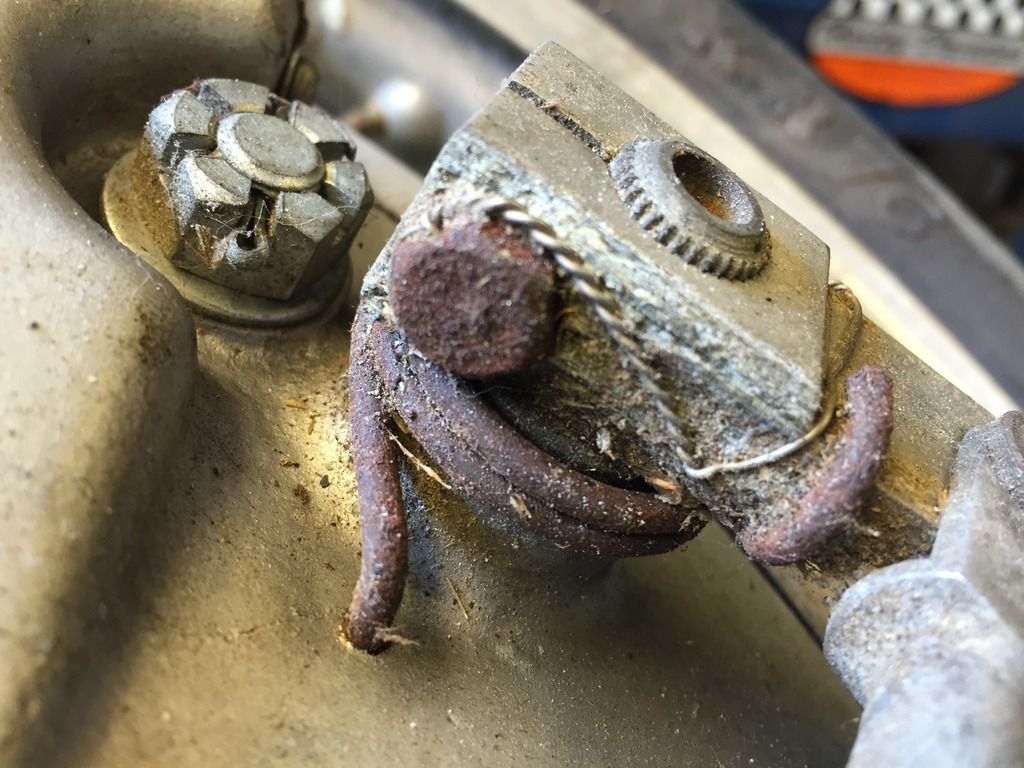 |
| Rust and grime. |
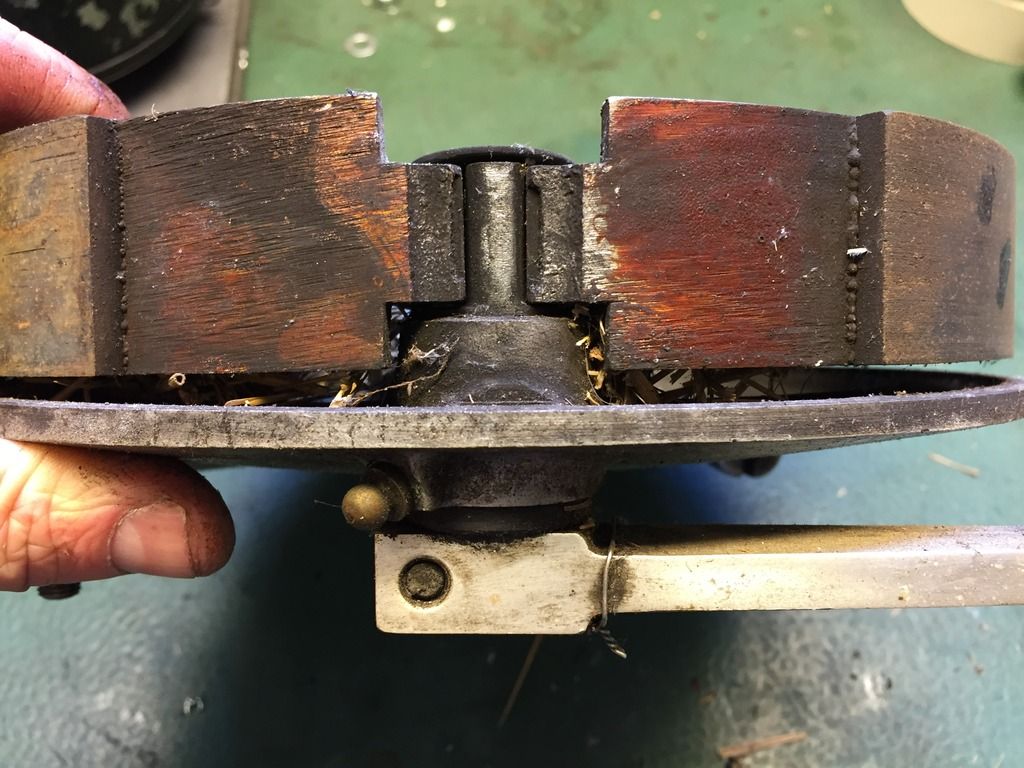
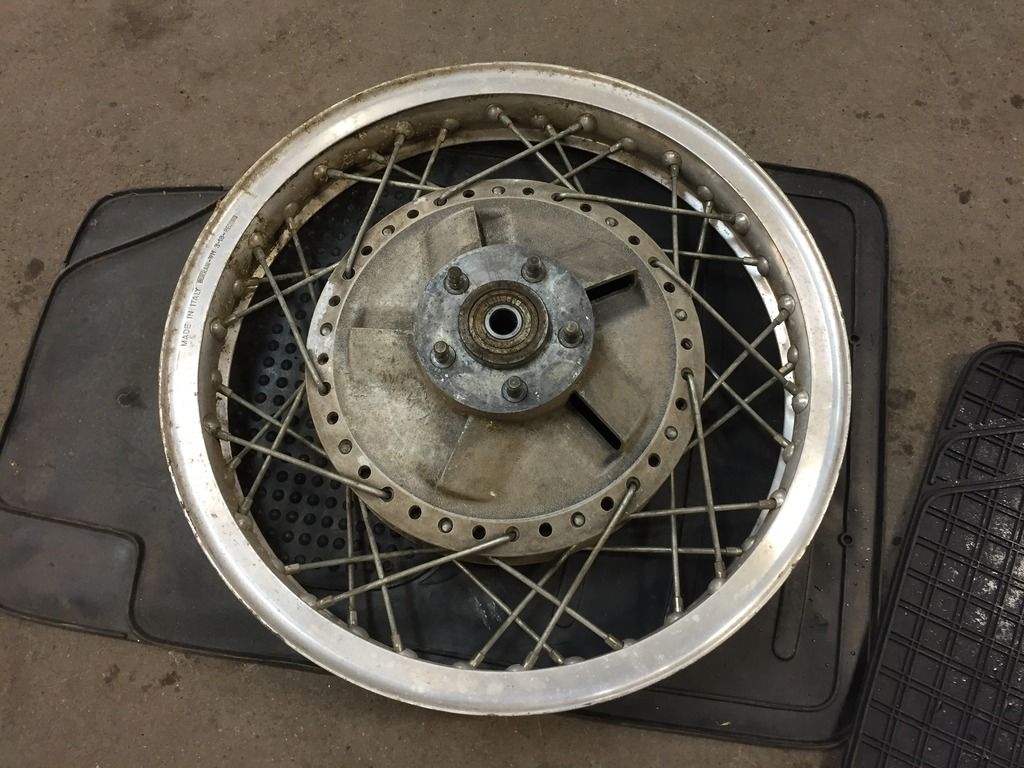
The rear wheel got the same treatment and was taken apart for cleaning and inspection. The rear sprocket came off as did the rear brake panel and parts
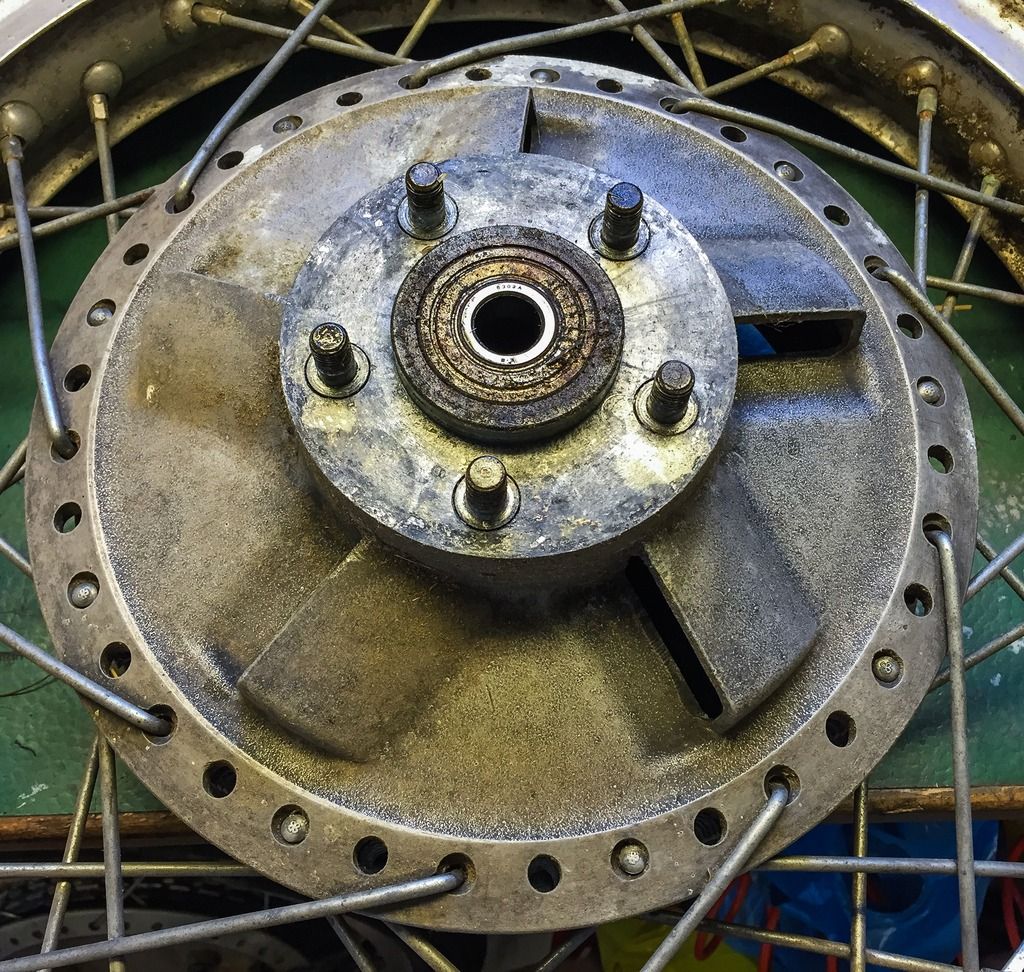 |
| Rear hub. |
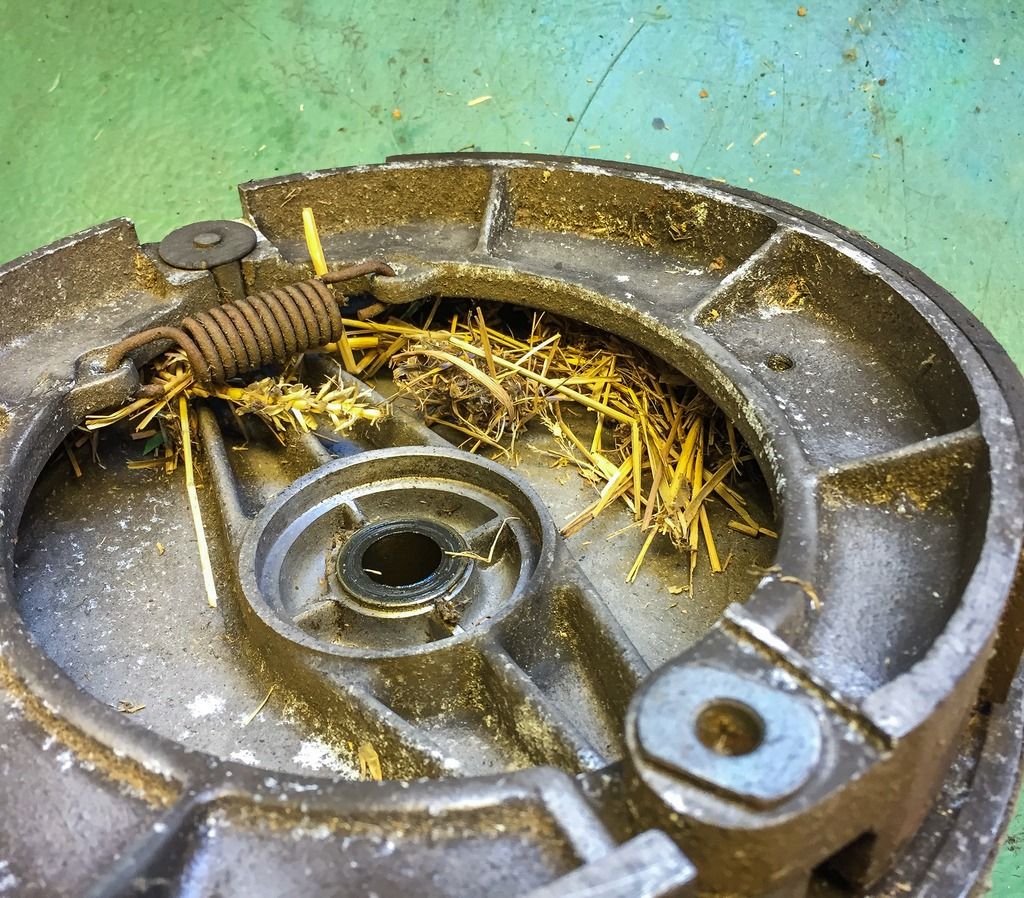 |
| Hay inside a race hub? |


Here´s the moving brake "cam" with it´s grease nipple and the brake linings on the shoes clearly visible. These are also in very good nick!
Thanks!!

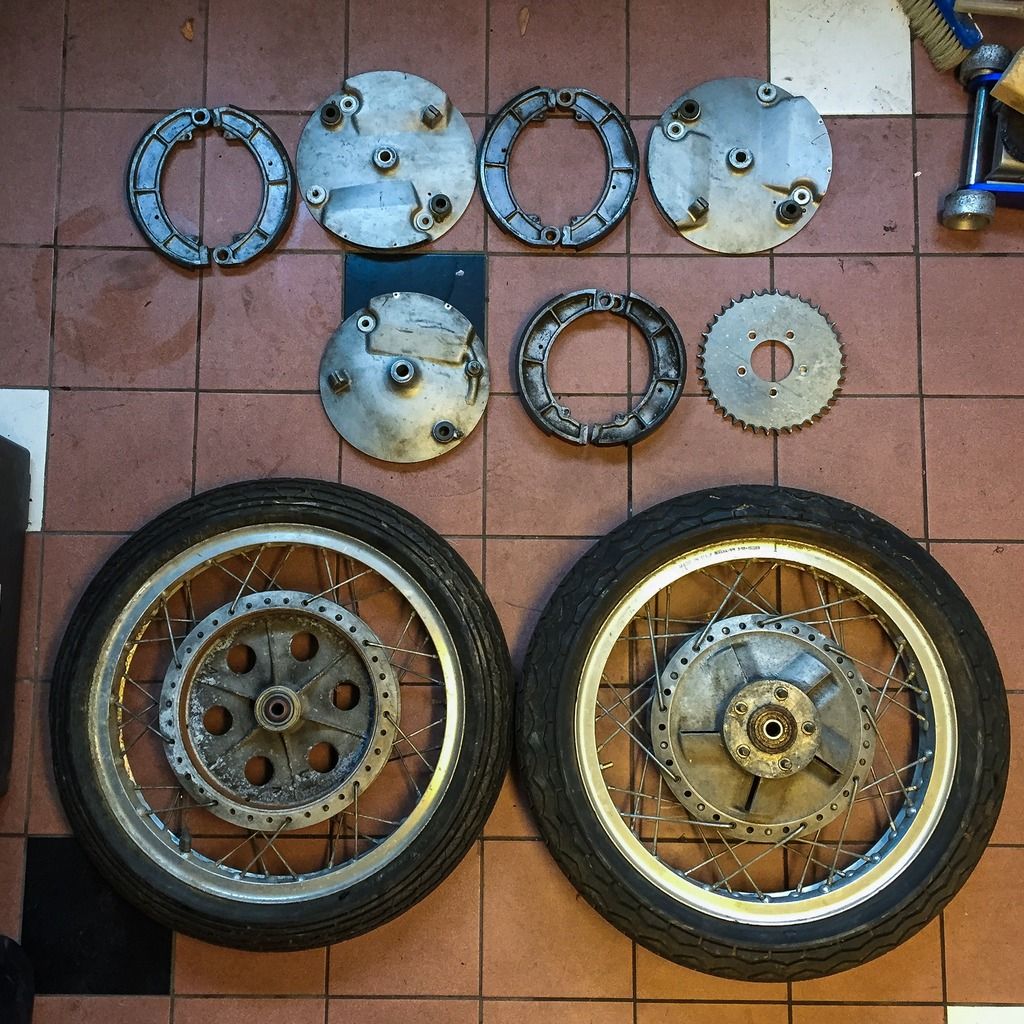
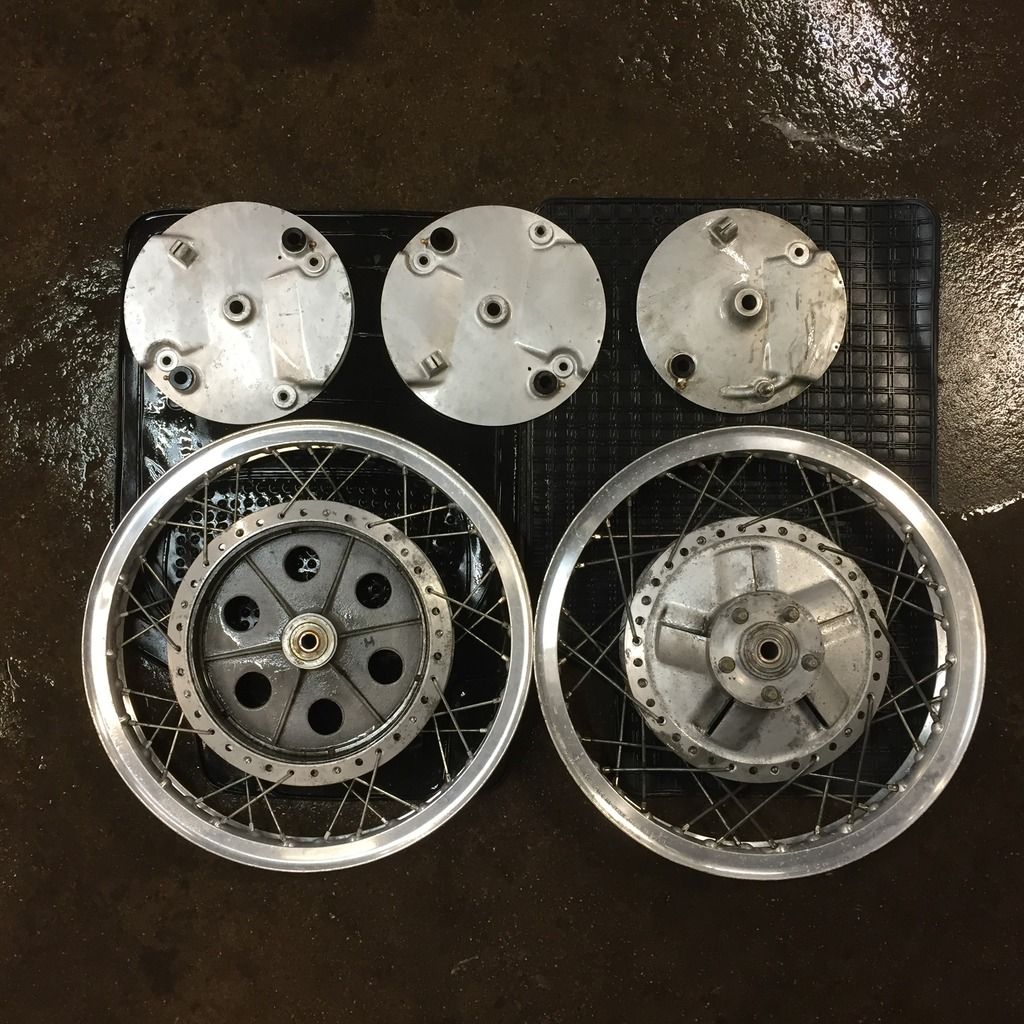
After a couple of hours everything was in pieces. The small stuff bathing in white spirit and the larger awaiting further cleaning. The next step was to get the tires off...

After my visit to Wheeler dealer I went back to the media blaster company and discussed what to do with my dirty and corroded wheels. I had read about ice blasting and thought that would be a good route to take. It sounds like a good idea to keep the wheels together and just blast away with dry ice and get them thoroughly cleaned. Well, turned out that wouldn´t happen. Pelle at "Allblaestring" did NOT recommend it. He said it would not work, period! OK, I usually listen to people and go by what they say, especially people who know their business, and Pelle does! Maybe I´ll have to rebuild the wheels totally?
Now, that would be the easy way to choose. Measure the offset, if any, and just remove all the spokes and nipples and get everything to as new condition. I did that on the engine and frame. Mostly because of the state they were in. I believe maybe the wheels can be spared that treatment... Let´s start with more cleaning!
There are many makes of "wheel cleaners" out there. They all have very good de-greasing properties and they also remove old brake pad/lining dust from aluminium parts. Some of them have color coding when the product has been on for long enough . These usually turn purple when the brake dust has been resolved and is ready to be sprayed off.
I took my wheels and brake plates across the street to my friend with the automotive shop and used his high pressure washer and a few different bottles of chemicals...

Here´s the front wheel covered in wheel cleaning solution waiting to be sprayed. Don´t worry about the wheel bearings... I´ll be changing them later!

And here is the rear wheel waiting to be treated the same way... The guys at the shop have a real good high pressure washer that removed all grease and grime. the wheels and parts were left clean, but slightly corroded.

Here they are. Clean and waiting for the final "blow job". Getting the water off by compressed air. Now it is time to decide what route to take.
Elbow grease for a few hours or complete dismantling and restoration, polishing, rezinking, painting and finally rebuilding...?
I took the wheels back home and put them on my trailer outside to see what I had to play with in broad daylight. My goal is to restore the bike to the condition it was in when "Esso" won the Swedish GP in July 1970. He had raced it a few times by then so it doesn´t have to be "brand new". It can show marks of racing and a little wear and tear here and there and I firmly believe I can do that with these wheels!
 |
| Front wheel, worst side. |
 |
| Rear wheel. |
The rear wheel has taken a lot more grease and oil. Both from the drive chain and the exhaust system. The brake plate will need a light sanding, probably, and the edge of the hub a good polish to be acceptable. Well, that´s an easy task. Just put in the hours!
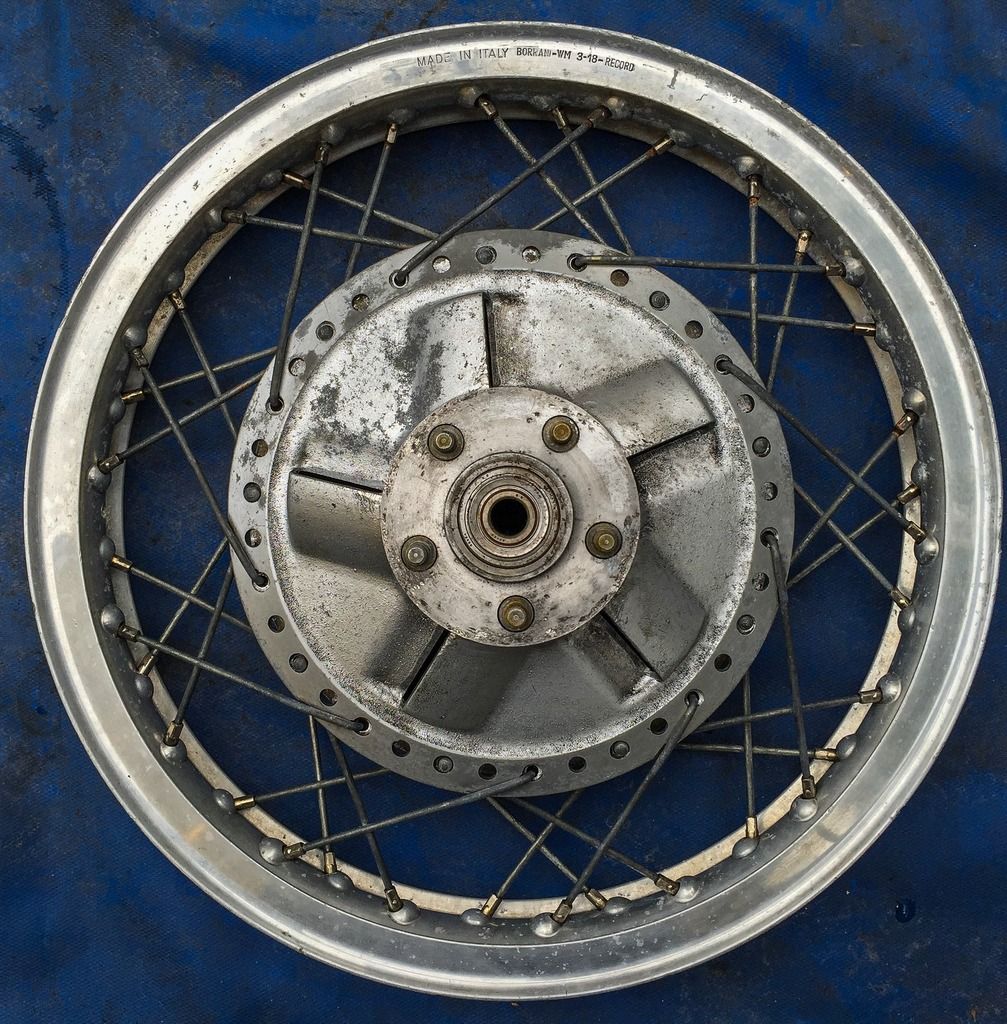 |
| "Borrani" rim...? |
The drive sprocket side looks about the same. Some loss of silver gray paint here and there, but nothing major. I´m a bit puzzled by the "Borrani" rim on my H1R. I believe "Esso" changed it sometime during his ownership of the bike and then it´s been there. If anyone out there has an original Kawasaki rim I´m interested!
The spokes on the rear wheel seems a bit more corroded than up front. I MAY have problems leaving them, but I´ll try. I know you won´t see it that obviously when everything is back together, It is so easy to stare at a flaw at this stage and go too far in fixing it. Wish me luck....
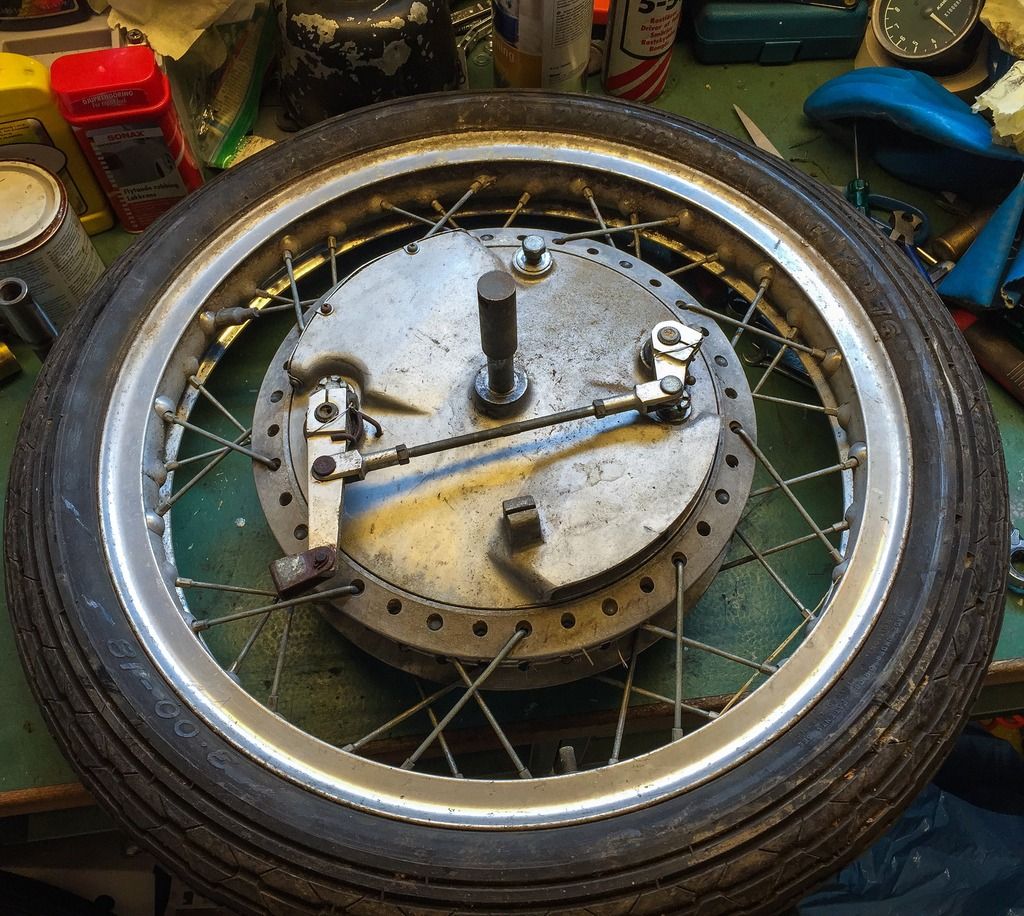
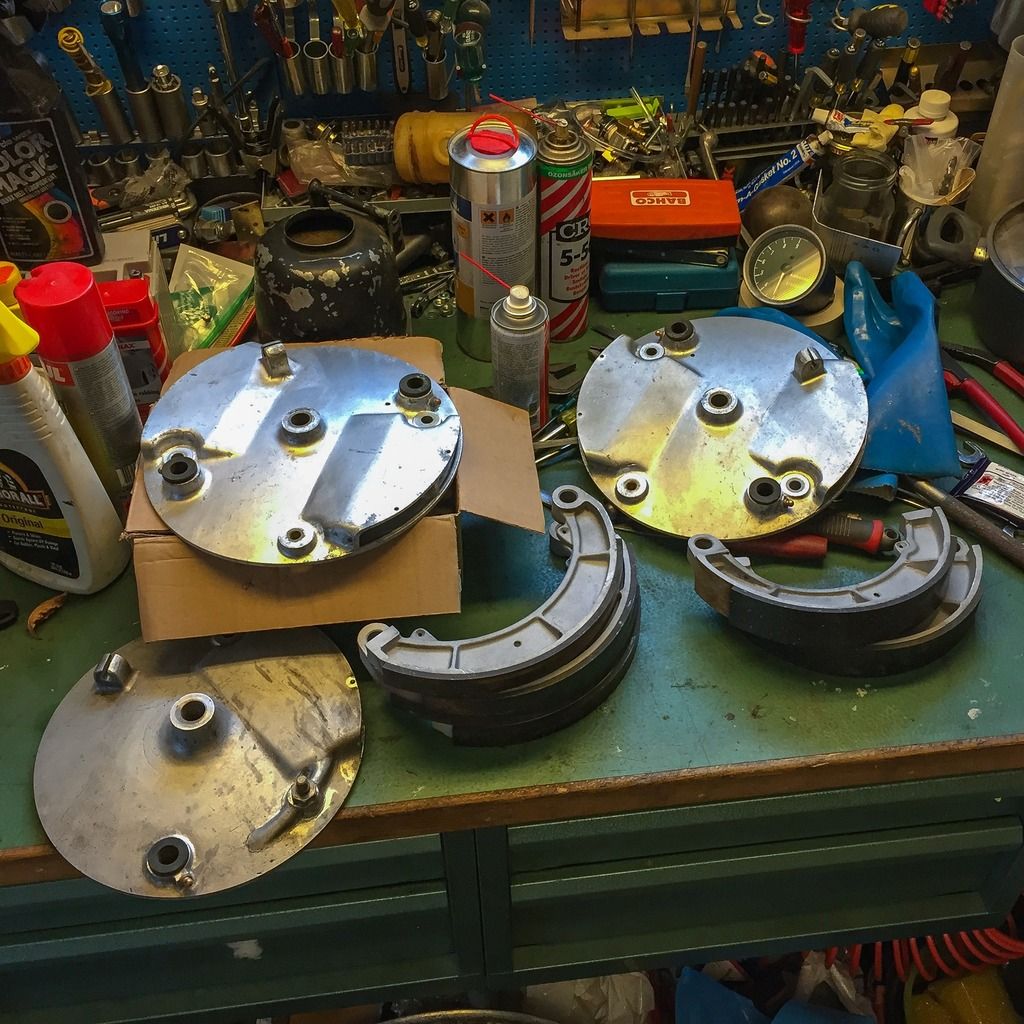 |
| Brake plates on the bench. |
I´ll leave you with this last picture of the brake plates and brake shoes on the bench. The shoes all have been media blasted (aluminium oxide...) to get them clean and good looking. I need that for myself when reassembling the brakes. Now it´s time to attend to the surfaces of the wheels and plates. A good polish and maybe a bit of paint improvement is what´s up next.
I´m still waiting for my front fork stanchions to be finalized at the grinder´s. We´ll see how long that will be. Hopefully not too long!
All the small parts will be going out to rezink this week (hopefully...) And when they get back I´ll start assembling the frame and triple trees... The true turning point!
Stay tuned.
/Per
Inga kommentarer:
Skicka en kommentar