The last three days have been busy with preparations and shopping for New Year´s eve here in Stockholm. Not that we´ll be having any big party or even be going to one... I´m working early tomorrow morning, the 1/1 2018. That´s quite OK since I got to stay home celebrating Christmas with my family this year. It doesn´t always play out that way in the airline business. After 30 odd years I´m getting rather senior so from time to time I get a few perks here and there.
Anyway, I was also able to continue my "marriage" preps for the H1R during my wife´s tour in to the city to do some last Christmas sale shopping. Nice.
 These little babies also had to come out of storage to be fixed before the engine goes back in the frame. They are some sort of "rubber dampeners" that shall reduce the amount of vibrations coming from the motor. I´m not quite sure about their actual function, but if the Kawasaki engineers felt they would do the job, I´m putting them back. I know Janne has a couple of these extra but I´ll stick with what I have, for now. I will, however, put the two in worst condition on the top mount of the engine where they are easily changed. The bottom engine mounts are much harder to reach once the engine is in place.
 The actual lifting of the motor needed careful planning. My rear wheel is out of the frame for rear sprocket fabrication in Tumba at ISR. That makes the frame lighter to handle so I figured this was a good time to try lifting the engine in place.
 I put my sturdy toolbox under the frame with a layer of fabric on top. The engine rests on a plastic box just beside the frame. My plan was to carefully nudge the engine inside the frame on to a plank and then somehow lower it into the engine mounts and have someone help me getting the engine mounting bolts in place while I held the engine and adjusted it to line up the mounts and the bolts.
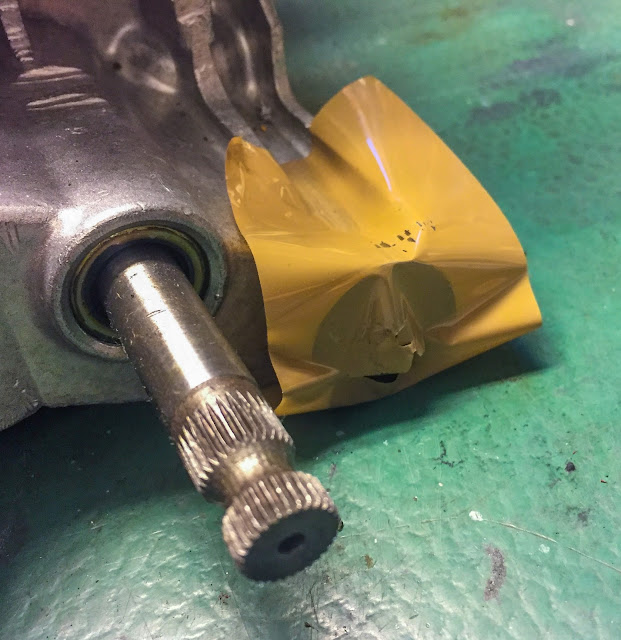 That plan fell short immediately! The rubber mounts would not stay put when I lifted the motor. The solution was simple. Packing tape is real thin and will not interfere with the distance between the engine mounts on the frame and the engine itself. The plank had to go as well. Too tick getting the motor too high. I also had to move the left hand fairing bracket out of the way (I should have seen that one coming earlier....)
 Only one of the rubber fit snugly in the engine. The one in the front part of the engine Ebbe had repaired for me. That hole had the exact correct diameter. The others were slightly enlarged.
 All the rubber grommets in place and the engine is ready to be lifted in to the frame! here we go....
 Bit by bit, nice and easy and real slowly the engine was nudged in to position. Here I´m close! The plank had to go so I used an old rag instead to somewhat protect the frame from scratches.
 It took some lifting, wiggling and quite a few strong words but after a while I had the top front engine mount and frame bracket lined up enough to use a screw driver to push the engine in the right way to let the engine bolt enter.
 Getting the bolt through the left side was rather easy. The right side a little more complicated, but after a few more drops of sweat and some cursing I got it in. Straight through the packing tape and out the other side. Good start!
 And here you can see the bolt on the left side. I chose to put a washer here even though it´s not needed according the parts manual. My bolts are a tad long and I also honestly think a washer is needed here. Later on I will probably have to remove the bolts one-by-one to have them drilled for safety-wiring anyway, so this solution isn´t 100% decided yet. I was rather keen on getting the engine back in the frame today so I skipped that for later!
 When I had the top front mount in place all I had to do was lift the rear end of the engine carefully and get the rag off. Yeah, I had to tear it off bit by bit, but I´ll take that loss! Here´s the result from the right hand side. Looks good, aye?
 And the left hand view. Much more to do on this side of the engine. But I feel real nice having married these parts today! This is one of the greater moments in any motorcycle restoration. Now, let´s just hope I won´t have to take it out again... I wouldn´t be surprised!
 This process took some space in my garage as you can understand. Most other parts and things had to move out of the way for a while. Here´s a snapshot of my "mancave" tonight, New Year´s eve. Pretty dominated by Kawasaki racers...
 After this weekend and my next work trip to New York I hope my rear wheel will be finished. The next mission is getting that back in the swing, putting the front sprocket on and mounting the drive chain. The seat is soon coming back from Delsbo and after that this project will look much more like the vintage racer it is.
 The last picture today shows the tank, frame and engine together. This is where the build gets real fun and interesting. All these small parts getting back on, all the parts needing adjustments to function as they are supposed to and also the final touches on the tank and the paint etc... All such nice work!
For now, I wish you all a very Happy New Year and a really prosperous 2018!
/Per
Anyway, I was also able to continue my "marriage" preps for the H1R during my wife´s tour in to the city to do some last Christmas sale shopping. Nice.


For now, I wish you all a very Happy New Year and a really prosperous 2018!
/Per
Den här kommentaren har tagits bort av skribenten.
SvaraRaderaAlready a Beautiful bike! Can hardly wait for the next chapter ;)
SvaraRaderaAll the best in 2018!
Thanks!
RaderaI´m now waiting for the rear wheel and the seat covers!
Wish you a nice 2018 as well!! /Per