I am sorry for leaving the blog for such a long time. It was never my intention it would be more than 7 months between posts in it, but that´s the way it ended up... My lack of motivation in the project, my getting another H2 to work on (which proved to be a whole lot more fun to do....) and the extremely tough job finding correct parts for the H1R are the major root causes for this delay in the project.
Please remember I never did set up any schedule for the restoration, because I guessed it would be hard getting stuff and I figured I might loose concentration and face times of diminishing motivation from time to time. I do fully understand if you think I´m having luxury problems here, but they are very real. Wouldn´t every Kawasaki triple enthusiast just dream of taking over this project? Absolutely! But they wouldn´t like the endless, resultless search for those obscure, extremely-hard-to-find-bits needed to continue working on the bike.
Believe me, it is very frustrating to know people are holding on to stuff they have in stock as some kind of investment instead of sharing it with someone actually working on a bike.... Oh well, enough moaning. Here´s what I have been doing the last couple of weeks!
 I figured I´d start off with something easy. I knew from day one I would need to get a replacement for 92072-008, Band Tool, that holds each side of the fairing in place, connected to the frame by the two small "cups" you can see in the picture top left. Those parts are, of course, impossible to find. I´ve been looking for 2 years now and have come to the conclusion I´ll never find the original one. So, what to use as a replacement?
 I looked up some alternatives on eBay and bought a few candidates. It´ll show later on I made a mistake here, but it is a rather understandable one.... On the right here are 3 of them and below follow a presentation of the crafts they came from. I know it is a parenthesis, but I find it amusing.
 In the picture on the left you can see the Kawasaki WSAA 1973-74. A very early "One passenger water craft" that uses 92072-502 as a fuel tank band. Will I be able to use it on the H1R? Maybe, maybe not!
 Here on the right is the Kawasaki Jet Ski 550 SX that uses 92072-3766 as a Battery band. Maybe that´ll work better...?
 And last, but certainly not least... is the Kawasaki Jet boat "Jet Mate" from 1989-1992. Far from an H1R, very far... But will the 92072-3726 "Band" work as a fairing retaining part? The answer soon to come!
 The "cups", still uncleaned and unpolished here, are attached to the fairing with a large headed M6 screw and then goes over the rubbers on the frame brackets as shown here on the right. The hooks are for attaching the fairing rubber (band tool) and pull them inwards and in that way keep the fairing snugly in place. All good in theory...
 OK, first out is the WSAA fuel tank band. Way too long as clearly seen here. Nice shape on the metal hooks, but no, they won´t do. Too bad since thay were the oldest parts in my collection of replacements. On to the next one!
 Next up is 92072-3766, the Battery band from the 550SX. Much better! My plan here was to remove that asymmetrical metal plate on one of the ends for a better look. But, as you can see, it actually pulled a bit too hard on the cups without that bracket so I tested the last option first...
 92072-3726 seems to be the best replacement so far. I straightened the brackets some and slightly enlarged the holes to accommodate the hooks on the cups. Yeah, this works!
 So, here´s my solution to the fairing retaining problem so far. A "Band" from a rather ugly and not very glamorous Kawasaki Jet boat.... Will it work in the end?
We´ll see... after all this fettling I realized they used TWO rubber parts, one on each side that was actually just wound up around the frame brackets and then hooked up to the fairing cups. I just thought I´d share this rather odd hunt for replacement parts with you guys...
The next project within the project came about after I finally found that illusive 21103-004 cam. Suddenly, one day a few weeks ago, it turned up in my saved searches for H1R-parts on eBay. It was my dear friend and "parts pusher" Dave Howard in England that had posted one on eBay. I double checked the part number within seconds on my iPad, where I keep the parts catalogue, and bought it! I wrote him a "friendly" reminder of the list I sent him about two years ago where this was one of the parts I needed for the restoration. He was very sorry for his mistake, forgetting about my wish list, and offered me a second one right off the bat. They arrived safely after a few days. Thanks a lot, Dave. These are badly needed here!
 Such small things and still so very, very important. I´ve been searching for these for more than 2 years and have seen exactly 0 during that time. And now I have 2 of them!
 Not only did he list the cams, he also listed a set of NOS condensers for the H1R. Yeah, I know, I have a couple of sets already... But, as I said earlier, when something shows up... BUY!
 Now it was time for a very interesting comparison. What is the difference between 21103-004 and 21103-005. Ignition cam for the H1R and the H1B? After a first quick glance there seems to be no difference at all. Note I had to label them very carefully not to interchange them.... From this angle there is no difference visible. There are some marks on the side of -004 that are not present on -005 but when it comes to measurements I couldn´t find anything different.
 Let´s try another view. From the topside. Here i have tried to catch the difference in angle (if any) between the slot at the bottom where they attach to the rotor and the slot at the top where the timing mark plate is situated. I see none.
 I also measured the diameter of the hardened surface where the breaker point tab is resting and opening for the timing cam on these babies. Same diameter both on top of the cam and at the lowest part. There seems to be no difference in angle for the highest point of the cam either. the only thing I´m having problems measuring is the "duration" of the breaker point lifting surface. Well, since they are different part numbers I guess there is some kind of difference between them but, so far, I haven´t been able to locate it...
 Anyway, that research will continue. I have two -004:s, remember. And a couple of -005:s for the H1B. On the right here are the parts now ready to go on to the bike!
My refurbished stator (still with H1B condensers), the rotor, the cam (now the correct one), fasteners for the stator to the engine cases, timing plate and the long fastener for the rotor, cam and timing plate. Let´s start putting the ignition on...
 Here we go! First of all the small 3mm woodruff key I managed to locate in my previous post and then the rotor. This is a brand new, original, correct part number, rotor for the H1R ignition. Nice!
 The correct ignition timing CAM, 21103-004, now finally in place. Next is the stator itself and then the ignition timing plate and the retaining bolt that attaches the plate, cam and rotor to the turning part of the igniton/generator.
 And here it is all in place! The three retaining screws attach the stator to the cases, the large bolt secures the turning stuff on to the crankshaft.
 Imagine the rotor inside the stator. That rotor is one big magnet rotating (with the turning crankshaft) inside the stator (stands still...) that is lined on the inside with multiple windings, stator coils, that generate electrical power together with the turning magnet inside. This alternating current is then fed to the rectifier and voltage regulator up front on the bike. The points generate the sparks in the spark plugs through the ignition coils and the condensers take care of the surplus power each time the points open up for a new spark. As soon as I can locate the correct ignition coils I will also be able to replace the H1B condensers with the correct H1R ones. Any year now.....
 The final touch for the day... That NOS H1B engine cover. Looks a bit too nice but it´ll have to do for now. I may change that later on and try to find a surface that is more suitable for a racer that has been used for 4-5 races.
 I managed to locate three correct length pan head screws in my own stock of fasteners. Of course I only use old, refurbished, Kawasaki fasteners whenever possible. I am lucky to have been working on these old bikes for more than 20 years and have never thrown anything usable away, ever! I always try to reuse those old battered screws and restore them with renovated, or just cleaned, threads and straightened pan heads. A fresh coat of zink makes them look new again.
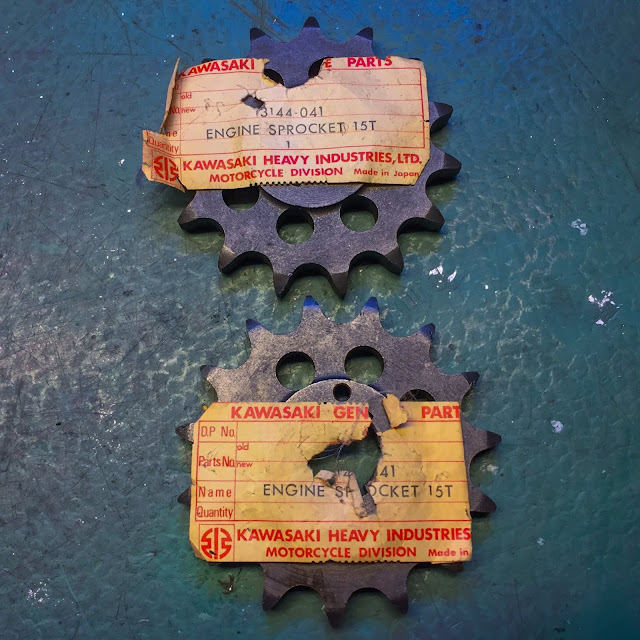 Here´s another one of those nice finds happening on eBay from time to time... NOS engine sprockets, specifically for the H1R. 15 teeth, one of the optional sizes available for different gearing. I think i paid 25 bucks each, which really is a steal!
 I really enjoy the hobby when these beautiful parts show up and I´m able to get them. Look at those lightening holes around these sprockets! Not needed on the street bikes but on a racer? Sure! Every gram counts towards the final, total weight of the bike on the starting line. That, my friends, is what building these racers was all about during the early seventies. Racing and winning and putting Kawasaki up there as one of the contenders in the race to be the fastest bike on the track as well as on the streets....
Next up on my restoration is the electrical system and the other ignition parts on the bike. I will also need to continue with the rear wheel, the brakes and the drive chain. But before putting the chain on I need to clean the clutch cable and adjust the clutch pusher etc, etc... Well, I´m back at it. I´m thinking H1R-restoration again 50% of my awake time. The other 50% is getting more H2:s to work on when I´m done with this build.
Stay tuned and, again, Sorry for the delay!
/Per
Please remember I never did set up any schedule for the restoration, because I guessed it would be hard getting stuff and I figured I might loose concentration and face times of diminishing motivation from time to time. I do fully understand if you think I´m having luxury problems here, but they are very real. Wouldn´t every Kawasaki triple enthusiast just dream of taking over this project? Absolutely! But they wouldn´t like the endless, resultless search for those obscure, extremely-hard-to-find-bits needed to continue working on the bike.
Believe me, it is very frustrating to know people are holding on to stuff they have in stock as some kind of investment instead of sharing it with someone actually working on a bike.... Oh well, enough moaning. Here´s what I have been doing the last couple of weeks!


We´ll see... after all this fettling I realized they used TWO rubber parts, one on each side that was actually just wound up around the frame brackets and then hooked up to the fairing cups. I just thought I´d share this rather odd hunt for replacement parts with you guys...
The next project within the project came about after I finally found that illusive 21103-004 cam. Suddenly, one day a few weeks ago, it turned up in my saved searches for H1R-parts on eBay. It was my dear friend and "parts pusher" Dave Howard in England that had posted one on eBay. I double checked the part number within seconds on my iPad, where I keep the parts catalogue, and bought it! I wrote him a "friendly" reminder of the list I sent him about two years ago where this was one of the parts I needed for the restoration. He was very sorry for his mistake, forgetting about my wish list, and offered me a second one right off the bat. They arrived safely after a few days. Thanks a lot, Dave. These are badly needed here!


My refurbished stator (still with H1B condensers), the rotor, the cam (now the correct one), fasteners for the stator to the engine cases, timing plate and the long fastener for the rotor, cam and timing plate. Let´s start putting the ignition on...


Next up on my restoration is the electrical system and the other ignition parts on the bike. I will also need to continue with the rear wheel, the brakes and the drive chain. But before putting the chain on I need to clean the clutch cable and adjust the clutch pusher etc, etc... Well, I´m back at it. I´m thinking H1R-restoration again 50% of my awake time. The other 50% is getting more H2:s to work on when I´m done with this build.
Stay tuned and, again, Sorry for the delay!
/Per
Inga kommentarer:
Skicka en kommentar