Vacation from work started last week and finally I could find a suitable time for taking the engine apart att Ebbe Parneståls shop, nowadays called "Eptune" iso EBOS. EBOS is still around but work mostly on modern bikes with service and guarantees etc. Eptune specializes in triples, other twostrokes and just about any motor you want to restore or tune. Here´s a link to their page:
http://ebos.se/eptune-about.php#
Give them a holler with any need you might have when it comes to performance engines or just plain restorations. They are GOOD!
Anyway, I´d been waiting for a while to find a time that would suit both me and Ebbe. I needed to be there when the engine came apart so I could document everything that happened to the motor. This will be the case for the chassi work as well. All for you guys!
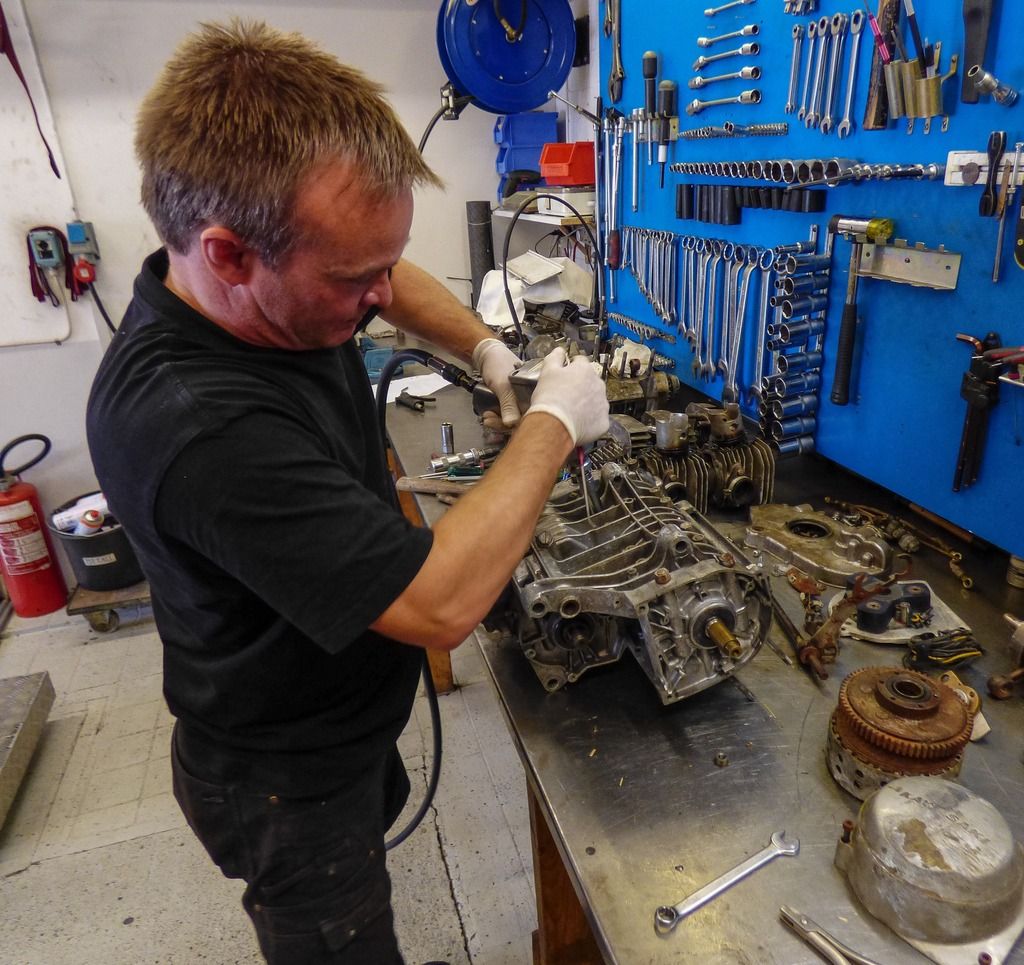
We started out just before lunch with the engine on the bench. Here it sits in all its glory....
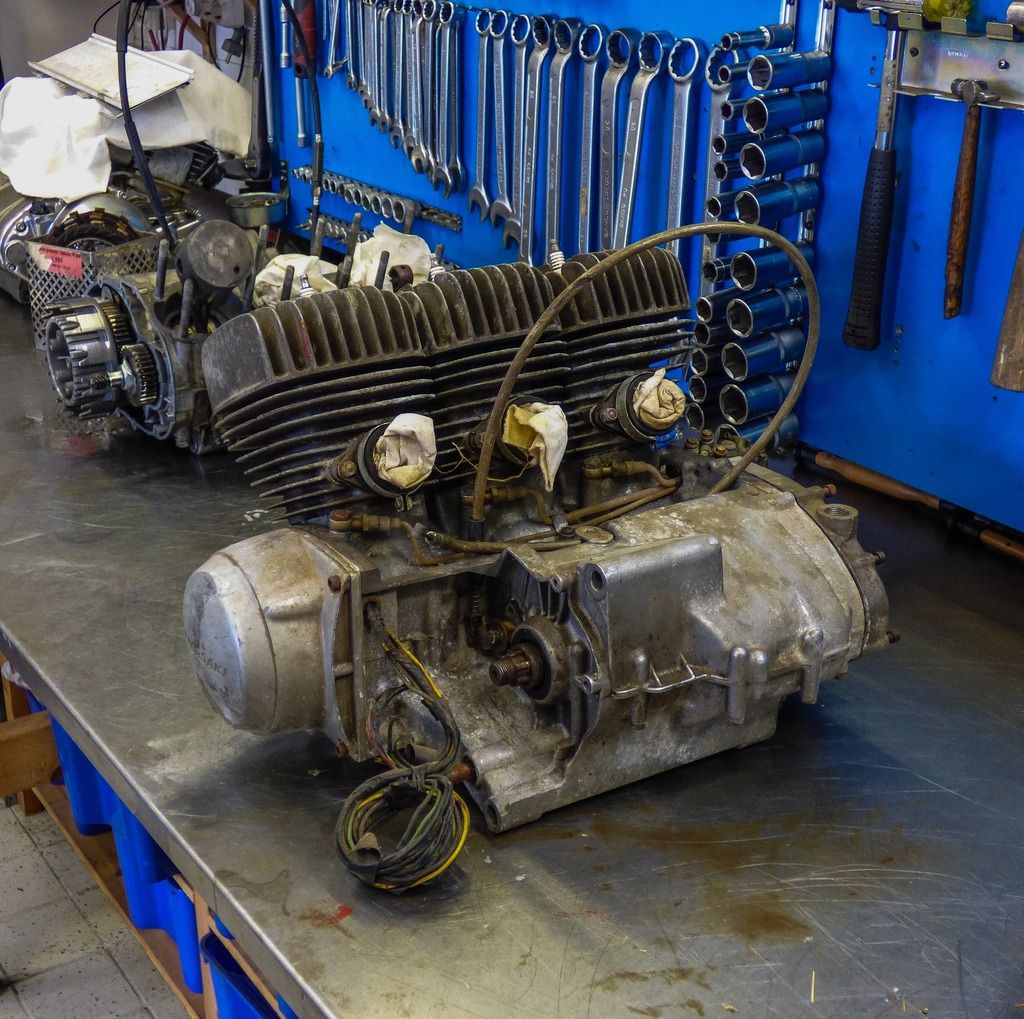 I haven´t touched it since I removed the heads to check for cylinder movement. I didn´t even remove the clutch cable or the stator cover. It´s all there.
First off is the generator/stator cover on the left hand side of the engine. I sort of new what to expect here, but I couldn´t imagine what it would actually look like. I´ve never seen a Kröber ignition unit before!
 Don´t ask me how this thing works... It must generate its own power somehow because one of the advantages with the Kröber was to be able to loose the battery and save some weight. I understand that the three things sitting 120 degrees apart beside the blue contraption there, are pick-ups for the ignition signal to its respective ignition coil. But there is no ordinary rotor, no stator that can supply electric current.... I suppose Kröber knew more about this than I do!
Next came the heads and cylinders (which we know move easily.... !!). Ebbe works so quickly it´s almost impossible to get sharp shots with the camera. Best way is to have the engine facing forward when removing the jugs and heads. It can easily tip over if left standing upright.
 An air driven wrench tool makes the process quick and easy. The head bolts are drilled in the center to save weight. Impressive in 1970 if you ask me...
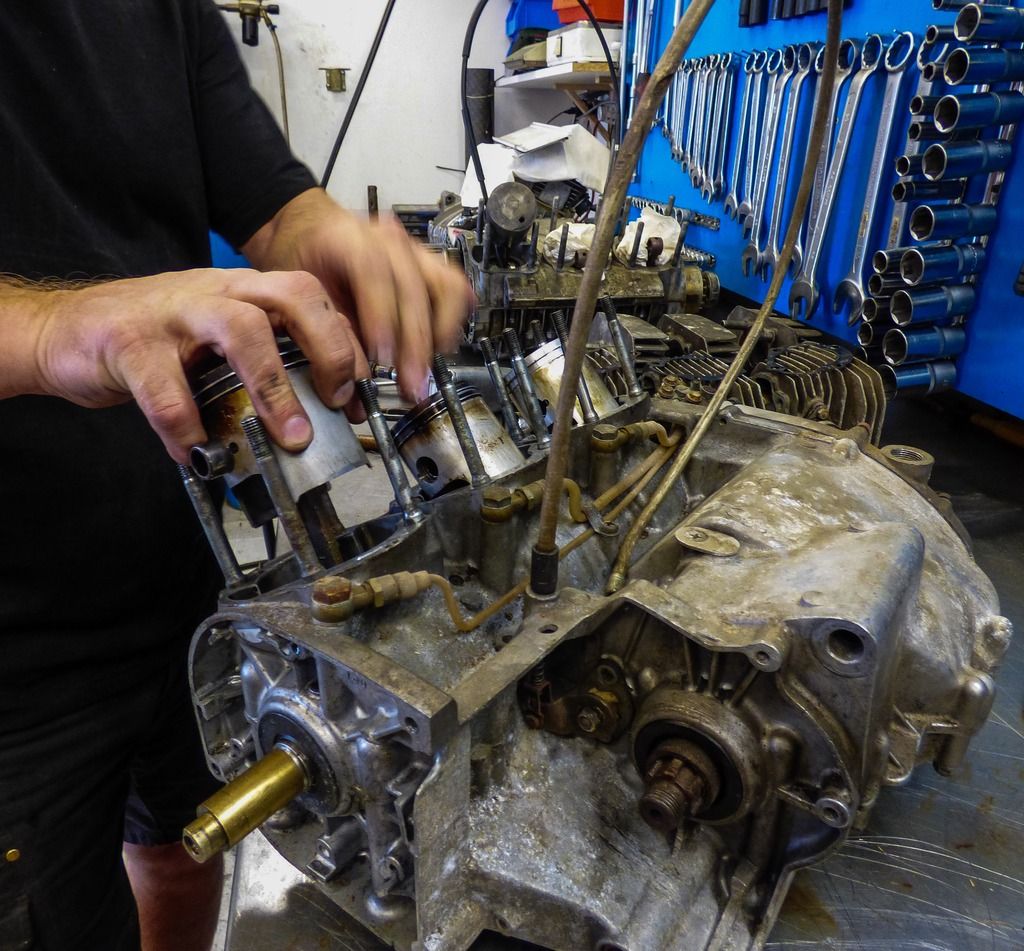
When the cylinders and heads are gone it´s time for the pistons. One was brand new, remember? And the other two actually looked fine as well. They can probably be used again and that saves me a bundle, both cash and time, trying to source them....
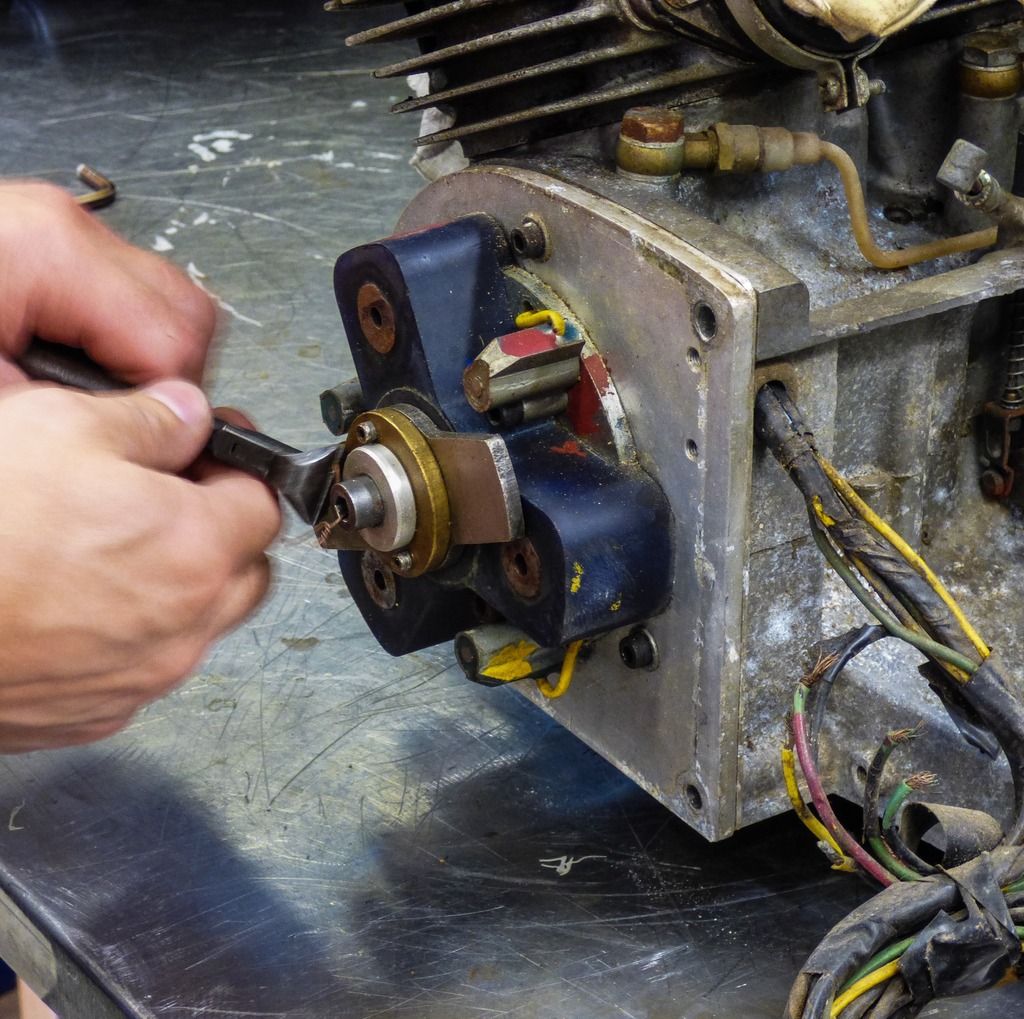
 Here Ebbe is removing one of the piston pins with a special pair of pliers. They all came out quite OK. Just some minor massage needed. You can also see the rather slim brass rotor still on the crank. Maybe that one generates the electricity within the blue stator? You tell me...??
Here is a better view of the rotor and the pistons being removed. We can see the brand new piston at the other end of the motor. The two others look a bit tarnished and burned but that is normal for normal use.
 As you can see, Ebbes hands are constantly moving at lightning speed and I haven´t got a chance to get sharp pictures. It is a true privilige to watch a real pro working his magic. And this is just the disassembly part. It will get even better!
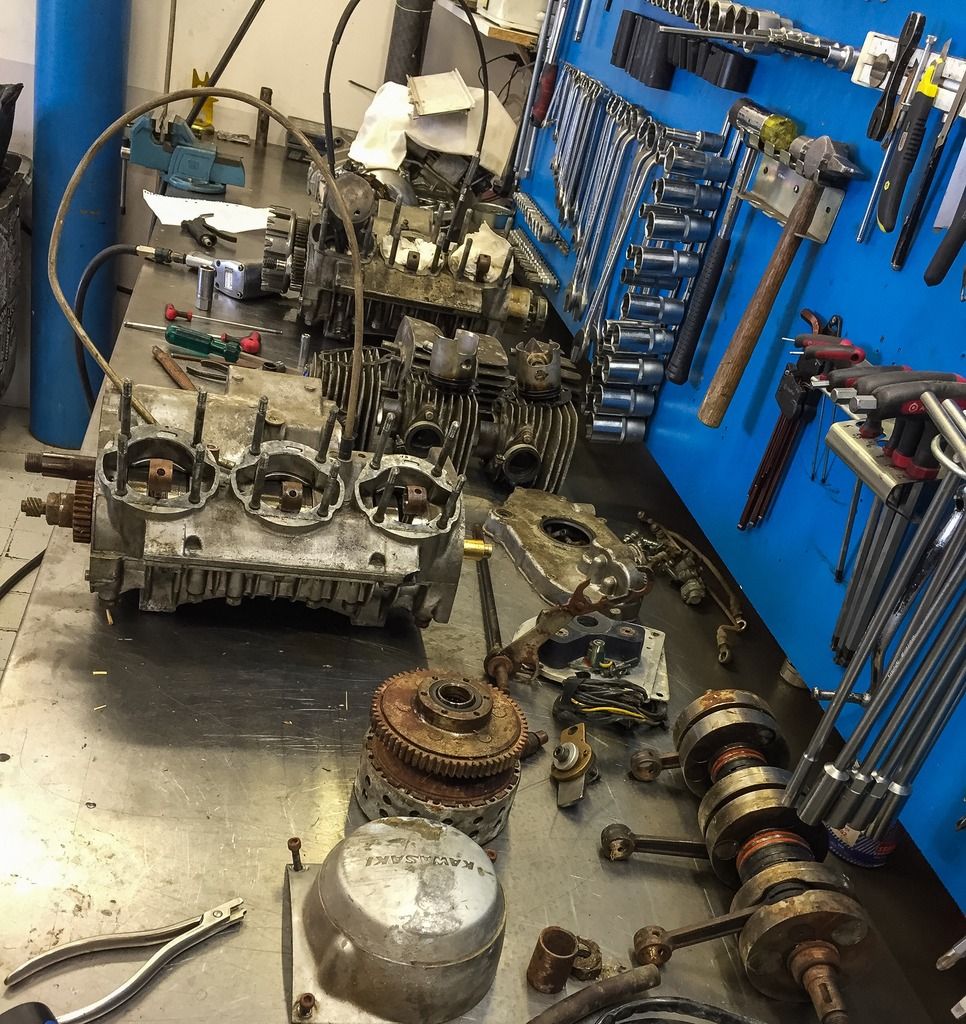 After just a few minutes the top end is off and we can move on to bigger things. In this picture you can see the spare crank (that one will also be rebuilt if I can find parts for it...), the ignition cover and the sadly rusted clutch parts. Sort of organized chaos, here.
 A first glance down at the crank and conrods. Actually looks great. Conrods feel tight in the bearings and move freely with absolutely no play felt. Is this as good as I think?
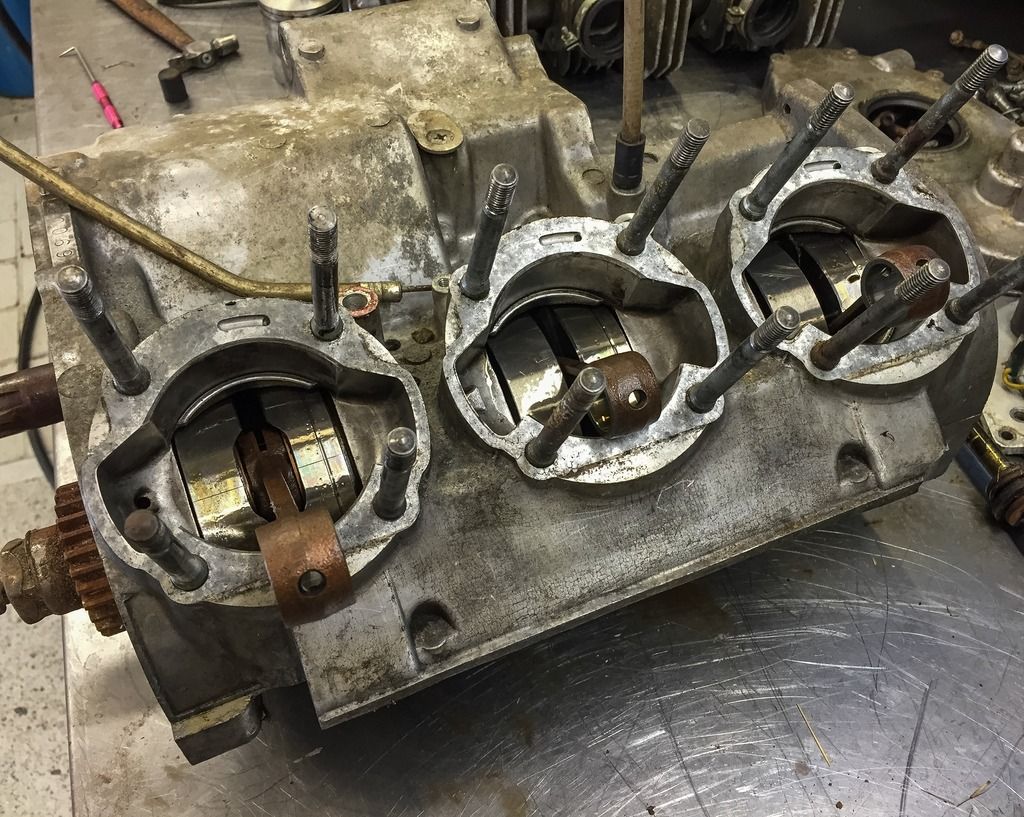
You can also see the reason why the cylinder base gaskets have their own part number in an H1R... The cylinder studs are wider going in to the engine case and get slimmer as you move upwards. Larger holes in the gasket calls for a special part number. Other than that the shape of the gasket looks to be the same as on the street bikes.This is also probably the reason they didn´t rust on to the studs!
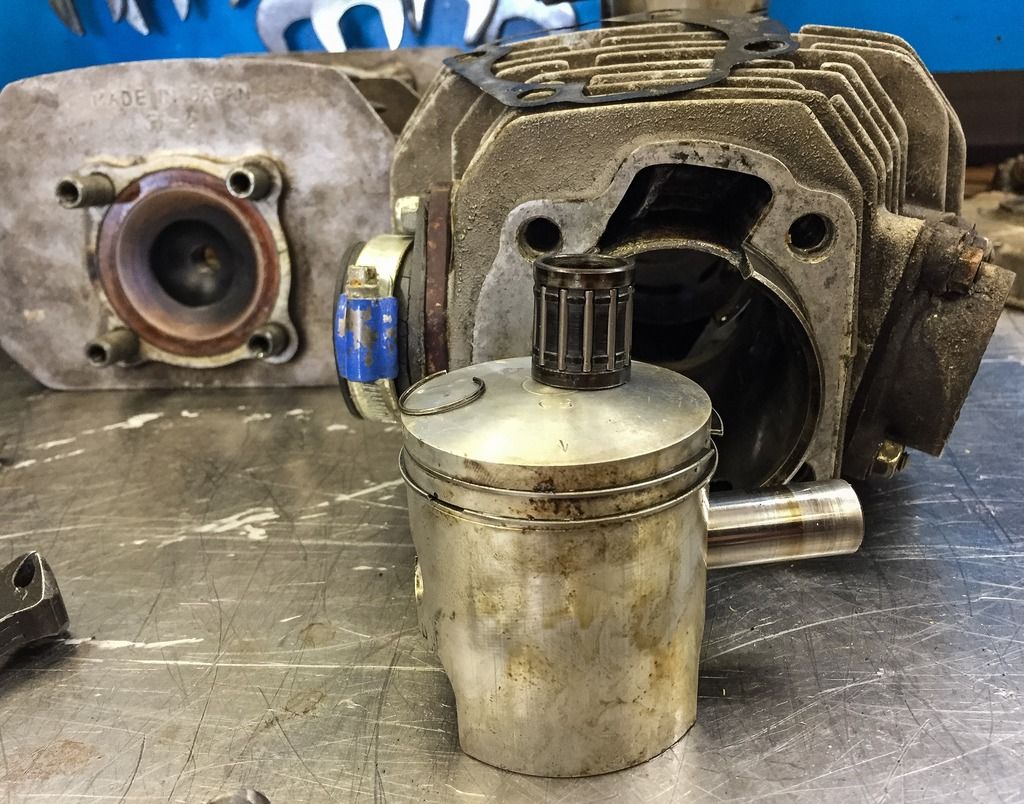 The pistons, cylinders and heads on the bench. The pistons are forged and of much better quality than the street ones. This is the new one infront of its jug with the piston bearing on top plus the circlip.All these small parts will be replaced with NOS stuff. Better safe than sorry, now that I actually have found them and was able to buy them.
I´m not quite sure yet what kind of ignition/electric system to run on the bike in the future, so I guess I´ll have to rebuild the original yoke with its breaker points and condensers. Those parts I´ve already been able to locate including a NOS rotor! Ebay is a fine source for parts, if you can handle the prices. Nothing for these bikes come cheap, that´s for sure.
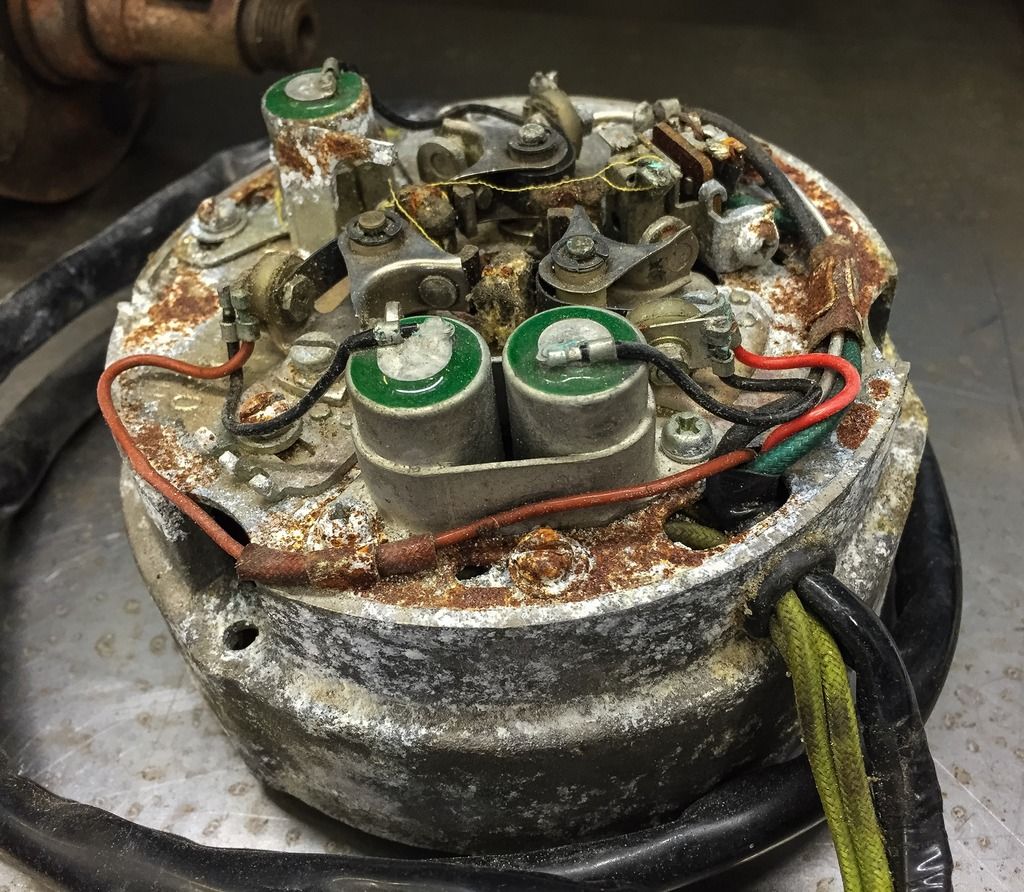 Here it is... The stock yoke. Three breaker points and three condensers plus a whole lot of oxidation, rust and grime. It will be a pleasure to work with this one on my own bench in my own garage. I´ll get back to that later. Just note the extra long wiring harness that connects to the yoke. This runs all the way up to the steering head where the ignition coils, rectifier and regulator are found. Seems to be in good nick, though. Nice.
 Ok, here´s the clutch... Will need some TLC to get back to full working order. I´m looking for clutch fibres and steel plates plus springs etc for this unit. One of the really hard parts to find is the large oil seal that seals between the clutch cover and the inner clutch hub (on top in this picture) I was also worried about the rust on the sealing surface, but Ebbe reassured me that he can take care of it! It´s no problem taking half a mm off the surface, rehardening it and still have a good sealing with the stock oil seal. Sounds good to me!
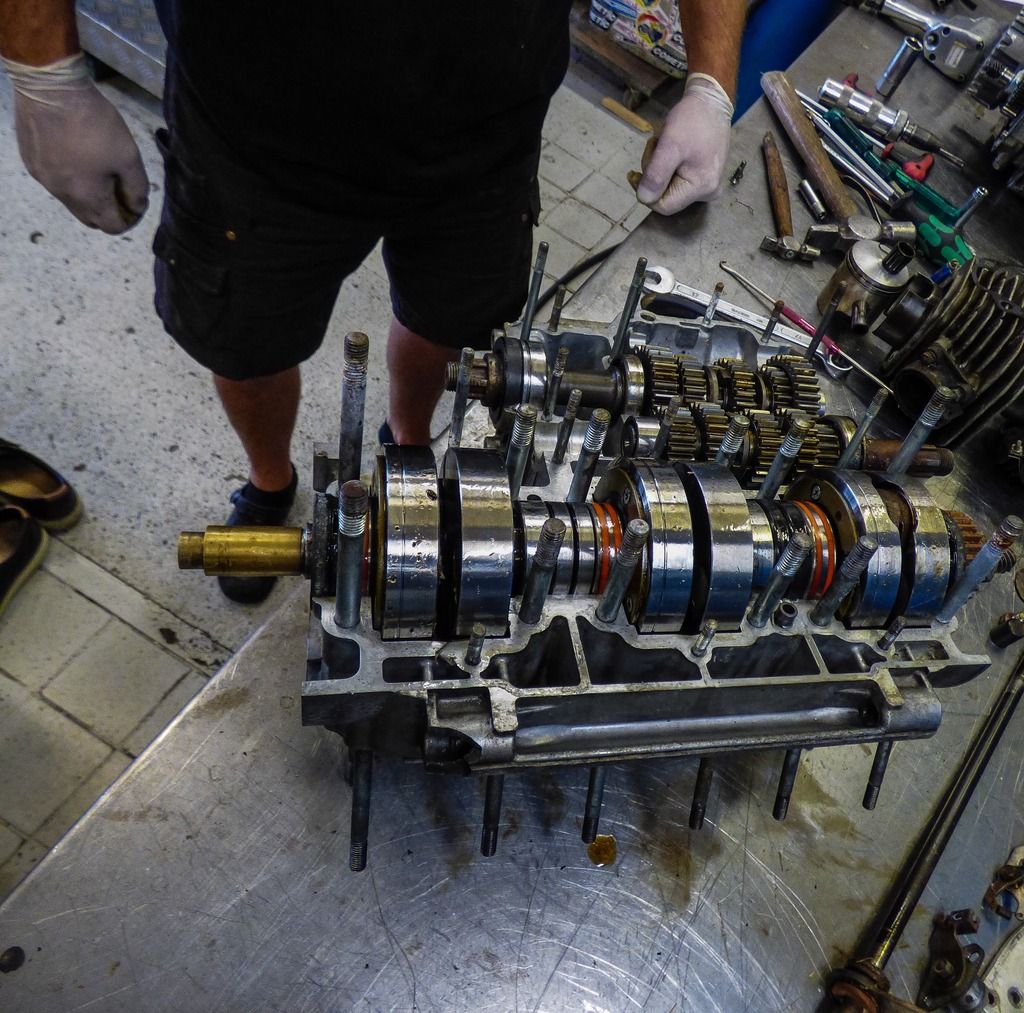
 Let´s move on with the crank case! To split the cases you need to get all the stuff off on the right hand side of the motor. Gear change mechanism, clutch (already off...) etc. In this picture Ebbe is pulling out the gear change shaft that goes through the engine. You can actually choose what side you want the gear change pedal to be, right or left. Oil seals on both sides, of course.
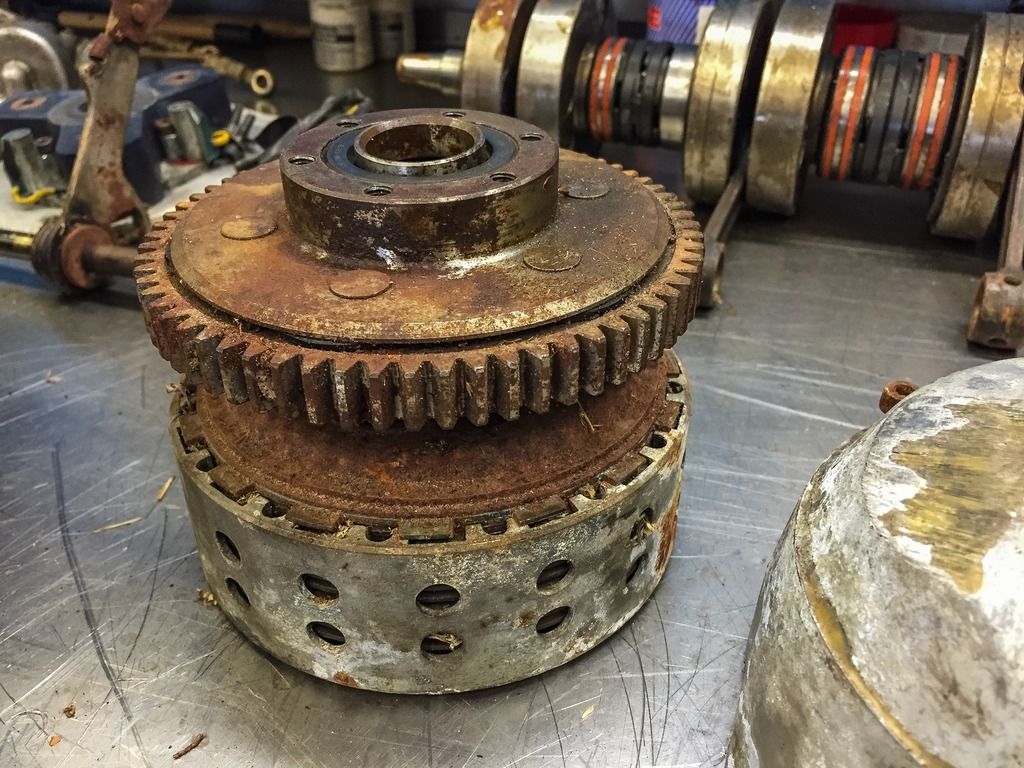
Here´s one of my major worries. Are these axles and gears too damaged by rust or can they be saved? There is also quite a difference in the gear change parts compared to the street bikes. These parts are much stronger, bigger and look like they can take a beating much more than the weaker street parts. You can also see the steel gear at the end of the crank that drives the oil pump and tachometer gears inside the clutch cover. All the screws here were rock solid in the cases so we had to use an impact screw driver. Much better to use it right away instead of ruining the screw heads and have much worse problems.
 Ok, lets´turn the thing upside down and loosen all the nuts. There are plenty of them! When they are all removed the cases should just separate easily. In this case they did. No biggie at all! In other cases someone did use some gasket compound or even glue that makes it almost impossible to take the halves apart. Thank God, not this time...
I believe this engine has been used and driven hard and thus been tampered with all the time. No use at all to glue stuff together in that case.
 Another moment of truth! How did the engine look inside? Catastrophy? Well....Not at all. another pleasant surprise. It actually looks greater than I could ever have dreamed of!!
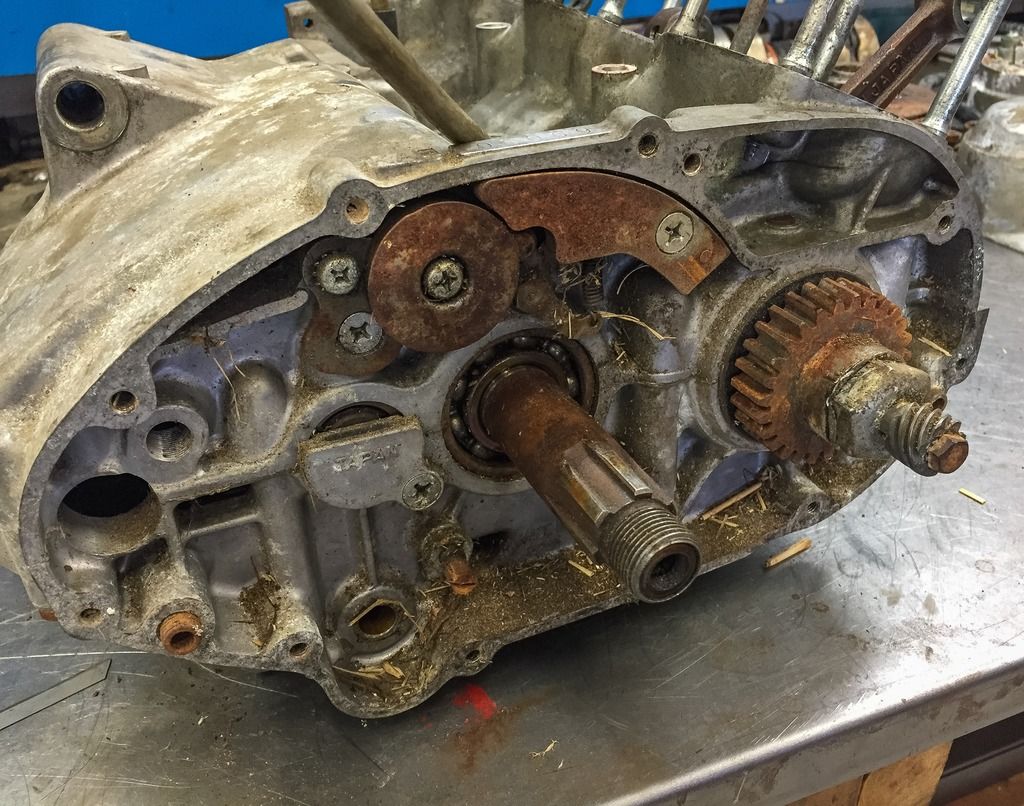
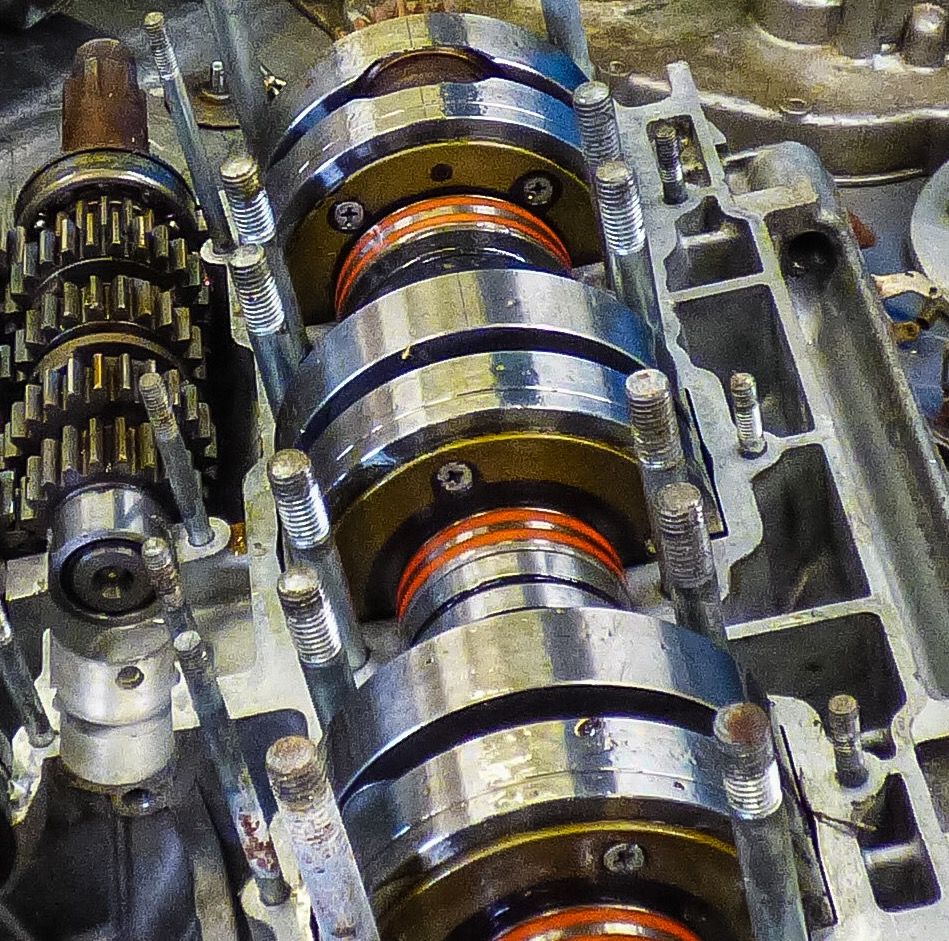
Nice shiny crank with bearings and oil seals looking brand spanking new. Gear box axles and gears absolutely free from rust and pits throughout (on the inside....)!
You can see one small damage to the upper engine case. A chip is missing close to the right hand engine mount. Ebbe will adress that issue as well. I´m good at a lot of things. but
not welding aluminium, though.
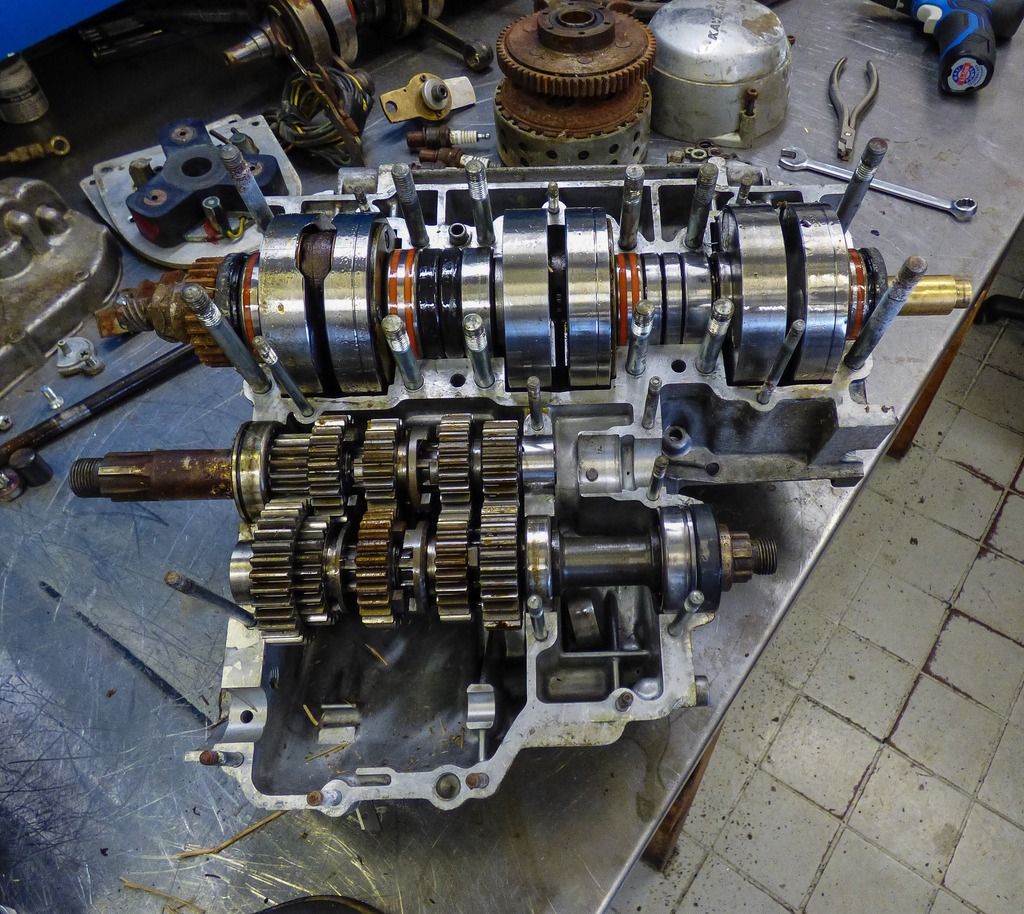 Here you can see the wonderful status of the engine internals. Everything looks nice! not too much work to be done here at all. Ebbe will take the crank out and clean it, measure the runout, measure the conrod play etc, etc and then put it back in. Hopefully no need to restore it at all.
The gears in the gearbox will be checked for pitting and torn dogs. Ebbe asked if I wanted to "undercut" the gears to make the gears "stick" better when engaged.
- "No need" I said. "Look at them, they are already undercut!" Another difference compared to the street engines. Nice, saves both money and effort!
Note also the absence of a kicker shaft and kicker spring... No such thing on a racer. You start your bike by running it on the track! Or by a starter in the pit lane. I´ll have to work something out when that time comes!
 Here´s another interesting thing. See the yellow plates on the crank shaft webs? Those are the oil reciever plates that attach to the crankshafts and the webs to keep the oil supplied by the oil pump as long as possible at the big end bearings. On street bikes when you want to run premix only, these should preferably be removed to let the mixed petrol/oil get easy access to the big ends. On the H1R you run both the oil pump AND premix at the same time.... I will for sure keep the oil pump and because of that, these plates will remain i place!
It sure looks good, doesn´t it?
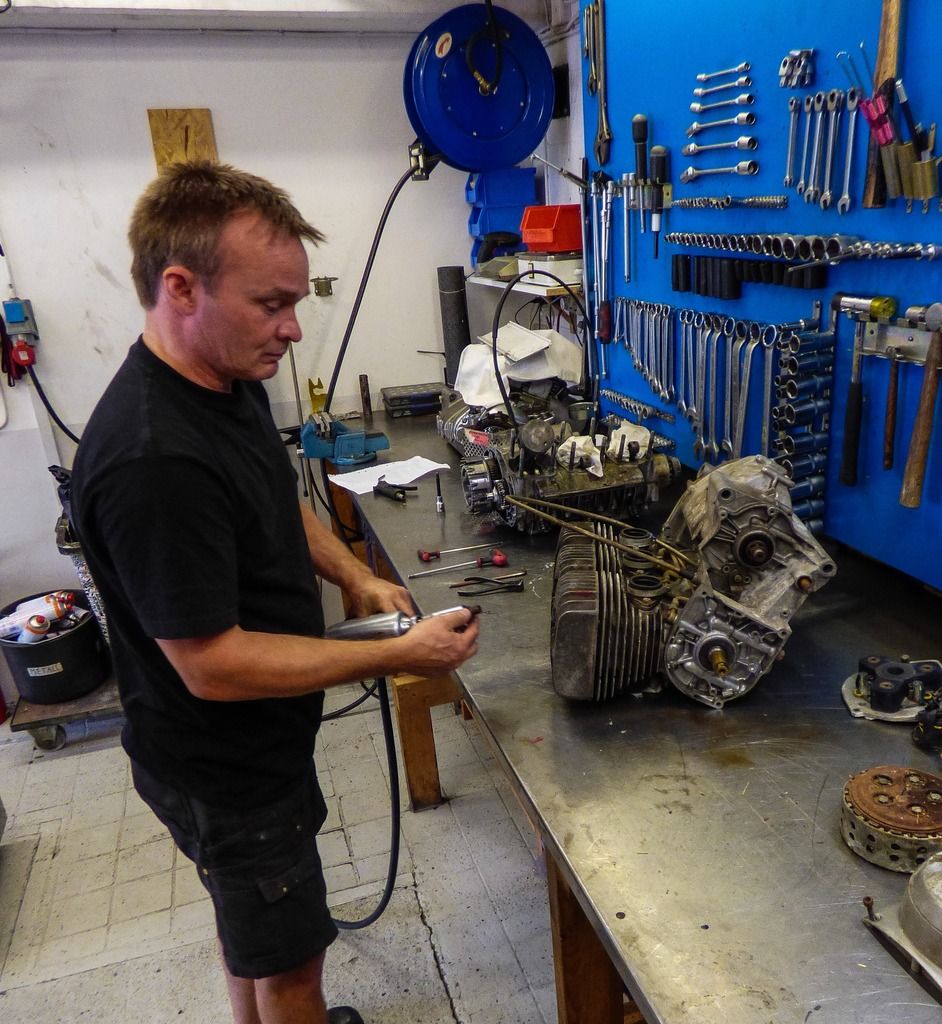
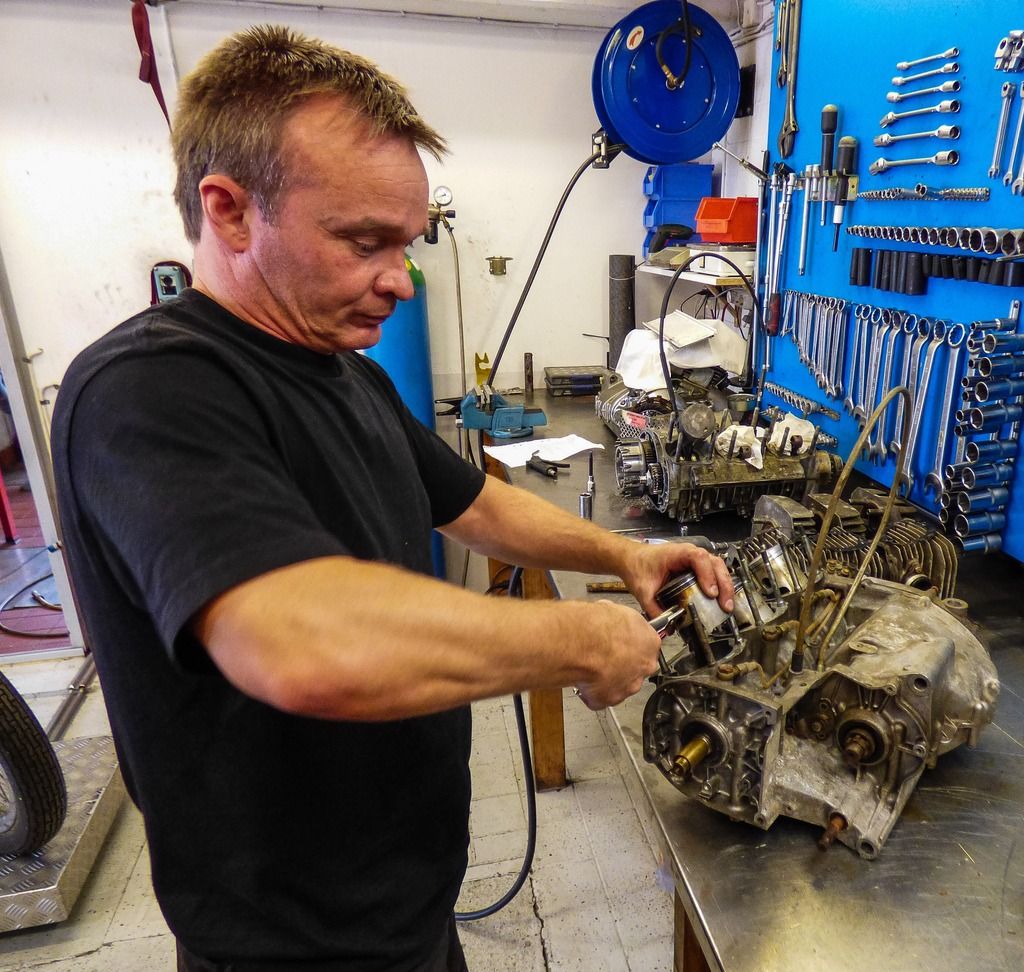
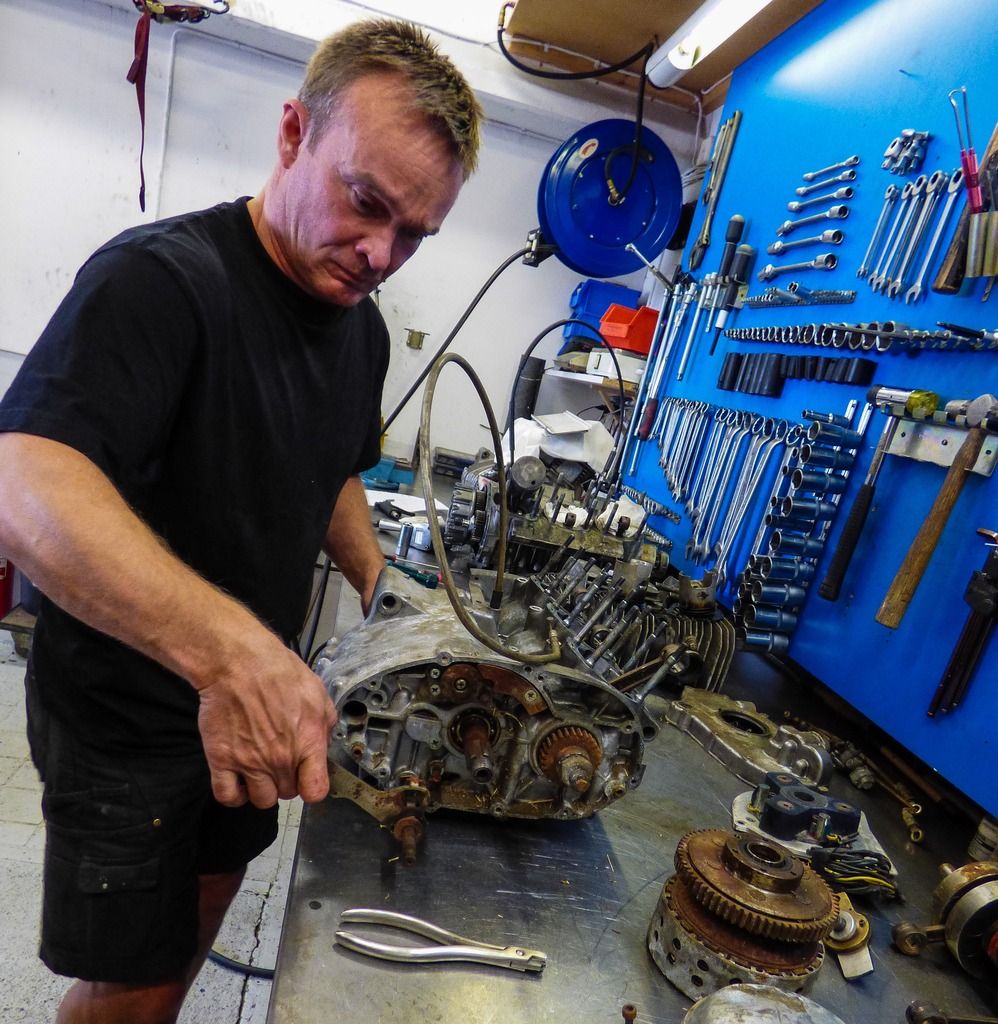
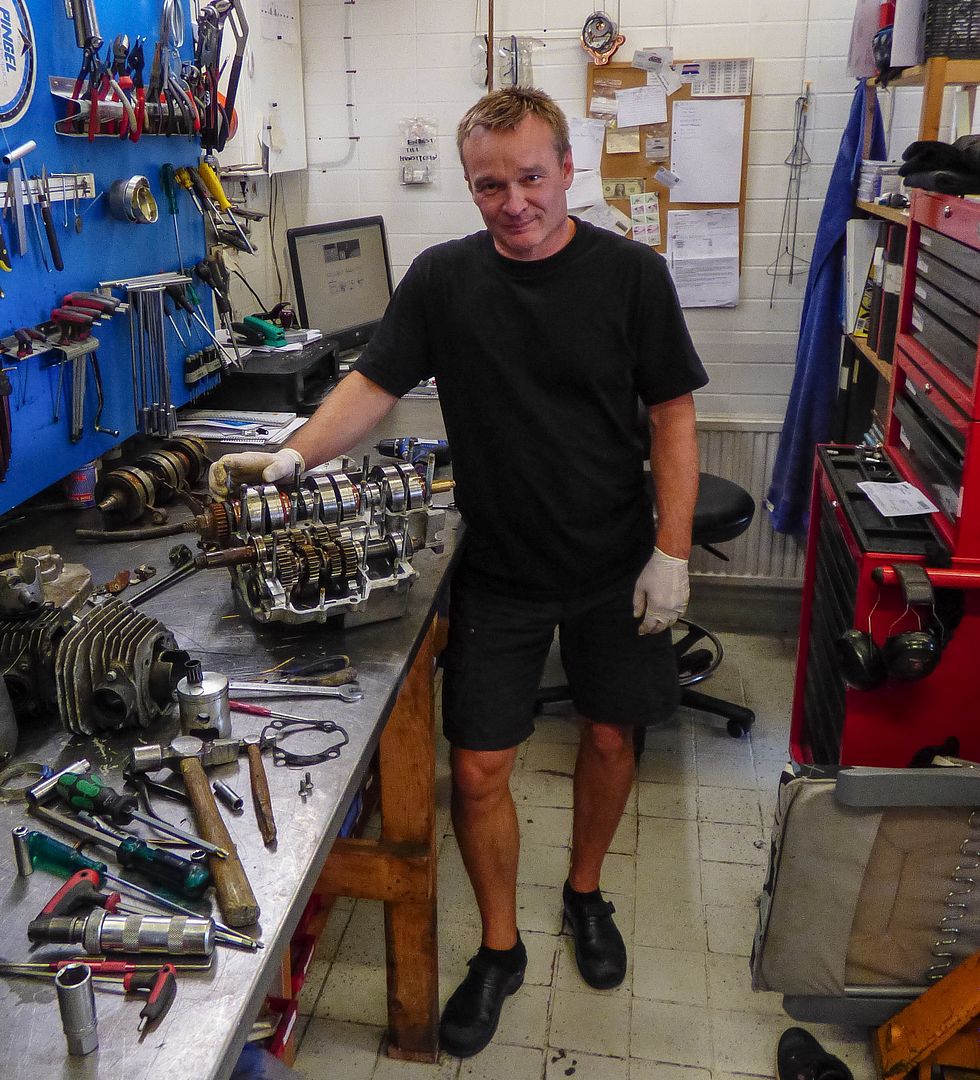 And here he is. One hour later with the disassembled H1R engine on the bench. I had a wonderful time in his shop trying desperately to get sharp pictures and listening to all his good advice on this and that. I could tell he was having fun as well, taking such a rare engine apart! Now it will be checked and thouroughly inspected for wear and tear. During that time I´ll have time to think about a very nasty decision to make....
I need to decide what route to choose with this restoration. I have boiled it down to three alternatives.
1) Restore it to drivable condition the way it looks now. Consider it to be what it is, a bike that has been sitting in a barn for 40+ years and let it look like that. Of corse I´ll have to fix a great deal of rust (front fork legs and large parts of the frame) other than that, it would look the same as it does now.
2) Restore it to what it might have looked like when Esso sold it back to Flöter in 1972. A well used and raced H1R with traces of abuse and maybe some damages remaining. Sponsor decals, a start number on the fairing, running the Kröber ignition and having "Esso Gunnarsson" as the driver´s name.
3) Restore it to what it looked like when it was bought by "Esso" from Flöter. Just as we could see in another post a while back. Take it all apart ( I´ll do that whatever route I choose...) and repaint, rezink everything that looks worn. get all the NOS parts missing and make it look brand new again...
On any other project, looking like this, I would 100% go with alternative number 3. I love it when things look shiny and new... But it´s not any other project. This one has a long story, has lived a long life on the tracks and survived 40 years, forgotten in a barn.
The thing is, I need to decide whether or not to media blast and vibratory polish the engine cases, cylinders and heads. I know I´ll like getting the parts back from polishing at PROSWEDE in Hörby and letting Ebbe putting it back together like the jewel it is. BUT, on the other hand, it never looked that good, even when it was new....
I was talking to a friend that works as a valuer at an auction house here in Stockholm. He explained how antiques work.
- "Leave it" was his advice. "You can always change your mind later and treat it to that as-new-surface you like, but you can never go back to this"
Well, that´s true.... I had my mind made up that way until I actually saw the parts there, on Ebbe´s bench. They looked so sad. Like they had been sitting in a barn for 40 years, and I don´t like it! I want it to be a racer again, not an antiquity. So, for now, I´m going route number 2... But with treated engine cases! I´m going to restore it back to 1972. Good looking, nicely running, but NOT new.
Tell me what you think!
By the way.. Thanks Roberto, for your valuable inputs! I needed to think this one through and you made me do it.
My next post will be about "Esso" again. I´ll share some of the pictures I´ve found and also his racing diary. That will be interesting, I promise!
http://ebos.se/eptune-about.php#
Give them a holler with any need you might have when it comes to performance engines or just plain restorations. They are GOOD!
Anyway, I´d been waiting for a while to find a time that would suit both me and Ebbe. I needed to be there when the engine came apart so I could document everything that happened to the motor. This will be the case for the chassi work as well. All for you guys!
We started out just before lunch with the engine on the bench. Here it sits in all its glory....

First off is the generator/stator cover on the left hand side of the engine. I sort of new what to expect here, but I couldn´t imagine what it would actually look like. I´ve never seen a Kröber ignition unit before!

Next came the heads and cylinders (which we know move easily.... !!). Ebbe works so quickly it´s almost impossible to get sharp shots with the camera. Best way is to have the engine facing forward when removing the jugs and heads. It can easily tip over if left standing upright.

When the cylinders and heads are gone it´s time for the pistons. One was brand new, remember? And the other two actually looked fine as well. They can probably be used again and that saves me a bundle, both cash and time, trying to source them....

Here is a better view of the rotor and the pistons being removed. We can see the brand new piston at the other end of the motor. The two others look a bit tarnished and burned but that is normal for normal use.


You can also see the reason why the cylinder base gaskets have their own part number in an H1R... The cylinder studs are wider going in to the engine case and get slimmer as you move upwards. Larger holes in the gasket calls for a special part number. Other than that the shape of the gasket looks to be the same as on the street bikes.This is also probably the reason they didn´t rust on to the studs!

I´m not quite sure yet what kind of ignition/electric system to run on the bike in the future, so I guess I´ll have to rebuild the original yoke with its breaker points and condensers. Those parts I´ve already been able to locate including a NOS rotor! Ebay is a fine source for parts, if you can handle the prices. Nothing for these bikes come cheap, that´s for sure.


Here´s one of my major worries. Are these axles and gears too damaged by rust or can they be saved? There is also quite a difference in the gear change parts compared to the street bikes. These parts are much stronger, bigger and look like they can take a beating much more than the weaker street parts. You can also see the steel gear at the end of the crank that drives the oil pump and tachometer gears inside the clutch cover. All the screws here were rock solid in the cases so we had to use an impact screw driver. Much better to use it right away instead of ruining the screw heads and have much worse problems.

I believe this engine has been used and driven hard and thus been tampered with all the time. No use at all to glue stuff together in that case.

Nice shiny crank with bearings and oil seals looking brand spanking new. Gear box axles and gears absolutely free from rust and pits throughout (on the inside....)!
You can see one small damage to the upper engine case. A chip is missing close to the right hand engine mount. Ebbe will adress that issue as well. I´m good at a lot of things. but
not welding aluminium, though.

The gears in the gearbox will be checked for pitting and torn dogs. Ebbe asked if I wanted to "undercut" the gears to make the gears "stick" better when engaged.
- "No need" I said. "Look at them, they are already undercut!" Another difference compared to the street engines. Nice, saves both money and effort!
Note also the absence of a kicker shaft and kicker spring... No such thing on a racer. You start your bike by running it on the track! Or by a starter in the pit lane. I´ll have to work something out when that time comes!

It sure looks good, doesn´t it?

I need to decide what route to choose with this restoration. I have boiled it down to three alternatives.
1) Restore it to drivable condition the way it looks now. Consider it to be what it is, a bike that has been sitting in a barn for 40+ years and let it look like that. Of corse I´ll have to fix a great deal of rust (front fork legs and large parts of the frame) other than that, it would look the same as it does now.
2) Restore it to what it might have looked like when Esso sold it back to Flöter in 1972. A well used and raced H1R with traces of abuse and maybe some damages remaining. Sponsor decals, a start number on the fairing, running the Kröber ignition and having "Esso Gunnarsson" as the driver´s name.
3) Restore it to what it looked like when it was bought by "Esso" from Flöter. Just as we could see in another post a while back. Take it all apart ( I´ll do that whatever route I choose...) and repaint, rezink everything that looks worn. get all the NOS parts missing and make it look brand new again...
On any other project, looking like this, I would 100% go with alternative number 3. I love it when things look shiny and new... But it´s not any other project. This one has a long story, has lived a long life on the tracks and survived 40 years, forgotten in a barn.
The thing is, I need to decide whether or not to media blast and vibratory polish the engine cases, cylinders and heads. I know I´ll like getting the parts back from polishing at PROSWEDE in Hörby and letting Ebbe putting it back together like the jewel it is. BUT, on the other hand, it never looked that good, even when it was new....
I was talking to a friend that works as a valuer at an auction house here in Stockholm. He explained how antiques work.
- "Leave it" was his advice. "You can always change your mind later and treat it to that as-new-surface you like, but you can never go back to this"
Well, that´s true.... I had my mind made up that way until I actually saw the parts there, on Ebbe´s bench. They looked so sad. Like they had been sitting in a barn for 40 years, and I don´t like it! I want it to be a racer again, not an antiquity. So, for now, I´m going route number 2... But with treated engine cases! I´m going to restore it back to 1972. Good looking, nicely running, but NOT new.
Tell me what you think!
By the way.. Thanks Roberto, for your valuable inputs! I needed to think this one through and you made me do it.
My next post will be about "Esso" again. I´ll share some of the pictures I´ve found and also his racing diary. That will be interesting, I promise!
Fully agree with your decision alt. 2 Per! This is a racer, and should be threated like that. Not to be a shining showroom queen, and not a museum kind of patina wreck. I would guess you are going to use it, so wear marks should be left, as new ones sure will come!
SvaraRaderaIt is truly fantastic to read your blog about this project - world class motor history! can not wait for next chapter..
Kind regards, Tore Svartås
Thanks Tore!
SvaraRaderaI means a lot to me that someone out there actually reads it.
It will be at least a week until the next post due to vacation...
C U!
/Per
Great reading Per !
SvaraRaderaUnknown = Malcolm Bradford ;-)
SvaraRaderaThanks, Malc!!
SvaraRaderaHello Peter, Yes #2. Remember the bikes' history has not ceased. Your ownership and restoration is very much a new leaf in its' history. I agree completely, It is a racer; and that's its' purpose.I'm undecided about paint; or you didn't specify in 2 above./ Absolutely love your Blog !, the new post threw me; until I found it. I'm restoring an H2 by the way. Up to gear-box in a few weeks. Kind Regards Paul. Australia.
SvaraRaderaThanks for the kind words, Paul. And good luck with your H2 resto!
RaderaPlease send me a pic when you´re done!
/Per